Description
About This Video
Transcript
Read Full Transcript
Hi, today we're gonna go back to the basics. So if you are new to pilates, this is a fantastic class for you. If you're not new to pilates, this is also a fantastic class for you because, in my opinion, it's always good to revisit the fundamentals, to go deeper, to dig deep and see what you can find no matter what level you are. So, here we go. I have my springs set up for foot work.
I am using three red springs and a blue and we're gonna start on our backs. So, placing the heels of the feet on the footbar, organizing yourself so there's a little bit of space between your shoulders and your shoulder rests, stretching your arms down along your sides and energizing them, reaching in the direction of the footbar, and then pause for a moment, closing your eyes, and just check in. Meaning, feel the shoulder blades softly resting on the reformer, still and flat. Feel the weight and the elongation of the spine, the tailbone dropping down into the mat, the top of the head reaching away from the feet and just give yourself that moment in space, moment in time to bring your awareness inwards. Focusing now on the breath as you inhale.
Feel that the abdominals or the belly could drop down towards the carriage without anything changing in the spine and then feel how we can funnel the air into the ribs, into the lungs. So, as you inhale, feel the ribcage expanding side to side, rather than front to back and as you exhale, feel the sides of the ribs narrow, and complete your exhale so much so that you empty your body of air and you feel that in trying to do so, the abdominal muscles pretty much automatically engage. Let's take two more breaths without changing anything in our bodies. Inhale, feeling the expansion of the ribcage. Exhale, feeling the softening and the drawing together of the ribcage, opening your eyes whenever your ready.
One more breath to be still. Heaviness in the bones. Lightness in the body. And then inhale with open eyes. As you exhale, change the position of your spine to that neutral alignment into a flat spine.
So we pull the abdominals down and we allow the lower back to flatten. And then inhale, rock the pelvis backwards, so the tailbone drops down, feels like it's going down between the heels. And then again exhale, navel to spine, lower spine flattens, arms are reaching, so we use the breath to move our body. Inhale to release back to neutral. One more like that, feel that that action is really abdominal work more than it's happening in your legs, more than it's happening anywhere else in your body.
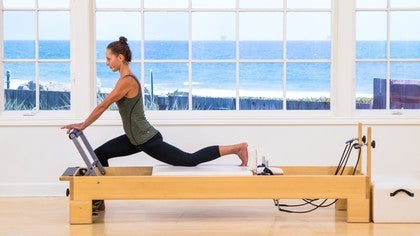
Using the abdominals to change the orientation of the spine. Inhale to neutral pelvis. Exhale, feel the abdominals flatten the spine one more time and then continue to move. So lift the pelvis off the mat, roll the spine up, reaching the arms long, pressing down through the feet, so we're standing on our feet, we're standing on our arms. My hamstring is cramping, so that's what's happening there, if you're looking at the picture.
Inhale to hold and exhale, dropping the chin down or dropping the chest away from the chin. Feel that you're trying to mobilize the spine, you're trying to create space between the vertebraes as you lay the vertebraes back down into the mat underneath you. Notice if your shoulders have crept up into your ears. Try to keep them away, inhale. Exhale, flatten the spine, what you can do with your feet is that downward press I mentioned earlier and then maybe just some idea around a little bit of a backward pull, like you're trying to slide your heels towards your sitting bones.
Inhale at the top and exhale, begin working your way back down. So that backward glide of the heels is a good way to create awareness around one of our muscle focuses which is our hamstring, so the two places that I want you to be primarily concerned about. One more time, inhale. Are the backs of your legs or your hamstrings and your abdominal muscles and just using the legs to support the spine and the abdominals to move the spine. Pause at the top, noticing that the ribs are slightly below the pubic bone in space.
Pause to inhale. Exhale to roll yourself back down. Notice if you tend to stand more on one leg or the other. Look deeply into your own body. We all have a preferential leg.
We all have preferential arms. Let's do one more, I know I said that was the last one, but I feel like we could do one more. Standing on both feet evenly. No tension in the neck or the shoulders. Feeling the body rise up out of the mat and then just concentrating on the placement of the bones, without really worrying about what other muscles are working so if you're just thinking about laying the bones down, then the abdominal muscles have to draw in, have to move the spine in that way.
Drop the tailbone all the way down, reach back and take a hold of the handles, not the straps, the handles. Lift one leg and then the other, so the legs come into a tabletop position, so that the feet are right in front of the knees. Create a little outward pull with the hands and feel the shoulder blades broadening or widening on the back. As you inhale, keep the opposite arm and shoulder blade down but bring the knees to the right. So the left shoulder stays down and wide.
Exhale, right where you feel that stretch is where you want to connect to muscularly to bring yourself back through center. As you inhale to move your knees in the opposite direction, pull your navel back towards your spine. So we're twisting the lower half of the body. Exhale to come back through center while at the same time, holding the upper half of the body still. Inhale as you rotate over onto one hip, keeping the knees and the feet aligned.
Exhale as we look deeply inwards, deepening into that center position. Inhale as we reach across to the opposite side, elbow wide. And exhale, navel to spine, to rock yourself back to center. You wanted to keep your feet slightly, just right in front of your knees. So if you can see your feet above your knees, they're probably a little high.
And exhale. And inhale, bringing awareness into the breath, feeling that the breath moves the body, and exhale. Pausing there now to place the feet back down onto the bar. Let's just rest the arches of the feet on the bar and then bring the hands so that their fingers are interlocked behind the head. Have to reach around those metal pegs.
Inhaling here, press the legs towards one another. Exhale, keep the head heavy in the hand as you curl yourself up. Now, as you're lifting your shoulders and your chest up off the mat, you want your lower spine to respond and flatten into the bed underneath you. Ideally that happens without shifting the pelvis, but if the pelvis needs to tilt slightly towards you to make the lower back flatten, that's fine. Inhaling to pause and exhaling to lay the spine down, but feel that there's work happening in both directions.
Again, I have my hands just at the top of my skull to avoid the metal pegs. Exhale, chin slides down into the chest slightly. We don't wanna jam the chin into the chest, but we want to feel that cervical nod or the movement starting with a slight downward orientation of the chin. Pause to inhale and then exhale to elongate back down into the mat. Again inhale, again exhale.
Now, imagine that your feet are stuck to the bar, they're stuck, they're glued, but as you're curling your head and chest up, try to pick those feet up. Don't actually pick them up, just imagine that you're picking them up and see if that helps you create more depth. Pause, or more sensation, inhale and exhale to lay the body back down. We're gonna do that two more times. Inhale, exhale, lift the head and chest.
Heavy tailbone, heavy head and hands. Pause, inhale, and exhale to come back down. Last one, we're gonna come up and make a change. So we're gonna exhale to lift up. Pause there, take your hands behind your thighs.
Use your arms a little bit to help you curl just slightly higher, not real high just think more forward than actual, than actual height. Take your arms forward, reach your arms back and place them back behind your head, inhale. Exhale, lift the right foot just off the bar. Try to keep everything else stable. Inhale, place that leg back down.
Exhale, lift the left leg. Inhale, place that leg back down. So, feel the organization around the navel drawing down. I like to think about my skin, the skin around my abdominal area, pulling away from my clothing. Inhale, the leg down.
Everything stable, this doesn't look like much, but you should feel it significantly, and down. Again, exhale, right leg. Inhale, down. Exhale, left leg. Inhale, down.
Exhale, lower the body all the way down. One more variation here, breathe in to prepare. Feel the orientation of the tailbone, exhale, lift the head and chest up off the mat. Reach back again to take the hands behind the thighs. Give yourself just a little bit more height or think about wheeling the spine forward.
Take the hands back behind the head, take an inhale. As you exhale, rotate your body towards the right. Inhale, keep the lift in your body as you come back through center, pressing the legs together. Exhale, feel the left ribcage slide towards the center of the spine and the right ribs come across towards the left tip as we rotate to the left, inhale, center. So I imagine the ribs trading places as we rotate to the right, the right ribs slide towards the center of the spine, the left ribs come up and across.
Like both pairs of ribs are funneling into that same side hip. Exhale, rotate across. And inhale to center, last time. Exhale, rotate across, the fundamentals are so amazing because there's not a lotta choreography to cheat with. Right, we have to work deeply, we have to work well, we have to organize all our parts.
Inhale to center, exhale to place the body all the way back down. So we're gonna move into our foot work. You can have your head rest up or down for this. I'm gonna place mine up cause it helps me to be able to see. I like to be able to see my feet.
So arms down at your sides. Feet now slightly apart so they're lined up with your sitting bones and then feel a sense of heaviness through the back of the ribs, the bottom of the rib cage. Inhale here, drawing your awareness to your breath. Exhale to reach out, pressing the reformer away, pause here with straight knees just for a moment. Notice that the knees aren't behind the ankles, but instead they're right in front of the ankles, and the fronts of the legs, the muscles in the fronts of the thighs, are working to lift the kneecaps up.
Keep the tailbone down and pull using the back of your legs to come back in, we won't do that slowly the whole time, but we wanna feel the, almost like a dragging down sensation with the heels as we press out, and pulling back of the heels to the sitting bones as we bend in. So we're endeavoring here to put focus, not just in a pushing action, but more of a pulling action. We use the back of the legs to pull the reformer out and the back of the legs to drag the reformer in. There's never a moment here when we're letting the springs do our work for us. We're working in both directions all the time.
The neck is relaxed, the arms are long and straight. Imagine here also that your feet are standing against something solid, standing against a wall. So as you straighten your knees, they don't move in space. They just stay nice and still. One more time, reaching out, and bending back in.
From there, move the feet down onto the toes. So we're gonna press the reformer out here. Then what I want you to do is feel that there's equality of weight between the big toe joint and the pinky toe joint, so the ankles sit straight. Lift the heels up as much as you can without rolling the ankles outwards and then hold the heels still as you bend in and press out, all of the same things apply in terms of that focus in the back of the legs. We just feel that as the legs are straight that we have a high-pointed position and then heels just stay right there as we bring the reformer in.
Notice again the orientation of the tailbone. It's tempting, I think, a lot of times to flatten the back when we're thinking about using our abdominals, but do use your abdominals, use your breath, but don't allow the spinal position to change. We'll do about four more like that, reaching out. Using the foot works to warm up the rest of the body, to warm up the larger muscles of the body so that we can do more intricate work later on. Here's two and pull, last time.
Bend in all the way, keep the toes where they are, just swivel the heels together and allow the knees to open about as wide as your shoulders. Press the heels together, you'll feel your inner thighs start to work and then reach out, pressing the legs straight, squeezing from the heels all the way up through the glutes like you're zipping your heels up, from your heels to your pelvis. Reach out and drag in. Reach out, it's a good idea every once in a while to recheck in, recheck in with the spinal position, recheck in with where the arms are in space, are your shoulder blades starting to hike up towards your ears and if so, replace them down away from the shoulder box, arms reaching long, so there's energy. Not just in the legs, but throughout the body as we move, bringing awareness, like using the idea that everything has a job, everything has something to do.
We'll do two more here, reach out, drag in. Keep that active press with the heels, last time. And drag in. From there, separate the feet on the bar, so we take the heels out to the outsides of the bar. Keep the knees set just over the second toe.
So it's essentially that same small V position, we've just moved the heels out. So we're gonna straighten the knees here, again keeping the knees right over the ankles not behind the ankles, and pull. So you can imagine here, without actually move your feet in space, imagine that you're trying to drag your heels towards one another on the bar. That's a nice way to bring awareness to the inner thigh muscles, which is important for us to be connected with, and then again, connect with your breath, connect deep into your movements. Notice that you're standing evenly on both feet, both legs.
Notice that the ribs are dropping and not trying to lift, the back ribs are heavy on the mat. We're gonna do two more and drag back. Last time, reach, and pull back. Move from there onto the toes, keeping the feet wide on the bar. Again, the knees are just over the second toe, press out, keeping that high position in the heels, and then bend, and reach out and pull back.
Heavy pelvis, heavy arms, energetic long arms, and breath. Work in both directions. Last four, stretch and drag. So we create a rhythm, using our breath as the rhythm. Last two and back.
Last time and back and then walking the feet back towards the center of the bar. Again, lining the feet up with the sitting bones, reach out. Press the legs out straight, feel the length through the head all the way through the tail, and then take the heels under the bar. So as you're lifting your heels, try to connect all the way up to the glutes, so it's like you're lifting your heels from the entire backside of the leg, and then as you're pulling your heels under the bar, don't just let the springs do that work for you, drag the heels down, try to pull beyond where the springs pull you. And lift and drag.
I like a three two one, down two three sort of pace. Don't wanna rush through things for like life for me anyway. Feels rushed so much and it's nice to just move slowly and with caution and with care and with intention. We'll do two more here and last one. So from that high heel position, bend one knee, take the opposite heel down.
Lift so that both legs meet in center and change. So we'll speed that up a little, up and then down, and up and then down, and notice here that as you're changing, dropping one heel under the bar at a time, that the pelvis isn't rocking back and forth, and if you have any doubt about that, you can just put the hands, put the heels of your hands, right on your hipbones, right on your hip joints, and feel that they stay very still. So there's an up and down, the legs meet in the middle and change. Also notice that the knee that's bending stays pointing straight up towards the ceiling rather than opening out to the side, we'll do two more on each side. Finding that deep stretch through the bottom of the back leg, the calf, last time.
Pause here, allowing the heel to reach under the bar. If you want an even bigger stretch, you can take your hands on the reformer, on the frame, and give it a little pull. So I'm pulling my carriage closer to my footbar to increase the stretch, lift the heel, switch sides, and pull. Come back up, come back in, roll to your side, put one hand on the shoulder block and help yourself up to sitting. So reaching down, I'm gonna take us down some spring.
I'm gonna keep two red springs on, no I'm not. I'm gonna change it to a red and a blue, which is gonna make one thing pretty challenging and one thing a little bit more simple. So get down the same way you got up, one hand on the shoulder block, place your head down, roll onto your back. I already checked before I started that my straps were even. So if you need some time to do that, take time to do that, it's important.
So I'm gonna keep my feet on the footbar as I place my straps in my hands. So now from there, put a little forward pressure onto the straps, not necessarily from the hands, but from underneath of the shoulder blades. Then lift one leg and then lift the other leg. So we're just gonna do some arm moving, but I want you to feel that you're moving your arms from the center of your body, from your core if you will. So as you start to move the arms, feel that the breastbone, the sternum, drops.
As the sternum drops, the ribs drop and we use that feeling of heavy bones to move the arms through space, so shoulder blades slide down the back, front of the ribs drop down, sternum drops slightly forward, it's the feeling that you're almost gonna lift your head and chest up off the mat without actually lifting the head and chest. Feel that the abdominals pull down and in, almost tucking underneath the backsides of the ribs, as a visual. If that visual doesn't work for you, that's okay. We're gonna do three more like that. So not just an arm exercise, using the abdominals to hold the legs up in space, feel the reach of the arms.
Try to create energy or create heat in the middle of your body. Last time here, inhale the arms up and exhale the arms down. At the bottom there, turn the palms of the hands to face your legs, inhale, feel that expansion of the ribcage as you reach your arms away from you, holding the shoulder blades still. Exhale, press back down. I like to imagine a bellows here, you know the bellows that you blow into a fire to make the fire bigger?
So, arms open, we draw air into the center of the body and as the arms press down we press the air out of the body, feeling the head reach a little longer behind us, feeling the spine stable, feeling a sinking or a heaviness through the back of the bellybutton. We'll do two more, inhale, wide ribs. Exhale, press the air outta the body. Last time, inhale, wide ribs. Exhale, press the air outta the body.
Inhale, now rotate the palms down, lift the arms up just to that start position, so we don't let this tension go all the way, keep the shoulder blade still now as you take your arms out to the side, bring some awareness to the squeezing of the legs together and press down. Inhale, lift the arms up, the scapula stays still, the shoulder blades stay still, open the arms out to the side without allowing the shoulder blades to slide towards one another, and exhale, navel to spine. Press the arms down and away. Inhale, three more, open, heavy through the ribs. Exhale, press, feel that as the arms are pressing down, maybe we can elongate a little bit more through the back of the neck, reaching out, lengthening the spine.
Last one, I think, I don't know, numbers aren't important all the time, are they? So now we go out to the side, same thing, keep the carriage still by holding the shoulder blades still as the arms come over the chest and then press down. Rotate the palms and reach out, keep the shoulder blades still, reach the arms up, and press down. Inhale as the arms reach out, arms come over the shoulders, exhale to press down. Last two, inhale, reach out, arms come over the shoulders, ribs soft and heavy, and press down.
One more, out, up over the shoulders, and press down. Pause there, keeping the upper arms very close to the body, the shoulders away from the shoulder blocks, and the upper arms hovering off the carriage. Bend the elbows, nothing changes in the upper arm, and straighten, inhale, bend the elbows. Notice that the wrists stay straight. So you don't want your wrists to bend backwards, but almost think about reaching around the straps with your hands to keep those wrists strong and still.
Bend as you inhale, press as you exhale. Bend as you inhale, press a you exhale. Again, as you're doing these just small simple movements, it's a great time to just continue to focus your energy inwards, to focus your energy into your breath, to focus on the stabilization of the upper body as the back of the arms are working. We'll do two more, inhale, so that straightening the arms starts from the stabilization created in the back of the body, last time. Exhale to press, pause there with straight arms, and lift your arms up.
Inhale here, now we are gonna lift the head and chest. So we're gonna do that same thing that we started with by just moving the arms, feel the sternum drop, feel the ribs drop, and then curl the head and chest up off the mat, pause. Start lifting the arms up, try to keep the curl in the body, stop the hands just over the shoulders and place the head down. Exhale, chest reaches up, sternum drops forward, ribs slide in together, arms reach past the pelvis. Inhale, arms up, and head comes down.
This is a lot, if this creates more tension in your neck, then work through your center maybe, go back to where you're just moving the arms. And inhale to come down, last two times. Exhale, head and chest lift, arms reach past the hips. Imagine that you're trying to reach out and touch the footbar. Inhale to come down, one more time.
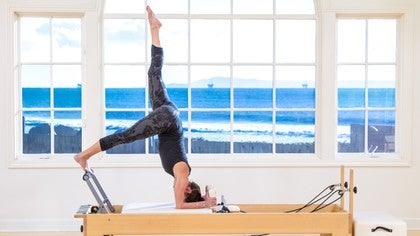
Exhale, lift up, so by now we should've generated a little bit of heat in our body, hopefully, and inhale to come down. Place your feet down onto the bar. Push out with your legs, choose one of your feet to lift up off the footbar, and put it into the strap, and then push into that strap a little bit, or hold some energy in that leg, lift the other foot up off the footbar, place that foot into the strap, and then bring the heels together and the toes apart. So moving on to just some basic hip work. You're gonna feel that the knees are turned out from deep within the hips, like you're trying to push the knees open without actually moving them wider.
So they're about inline with the shoulders. Press the heels together, so now we feel the insides and the outsides of the legs. Reach the legs forward, exhale, and bend, stopping just past 90, exhale. As your legs pass forward feel that you're trying to pull yourself backwards in relationship to the forward movement of the legs with the abdominals. So the abdominals move the carriage, the legs stretch out in space.
Trying not to just force the legs forward, but to find all of those muscles that we talked about, the deep external rotators, the inner thighs, and then working really controlled through there. And we'll just two more, I've got my feet flexed, and my second toe lined up with my knee, and one more, the heels press straight out, pause there. Press the legs down, maybe just right above the footbar. Separate the legs, circle the legs around and up, bringing the heels together, keeping the external orientation in the hips, exhale to press down. Inhale, reach out, circling in that hip joint.
Exhale to press down, again, feeling the abdominals controlling the movement of the spine, maybe if you need to, you'll rest your hands on your pelvis, again, just to make sure that that's not changing, it's not moving around, it's in neutral. Tailbone dropping down, legs are coming around to both sides and they make a symmetrical circle, and you watch as the legs come to center that they come to center evenly. We'll just do two more here. Feeling the back of the legs working too. Move the legs away from the body, here's our last one.
Around and back and now we reverse, open the legs. Reach, back of the legs working, bring the heels together, stretch the legs away from the head, and inhale, tailbone down as the legs comes up. Separate the legs, press down and away, pulling back through the abdominals, creating awareness all the time in the center of the body, in the powerhouse. Exhale, press down, moving again the legs symmetrically, standing in both straps. So I have to concentrate a little bit more on standing on my right leg because that's the leg, in my experience, in my organization, that doesn't work as well, or isn't as inclined to bear weight.
So that's where my focus is and we all have a leg like that. So if you don't know which one it is, try to see if one leg pulls harder or comes to the center faster than the other one. Here's our last one. Now from there, the legs are just inline with the eyes. We're gonna take the legs out, and I want you to imagine that you're sliding your heels across the surface of water.
So the legs don't drop down in space and as they continue to open, it might feel as thought they're lifting slightly. Soften through the knees, get a little bit of work through the fronts of the legs, and drag those legs back together, inhale, allow the legs to separate. So you could create the same idea that we used with the opening and closing of the arms. So bringing awareness to the bones of the ribs, right, feeling as the legs reach out and as we breathe in that the ribs can get wider, and then as we press the legs together, navel to spine, feel the ribcage slide, slide inwards. So we mimic the movement in our legs with our breath, with the movement of our ribs.
Pulling together, here's our last one. Inhaling to open the legs. And exhaling to close. Bending the knees now, taking the feet out of the straps, place one foot on the bar before taking the second foot out and come in. Reach back and hang up your straps on the hooks, on the pegs, and then while you're there, if your head rest is up, take it down.
So this, remember, when we'd set up our springs for those last few exercises, those were where that spring makes it a little easier, this is where this lighter spring will be a little bit more challenging. So if you want to change to say add a red spring so you have two reds and a blue spring or add just a red spring and take away the blue, that would be totally appropriate. I'm gonna just see if I can suck it up for lack of a better expression. So we're gonna keep the carriage still. We started with this movement in the beginning of the class.
The pelvic curl, it's gonna be a little bit more challenging here because now we've got a lighter spring, so we're having to hold the reformer still by ourselves instead of having the springs hold the reformer still. So we reach up, inhale, and exhale, keeping that carriage pulled into the stopper, roll the spine down. So if you didn't feel your hamstrings before, I'm gonna guess you can feel them now. Inhale, exhale, keep that carriage still as you roll up, roll up, feeling that deep work in the back of the legs, lifting up nice and high, inhale, and exhale to roll down. We're gonna do that one more time.
If you have two reds and a blue or you made your reformer heavy, this next part, I wouldn't recommend doing that heavy, I would recommend doing this next part that we're heading into right now, with no more than two red springs. So we're gonna stay up. We're gonna press the carriage away, almost all the way straight, so say like three quarters of the way straight, and then we're gonna lift the hips and bring that reformer all the way back in to touch the stopper. Press out, don't go all the way to straight, go to where you can feel that your back is totally stable. Reach out, inhale.
Exhale, feel the hips, not the ribs, lifting as you pull the carriage back into the stopper. We're just gonna do two more. Inhale out, exhale, lift the hips and bring it back. Last time, inhale out. Exhale, lift the hips as you bring the carriage all the way back, inhale to hold that carriage still, and exhale, roll the spine all the way down.
I don't know about you, but that made me feel like we should have a stretch. So let's roll ourself up. Move the springs, organize the springs so you have one red spring on only now. We're gonna take the hands onto the footbar and put one foot just on the outside of that reformer's frame, the other foot's gonna go right up against the shoulder block. We're gonna place the knee onto the reformer.
From there pressing into the arms and lifting the spine up, pulling the navel back towards the spine and think here of trying to pull or draw the pubic bone slightly forward, and then we're gonna take that knee out behind us. So we drop down into a stretch and try not to just arch the back as you go down, try to hold onto the front of the body, and hold there and breathe. So we'll hold here and we'll stay for three full breaths. Energy in the arms, active energy through the spinal muscles. Now think about tilting the tailbone in the opposite direction upwards and then press the reformer back.
Keeping the pelvis squared. Keeping the alignment of the spine. Holding again. Now as that front knee starts to bend, I want you again to think about pubic bone up towards the ribcage or trying to tuck the pelvis a little bit. It's not gonna actually be in a round place, just an organization of energy or awareness.
Holding and breathing and then one last time, tip the tailbone up, press the reformer away. Keeping the head inline with the spine. Bending that front knee, lifting the spine up, as you bring that reformer all the way back into the start position, and then stand on the leg that's on the floor, step off, and walk around to the other side. So again, hands on the bar, opposite foot up against the shoulder block. Try to tuck the toes under like you're gonna stand in a pushup position with your feet.
So we get a little bit of a stretch through the toes and through the foot there, and then lifting the spine. The front knee is gonna stay just over that ankle and then we're gonna press down and back with that carriage leg without letting the knee of the front leg move at all, so it stays right over that ankle grounded. We're just pausing, I'm talking, you're breathing. We're gonna lift the tailbone up, press out with that leg now, trying to hold the spine long and straight. Finding a stretch now through the back of the leg.
Then bend that front knee again, lifting the chest up and bringing the reformer back almost all or as far in as you can, again just stopping when that front knee is over the ankle. Pressing the reformer away, lifting the back, holding and breathing, energizing the muscle in the back of the leg that's stretching right now, the glutes on the backside of that carriage leg, and then press out, hold. Then bend and lift, rising up off the carriage with your energy as you come back in. Stand on the leg that's on the floor and step off. So we're gonna get our short box in a moment, but before we do that, let's take the footbar down, and then load up all of the springs.
We're gonna do an abdominal exercise and we want to make sure that the carriage stays nice and still. Get the strap so that it's ready for you to use and grab the box. So we're gonna put the box on short ways. Put the box on short ways and then sit down on the box, facing the footbar. Reach down for that strap and hook it over your feet or hook your feet underneath of it, and then if you've gotta long enough strap, if you got enough strap, see if you can get the feet to reach out and anchor into the footbar.
Sit right at the front of your box. Take the hands, your palms, and place them in between the pubic bone and your hipbones. So resting just at the lower part of the abdomen. Press the legs together and see if you can, by pressing the legs together, feel just a little bit of tissue change. The skin on your body pulling slightly away from your hands.
Take a breath in. As you exhale, I want you to start with that skin pulling away from your clothing idea, and then start to rock the tailbone under. So we're gonna roll back, only as far as we can, without letting the abdominals push upwards into the hands. Pause to inhale. Exhale, feel the deepening of that part of your body as you roll forward, shoulders come over the pelvis, and then stack the spine back up again, inhale.
Exhale, draw the abdominals in. Round the spine, rolling backwards. Don't be concerned about how far back you can go. Be concerned about how deep you can stay connected. Pause to inhale.
Exhale, lift up and over yourself, and inhale, stack the spine. Again, couple more times, inhale, prepare. Exhale, abdominals come away from the hands. Like even though you're touching yourself, you're trying to create a differentiation, a space between where your hands are and the muscles that are working. Pause, inhale, and exhale to lift up.
Inhale to elongate, lift the spine tall, last time. Inhale. Exhale, deepen, moving downwards. So making that a full body experience. The legs are working, the shoulders are dropping, the abdominals are deep, exhale, come up and over, and then lift the spine back up again.
So I'd like for us to take our hands behind the head. If that feels really a lot, if you create a lotta tension in your neck and shoulders by doing that, can just bring your arms in one hand over one, elbow position, in front of you. I like to have my hands behind my head because I can get a nice spinal position. So what I want us to do is squeeze the shoulders together. So we're not gonna stay there 'cause it doesn't feel good, but notice as you squeeze your shoulder blades together, it pushes your head forward.
So what I want you to think about instead is separating the shoulder blades, allowing the shoulder blades to wrap around the front of the body towards the ribs, and you'll feel there that now you've got some space, some less tension in the neck, we'll say. Draw the abdominals inwards, press the head into the hands so the shoulder blades are wide and sliding down the back. You may feel a little bit of work in your upper back. That would be a good thing. Keep the legs still as now you rotate to one side.
The head just goes with the hands. Inhale as you come back to center. Deepening into the center of the body, rise up off the pelvis energetically as you rotate to the other side and center, and again, lift, and rotate, and come back to center, and lift, abdominals in. So we spiral and my favorite image here, what I often think about, is a barbershop pole. Those alternating, red and white, kinda candy stripe moving spiraling poles.
So we're not just twisting, you know how they go up, up all the time up, that's what we're thinking. Lifting, pulling maybe even, up on the head to create the sensation of the spine getting longer, and center, last time to each side. You notice that you're pushing your head forward, check your shoulder blades, they shouldn't be together, and center and other side, and center, and now from here, we're gonna tilt. So I want you to think right ribs to right pelvis, lifting the left ribs off the left pelvis without actually shifting at all away from the left sitting bone, and then draw awareness into that side of your body and use the muscles on that side of your body to come back up towards upright. Knees are pressing together, inhale, pull the spine.
Think of both sides of the body lengthening as you reach over and exhale as you pull yourself back. Inhale, lift up to stretch over. Exhale to pull back. Inhale, lift up to stretch over. This is a movement where you kinda have to look for what you're trying to find, can't just kinda bend yourself in space or flop to one side.
You really gotta think of elongating up and out and exhale coming just back to straight. Elongating up and out. Exhale coming back to straight. So last exercise here, what I'd like for you to do is place one hand in that same space, right in the middle of the two hip joints or the two hip bones and place the other hand behind you, right behind that hand. So one hand is on your sacrum or the base of your spine and one hand is on the front of your body.
So again, trying to pull the tissue, the muscles, the skin away from your clothing and you may feel that there's a little bit of tissue change in the back right over the sacrum too, that's a good thing. So now we're gonna take the spine straight back, straight back, straight back, and your hand is there so you can feel if your spine is arcing or rounding, right, it just stays stable and then we pull those two things back up together. What we're doing right now is called a co-contraction. Hinging back, so we're thinking about abdominals and back muscles working simultaneously. Exhale to pull back up, we'll do one more like this.
Inhale to reach back and exhale to pull up. Change the orientation of your hands. The opposite hand comes behind you. Again abdominals back towards spine, pivot, hinge, inhale, and exhale to lift. Pivot, hinge, feel the front and the back of the body working together and exhale to lift.
Last one, inhale, hinge. Exhale, lift, and then take your hands away. Take your feet out from underneath that strap. Step off to the side. Come and change your springs to a blue spring.
So we're gonna turn the box so that it's facing the opposite way, or long ways, we'll call this long box. I like to make sure it's nice and centered. I'm a little bit obsessive about things like that, which is why I teach pilates probably, and we're gonna lie down on the box. So lying down so that your ribs, where your ribs come together, are just right at the very end of that box, and then take your arms and just reach as far as you can on the frame. Let your head drop below the box and then create a little bit of energy through the abdominals and through the back of the legs.
So I don't want the legs to lift off the box, I just want them to feel as thought they're just hovering. So they're not resting on the box, they're reaching energetically. Then we're gonna talk about a little bit of reverse articulation, so I want you to lift the back of your head, not your face. Lift the back of your head. Once the back of your head is inline with the rest of your spine, we're gonna start sliding the shoulder blades down.
So as we slide our shoulder blades down our back, the carriage will begin to move. As the carriage moves, I want you to keep the front of the ribs down on the box, but see if you can lift the sternum forward. This is a small movement, small, small, and then resist your way back down. Again, so we start in kind of a negative place, not a negative in a bad way place, but in terms of spinal alignment, we're not in a neutral alignment. The head is below the chest then the back of the head lifts up.
The shoulder blades start to slide. The abdominals are active, the legs are active. Slide the shoulder blades down, lifting the sternum without actually letting the ribs lift off. So the goal is to work through the upper spine without changing the position of the ribs in relationship to the pelvis in the lower spine. So there's no arching of the lower back, the lower back stays totally still.
Shoulder blades slide down, it's subtle. It's very subtle, both arms working evenly. We stretch the chest out and forward, reaching the top of the head in a forward direction. I'm still keeping my eyes down, looking just at the end of the reformer, we're just gonna do that two more times. Inhale, sliding the shoulder blades down.
Feel the back reach out and then up, and down and last one, back of the head lifts. Doesn't have to be big, don't think about big. Think about intention, think about where you're putting your awareness, where you're moving yourself from, and then reaching back down. And then once the carriage comes all the way in, help yourself up off the box, and then find a wall, and what I'm gonna use for a wall is just this post on this window here. So feel the head pressing back into the wall, the ribs resting against the wall, and what you should feel if the head and the ribs are in the right place, that maybe, in fact not maybe, there should be a little bit of a space between the bottom of the ribs and the top of the pelvis.
Want us to soften our knees there, the feet are out in front of us about, I would say, six to eight inches. So inhale, feeling the alignment of the spine there. Keeping the knees soft, start peeling your back away from the wall, so we start with the head. The head gets heavy and as the ribs come down the front of the body, the tailbone hasn't moved yet, but the lower spine now touches the wall, right, that's the same thing we talked about doing when we were doing our chest lift. It responds to the movement of the upper spine.
And then we continue going downwards, continue. Now the pelvis has to change a little bit and that's okay, but as you're folding downwards, continue to create up energy in your body. It's not important how low you go. Just looking for awareness here. Inhale, exhale, start with the pelvis.
So feel the tailbone slide under until it's pointing straight down. Then use your abdominals to press into the wall behind you, flattening through the lower back, and then stacking the spine back up the wall. As the head comes back, make sure the tailbone is dropping back, if it's not already. Inhale, we'll do that two more times. Exhale, chin into the chest, abdominals in, rounding your spine.
There's a deceleration idea with the front of the body. So as the upper body's folding downwards, the front of the body's working hard. We're just creating uplift just to support the spine as it hangs down against gravity and then feeling the organization of the bones. Does one side of your back feel thicker or does one side of the back come into the wall first? Just things to think about.
Knees are still soft, eyes come forward, tailbone drops back and last time here, inhale. Exhale, chin comes into the chest. Lower spine flattens into the wall. We roll down and as you roll down, maybe there can be an idea about letting any tension in your body go. Drop it right out through the top of the head into the floor underneath you and leave it there.
And inhale. And exhale, lifting back up. Finding the, all the natural curves of the spine, and as you stand up just noticing, taking a moment to notice, what your body feels like. And I don't know what it feels like. I can tell you that mine feels like the moving energy and awareness around alignment, around posture.
It's nice to sometimes just briefly pause and acknowledge those moments and be still. And that is that, have a good day.
Pilates with Meri Rogers: Reformer Workouts
Mention
 |
Meredith Rogers (Teacher) |
 |
Elizabeth S |
 |
Frances K |
 |
Barbara L |
 |
Gia Calhoun |
|
|
Rebecca |
|
|
Kate S |
|
|
Christine T |
|
|
Nicola F |
 |
Amanda T |
|
|
Valerie Kosty |
 |
Viola R |
|
|
Heather P |
 |
Claire O |
 |
Tracie G |
|
|
Merve D |
 |
Bahara |
|
|
Jodi F |
|
|
Dana L |
|
|
Carlotta C |
|
|
Lissa D |
 |
Aljona M |
 |
Heather G |
 |
Galina G |
 |
Z A |
|
|
Lori |
Comments


I appreciate hearing from you so much.


You need to be a subscriber to post a comment.
Please Log In or Create an Account to start your free trial.
