Description
About This Video
Transcript
Read Full Transcript
Hello, I am Carrie Macy Samper. Nice to have all of you here today. We are going to do a mats class, specifically for triathletes, and it's actually a great class for anybody, so if you're not a triathlete, please try it anyways, but it's gonna focus specifically on some movements that triathletes don't get enough of in their normal training, and also do some movements that will help them in their normal training. So, as all of you know, triathletes perform and train in three things: cycling, swimming, and running. All of those exercises are done mostly in the sagittal plane, so this kind of motion for swimming, and they're also done either forward flexion, on the bike, or if anything straight and neutral spine here.
There's not any extension. There's not any lateral movements. And there's not much rotation that happens. So we will address all of those things, extension of the spine, extension of the hips, extension of the shoulders, rotation and side bending, a little bit more in the class today, and we will also focus on two parts of the body that triathletes really need both strength and mobility in, and that's the feet and the ankles, and in the shoulder girdle, the shoulder joints. Alright, so we will start our class today with some exercises for the feet to get the feet grounded.
The towel exercises. So if you're sitting down on the floor, you can do it like the three ladies here. You can also sit on a bench, or you can stand up. If you're standing, it just requires a little bit more balance than sitting. So go ahead and place your feet about hip-width apart, right on the towel.
And if you're sitting on the ground, you guys can put your hands behind you, just for balance. There you go. I want you to spread your toes as much as you can. Pick your feet up off the ground as much as you can. And then reach for the towel with your toes.
Spread the toes as much as you can. Grab the towel, and squeeze the feet to pick the towel up. Then release the towel, and do it again. So you're basically just grabbing the towel, lifting it, and releasing it. Grab the towel, lift, and release.
So you should feel this in the bottoms of your feet. You might get some little cramps in your toes. This is all good. It's because we don't do this enough. Triathletes or normal people.
Then reverse it. So curl the feet in, push the towel away. Curl in, push the towel away. Curl in, push the towel. Curl in and push.
Do it one more time. So, reverse again. Pull the towel into you. So it's much better to do this on a wood floor, thzn it is on your actual mat. You'll notice they have their towels on the wood floor.
Reverse it. Curl in and push the towel away. Curl, push. Curl, push. And you also wanna focus on your feet being straight, and not curving side to side as you're doing this.
And then finish. Alright, great. Everybody come to standing now, and you do not need to be on your towels, so why don't you hand me your towels, and we'll just set them over here. Thank you very much. And you can still face forward.
Stand feet hip-width parallel, and I want you to look down at your feet everybody. This is an exercise called doming, and what we're trying to do is basically, actually students you can look at me for a second. If this is your foot, you're trying to get your foot to do that. So your toes are gonna stay flat, your heal stays down, and your arch comes up, okay? So look down at your feet, spread your toes as wide as you can, and then pull your arches up to the ceiling, trying to keep your toes as flat as possible.
And then release. And if you're confused, you can look closely at my feet. So you spread the toes, pull the arches up to the ceiling, and see how my toes are trying to stay flat not curved. No problem. And spread the toes, then lift the arches.
You see how there's space under my arches, but my toes are not curling, they're flat. Okay, so do three more. So spread the toes and then scoot up. And then release, two more. Spread, scoot up.
And release, and one more. Spread, scoot, and release. Good, you guys! Alright, now all turn to face in each other. At the front edge of your mat, stand with your feet hip-width again, and just feel your feet feel a little bit different. Hopefully they feel a little bit more stretched and awake.
Ground them into the ground. Interlace your fingers and place your hands behind your head. Okay, start to do a squat. So you'll sit your hips back, your chest will come forward a little bit, and you go down as far as you can keep your heels on the ground, and then stand up and at the top, squeeze your bottom, pull your ribs in, and lift your head to the ceiling. And then again.
Sit down, keeping your feet grounded on the ground. Stand up quickly, use your hips and your core to stand up tall. So this is basically our footwork, right? Bend your knees, we're just doing it parallel, and then stand all the way up. Go a little deeper for two more.
Bend your knees, go as deep as you can go, and stand right back up. Last time, bend your knees, and stand up. Alright, let's do now five more, a little bit deeper. So, squat down as far as you can. Hopefully into like rolling like a ball.
Curl into yourself, and as you stand up, press up, open your chest, and look up at the ceiling. So you go into some extension. Bend the knees, curl into your roll like a ball, and then stand up, lift your chest to the ceiling, gaze up. And again. Curl into the rolling like a ball shape, and then stand up.
Drive down with the feet, up with the chest. One more time. Bend the knees, curl into the roll like a ball, drive down in the feet, lift the chest all the way up, and then release the arms. Excellent. Take your arms above your head, interlace your fingers, lift tall up through the shoulders.
So it's okay let your shoulders come to your ears. Ground down into your feet, and then side bend over to the right. Pause, and just feel, are my feet still evenly weighted? Make them evenly weighted. Keep your hips over your feet.
Stretch a little further. Come back up, over to the left side. So your shoulders are still lifting, 'cause you're trying to get as much stretch in your sides as possible. Some of that lateral movement. Come back up.
Now, draw your shoulders down out of your ears. And side bend to the right. Feel the difference. There probably will be more work required in your core and less stretch felt. Come back up.
Over to the left side. The shoulders are drawing down now as you side bend over, and come back to the center. Good, and then open your arms to the side. Sit all the way down onto your mats, and lie back. For the first few exercises, we'll use this bolster like this, so that you're leaning against it.
So your ribs are on the bolster, and as you lie back, you would want your head to be able to touch the ground. And then you'll know you're in the right spot. That's right. Alright, so for the hundred, bring your head up. Stretch your legs out onto the mat.
Lift your head up, Leslie, there we go. Look into your abdominals and use that bolster to kind of cue your body to curl into your abdominals more. Stretch your legs as far as you can, and actually flex your feet and feel like you're standing into the ground, like we just did. Now if you have enough strength in your core to be able to float your legs off the mat, point your toes now, that's fine. If it doesn't work, leave your legs down.
Pump your arms. Take a big breath in. And a big breath out. Good, breath in, and on your exhale, pull your ribs into the bolster. Breathe in.
And breathe out. And just remember, it's okay to keep your legs on the ground, so go ahead, Leslie, put your legs down on the mat. You still keep the energy and the work through the legs, and the deep work in the core. You just don't have the legs hovering. You can lift your legs back up.
Good, do two more breaths. Breathe in. Breathe out. Last breath inhale. And then exhale.
Lower your legs. Lower your head. Take your arms all the way back over your head, and interlace your fingers over your head. Good, so we're back to the position we were at the beginning. This time we have more extension, so we're aligned over the bolster.
The legs are pressed tightly together. You flex your feet so stand into the ground. Try to pull your ribs into the bolster, so you connect through the abdominals. Then lift your arms to the ceiling. Lift your head.
Roll up off of the mat. Round forward. Reach your fists towards your toes. Let your head go right between your arms, so the arms are parallel to the floor. Roll back down into the mat.
Pull your waist in. Tuck your tailbone under. Go over the bolster, and reach your hands back as far as your shoulders allow. You may touch the floor, you may not. Lift your arms.
Lift your head. Peel up off the bolster. Use the bolster to help you roll up and forward. Good, and then roll back down into the mat. And once you're on the bolster, lift your arms up and over your head.
Reach back for the floor. Continue, do two more. If you don't have a bolster, you can just use a big towel rolled up. You could also use a small barrel, if you have that in your Pilates studio. And roll back into the bolster, and lift your arms over your head.
Now you guys, on this one, I want you to try to keep your ears and your arms together, so as you roll up, just keep your head with your arms. Round forward. Keep your head with your arms. Roll back, keeping your head with your arms. And then lie all the way back.
Reach your arms all the way over your head. Lovely. Circle your arms around to the side. Bend your knees, and bring yourself up to seated. Scoot the bolster out and away, just to the side of the mat.
Very nice. And then go ahead and lie back onto your back. So, in addition to the things I mentioned that triathletes need, they also really need core control and core stability to get faster and more endurance in their events. So all of Pilates is amazing for them, in general. Alright, you need your Thera Bands now.
So reach your Thera Band for single leg circles. Place the Thera Band on your foot, and reach your leg up to the ceiling. The reason we're using the Thera Band, is just to create more range of motion possibility in the hip, and a greater sense of ability to keep the core engaged. So, one in each hand, pull your elbows down onto the mat on either side of your ribs, and loosen it a little bit, Gita, that's gonna be too tight. Alright, good, draw the hip down into the mat.
Cross your leg over your body. Circle it down and around and all the way back up to the top. Do it again. So make the circle bigger than you normally would, because you have the Thera Band guiding your leg. You still, keep going, have to control the core as the leg circles.
One more big circle. Now reverse the directions. Make sure your chest is open, and your elbows are pressing down into the mat. Good, so you're not letting the shoulders creep up, just because you're holding the Thera Band. Also, try not to let your left leg move anywhere.
One more circle. Good, hold. Now for your final stretch here, pull your leg diagonally across your body to your opposite shoulder. Pause. Put the Thera Band, both sides, into your left hand.
Hook your right thumb into your hip crease, and push your hip crease down toward the end of the mat. Hold, keeping your right hip on the ground. Then turn your foot. You're gonna sickle it in, so it's a very strange position, but you just turn your foot like that, and you'll feel (makes funny sound), this big stretch down the side of your ankle, your tibia, your anterior tibialis, and then bring your leg up to the center. Good, switch sides by bringing your left leg up, putting it in the Thera Band, and putting your right leg down.
Alright, you probably feel the difference in both legs, now, we go to the other side. Cross over to the right. Big circle around, and all the way up. Cross over to the right. Around and lift up.
Keep the right leg steady, as the left leg does big circles. Very nice you guys, one more time. And reverse the direction. Go to the left. Circle the leg around and up.
Open to the left. Keep drawing the ribs into the mat. Keep pressing the hips into the mat. Two more circles. Good job, last circle.
Keep the legs straight up, Put the Thera Band on both sides into your right hand. Cross your leg over towards the right shoulder. Hook your left thumb in your hip crease, and push your hip crease forward, and then sickle that foot. You kind of just (makes funny sound) the foot in. Yes.
Oh. And someone assisting you to do this makes it feel even better. There. Yes, if it makes your face do that, you know you're right. Bring your leg up to the middle.
Take your foot out of the Thera Band, and put the Thera Band down to the side. Alright, stretch your legs out straight. Ground your feet like you're standing in the ground. Interlace your fingers. You can lift the shoulders on this one, and just roll up to seated.
Rolling like a ball, move your hips forward. This is just the regular rolling like a ball. Hold your ankles. Pick your feet up and dive your head between your knees. Inhale, roll back, lift your hips.
Exhale, head to knees, to return. Inhale, roll back, lift the hips. Exhale, head to knees, to come up. Roll back, lift. Roll up.
Good, inhale roll back. Exhale, roll up. Pause. Let's all go together on the last one. Roll back.
Roll up. Put your feet on the mat. Very nice, get your bolsters. Place it back in the same position for your series of five. Okay, just like you did the hundred, you'll find the same spot, so it's basically right under your ribs.
Bring your right leg into your chest. Stretch your left leg out. So really reach through that left leg. I'm gonna switch legs just to see that. Stretch through the front of the hip.
Triathletes need that reach. Pull your knee in and curl your chest into your knee. Then hover the left leg off the ground. And then switch sides. Really reach the right leg out.
And switch sides, reach. Switch sides, reach. Curl up and into yourself a little harder, so you're really working the abdominals. Stretch. And stretch.
Quicken your tempo. In and in. Three more sets. And pull. Good two more.
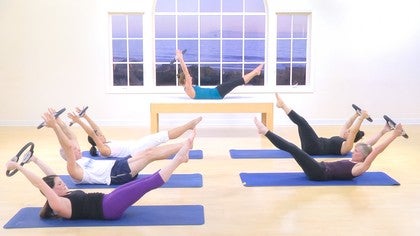
In, last set. Both knees come in. For a break, put your feet on the ground, and let your head go back, just for a little stretch carefully over the bolster. Then come back up for double leg stretch. Bring your knees to your chest.
Hold your shins. Inhale, extend your arms and legs apart. Hold. Really curl into that. Exhale, circle in.
Inhale, reach the arms and legs apart. And exhale, circle it in. One more like that. Inhale, reach. Exhale, circle in.
Now you'll extend in the upper body. Inhale, go behind the bolster. Exhale as you circle in. If you start to feel this in your hip flexors, just lift your legs higher to the ceiling. Okay, so the legs can come up as the chest and head go back.
If you're still good, it's more challenging to have the legs lower. Good, two more. Inhale. Exhale. Sue, still keep your ribs in the bolster as you extend over it.
There we go. Lovely. Scissors, legs go up to the ceiling. Hold the right ankle. Lower the left leg, pulse.
One, two, switch. One, two, and you can lower the bottom leg pretty low. And think about reaching the front of the hip. We're trying to extend out through the front of the hip. Open your chest, everybody.
Gita, open that chest, there ya go. One more each side, and then bring both legs up to the ceiling, hands behind your head. Chest stays up. Lower and lift. Inhale as you lower lower lower.
Exhale, lift. Inhale, lower, keep the ribs in the bolster. Exhale as you lift. Inhale as you lower. Exhale as you lift.
One more, inhale lower. Exhale as you lift. Bend your knees. Put your feet down. Take your head over the bolster, just for a breath.
So you can rest like that as much as you want in between, or as little as you want. Knees in, head and shoulders lift up for the crisscross. Twist to your right. Extend the left leg. Really twist, and twist to the left.
Extend the opposite leg. And twist to the right, reach. Twist to the left, reach. Keep breathing, you guys. Go to the right, and the left.
One more set to the right and the left. And knees in, head goes back. Straighten your legs out onto the mat. Reach your arms over your head. You can interlace the fingers again.
And this is just getting extra stretch in the ribs and in the shoulders. Roll yourself up to seated. Lovely. Alright, we're going right to the sauce. We're skipping a couple of things.
I want you to move your bolsters a bit forward, and if you need to sit on the bolster for hip flexors or whatnot, go ahead. I know none of you really do, but... Actually, Leslie, sit on the bolster. There we go, alright. So this just gives you some relief in your hip flexors when you're sitting up straight.
If you don't need it, take your legs as wide as the mat. Take your arms out to the side. Take a big inhale, sit tall. Exhale, twist to the right. Hold.
No bending yet, just twist to the right. Get taller. Can you twist more and sit your hips heavier. Can you flex your feet stronger? And come back to the center.
Breathe in. Exhale, twist to the left. Such a beautiful view over here. And inhale to the center. But it's a more beautiful view looking at you guys.
Twist to the right. Now bend forward, and reach your left hand towards your right foot. Rotate your chest more, and come up. And then twist towards the left. Bend forward.
So get that rotation in there. Rotate more. Rotate more, and come all the way up. Twist to the right. Use your obliques to get the rotation in the spine, and then roll up tall.
Twist to the left. Exhale, pull the waist back, the ribs back. Twist more, Gita, there we go. One more each way. Twist, exhale as you reach.
And roll up. One more to the left. Exhale as you reach. And roll up tall. Lovely.
Alright, release your arms. Let's move on to the rowing. Okay, we'll do the front rowing. So you need your Thera Band. Place it on your mat, and if you're sitting on a bolster, just stay on the bolster.
Place the Thera Band on top of the bolster, or on your mat. And then sit right on it. Literally, basically, your sit bones go on the Thera Band. Grab the Thera Band, and hold it with your thumb and your pointer finger. Not too too tight, so if you press forward, you can kind of give it...
Is that enough tension for me? And if it's not enough tension, choke up a little more. Too much, go a little less. Starting right at your chest. Inhale, reach the arms forward and up.
Exhale, lower the arms to the mat. Inhale, lift the waist, lift the arms, lift the head. And exhale, press the arms to the side as you grow taller. Again, inhale, reach forward and up. Exhale as you lower down.
Inhale, reach and lift. Exhale, open to the side. Keep going, reach forward and up. Lower down. You notice the Thera Band actually pulls your shoulders into place, but makes you work the muscles a little more around the shoulder.
Perfect for your triathlete. Flex your feet. Hands by your hips. Round your head towards your knees. Slide your hands to your heels.
Now keep reaching out with the hands as you roll up to seated. All the way up. And on this one, take your arms behind you. Stretch your chest. Good.
Triathletes need that for swimming, right? Round forward, slide the arms forward. Reach through the arms to come all the way up, and it feels so good to open the chest. Press the shoulders down. Gorgeous, one more time.
Round forward. Slide your hands towards your heels. Push the straps to lengthen your spine up, and circle your arms all the way behind you. Cross your legs now, and we move to shaving. So now wrap your hand around the Thera Band a little bit.
And now, you're still holding it the same way. Place your hands behind your head. And if you want, you can just hold it with your fist. Press your arms straight up above your head, and bend your elbows to come back. Press your arms straight above your head, and bend your elbows to come back.
Press your arms straight above your head as the shoulders draw down. Bend the elbows, one more time. Press the arms straight above the head, then open your arms to the side for the hug. Close your arms in front, and open to the side. And again with this Thera Band, keep going, you notice there's a downward pull of the band, and it really just connects your shoulders into your back, and your core to your shoulders.
Very nice. And then release your arms down. Okay, come off of your Thera Bands. Place them to the side, and we will roll onto our stomach for the swan, single leg kick, double leg kick with your bolster. So move the bolster to the middle of the mat when you guys bring your heads to the center.
Place your hips on top of the bolster, so your hip bones are actually kind of almost off it. It's really your hips and thigh that are on. And then place your hands by your shoulders, and place your face down onto the mat. This is just gonna give a little bit more range of motion in the swan. Roll your shoulders back and down.
Start to look forward, and press yourself up into a swan. Stretch through the arms. Only go where you can keep your shoulders on your back, and then lower yourself to the mat. Leave your legs down for now. Inhale as you come up.
Exhale as you lower down. Good, inhale as you come up. Exhale as you lower. Now inhale as you come up. This time, as you exhale and lower, lift your legs behind you so you'll do the rocking swan, but keep your hands on the mat.
Stretch your arms, come up. Lift your legs, go down. Stretch your arms, and lift up. Beautiful, you guys. Lift your legs and go down.
Stretch to come up. And one more lift and lower. Stretch to come up. And lower yourself down. Nice.
Come onto your forearms. Your single-leg kicks will also happen in this position. So push your arms into the mat. Stretch your legs, and they can be touching the mat, at the moment, and really lift through your abdominals. The reason to do this, is it gives you, again, more range of motion in the front of your hips, which many triathletes have quite tight fronts of the hips.
Now, if you can, stretch your legs so straight that they lift off the mat. Then bend one leg. Kick your bottom, one, two. Stretch it out. Other leg, one, two.
Keep pushing with the arms, two. Stretch it, one, two. And again, one, two. One, two. Keep going with the kicks.
Make sure that your legs are touching. The upper part of the legs are touching. That they are not separating. That one knee is not dipping. Keep kicking as you lift your abdominals.
One more each side. Very good, and then sit back to a child's pose. All the way back. Nice. For your double-leg kicks, I want you to move the bolster forward just a bit.
So you're actually going to lie on it on your ribs. Okay, so just your chest is basically off. Take your hands behind your back, and then you kind of round your body over the front of the bolster. Look to the left. Kick your bottom with your feet three times.
One, two, three. Put your feet down. Hook your thumbs. Lift your chest, and arch back. And the bolster should just give you a little boost.
Lie down. Look the other way. Curl your tailbone down into the mat as you kick. One, two, three. Stretch the legs.
Reach the arms. Lift the chest. And lie down, look to the left. Kick one, two, three. Stretch the legs.
Reach the arms. Lift the chest. And lie down. Doesn't it feel nice? You suddenly get more extension.
And then reach back. Lift the chest. Everything up. One more each side. Kick a one, two, three.
Reach the legs and the arms and the chest. Last time, one, two, three. Reach the legs and the arms and the chest. And rest. Wonderful, another child's pose.
Sit right back. Good. Okay, so the reason for that bolster, you can do all of it without the bolster. The reason for having it there is to create like I said more space, more room, to get bigger ranges of motion when you are tight in the upper body and in the hips. Alright, now we're going to use the Thera Band.
One more thing for the feet. I'm gonna go this way so hopefully we can look at my ankles. Take your Thera Band. If you have a short one, just use one length. I'm gonna double mine up, 'cause it's long.
And you wrap it literally around your ankles. It's kind of awkward to get into it, but wrap it around your ankles, and then pull it kind of tight, so that if you notice that my feet are together, totally touching together. And my foot is cramping, so let me un-cramp it. It's very normal for that to happen. Then I want you to pull tight on the Thera Band, and try to sit on your feet.
Your goal is not to let your heels fall apart. Your goal is to keep your heels together, and be able to sit upright. It stretches the front of the feet. It stretches a lot. Hopefully you're feeling something in your feet.
If it's too much and you really can't be up here, then just allow yourself to take some weight off by leaning forward, but try to keep your heels and ankles together. Breathe. This is helping our feet to be in alignment, to stretch in the right places where there's imbalances and tightness. Okay, now shift your body weight forward, and flip your feet so your toes curl under. And we do the same thing.
Keep your heels and ankles together, and sit vertically on your feet, and keep pulling with the Thera Band. Good, and again, if it's like excruciating, like you can't manage it, just hinge forward. Take some of the weight off of the feet. But we should be able to do this. And this will help with knee stretches, elephant.
And then come forward, and just release the Thera Band. Okay, scoot your legs out in front of you, and shake your legs out, and move your bolster off to the side. Do you feel new aliveness in your feet? Good, lie on your backs for shoulder bridge. So you lie all the way down.
Bring your feet in line with your hips, and you should feel the heels with your fingertips. So pull your feet in close enough that you feel them. Alright, press your arms into the mat. Open your chest, and lift your hips to the ceiling. And hopefully with all of that front body opening, you feel a little more stretched through the front.
Bend your right knee into your chest. Stretch that leg up to the ceiling. Flex your foot. Lower your leg down in line with the other leg. Point, kick it up.
Flex and lower down. Point, kick it up. Flex it down. Point, kick it up. One more, flex it down.
Point, lift it up. Bend your knee. Replace your foot. Bend the left leg in. Stretch the left leg up to the ceiling.
Flex and lower down. Keep the body strong. Lift, and lower it down. Point, lift it up. Press the arms into the mat as you lower.
Point, lift it up. Flex it down. One more, lift it up. And lower it down. Bend the knee.
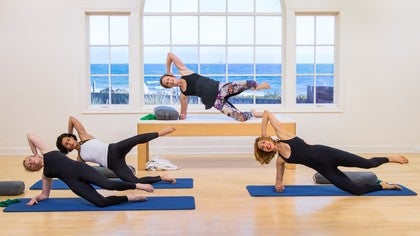
Replace your foot. And roll your spine into the mat. Very nice. Alright, let's do our side kicks. Leslie, if you could bring your head to this end, and everyone lie on your right side, facing forward.
Line yourself up with the back edge of the mat. Prop your head up on your arm. Now if you don't like the head on the hand, the bolster is a wonderful pillow. You could also use that. Lift your legs forward to the front edge of the mat, and we'll do some more lateral work.
So lift your leg to the height of your hip, and reach it nice and long. Just front and back. Kick forward one, two, and reach it back, two. Forward one, two, as the leg goes back, you get taller. Front one, two.
Reach it back, two. Press down with the right leg and lengthen the left. Two more, front, front. Grow tall through the top of the head. One more, and reach long to the back.
Return your leg to the center. Now take your left hand, and place it right on the top of your hip, and push your hand into your hip, so your hip gets longer away. Flex both foot, and then lift your right leg up as high as you can without rotating your hip. Just, sorry, your left leg, and push your hand into that hip, and then lower down. So it's almost like your hand and your hip are coming toward each other, and then they stop.
And lower. And again. Reach as you lift. And lower. Continue two more reaches.
You lift. And lower. Good, Gita, get lets of work in that right hip. Nice, little circles. Same thing in the hip.
Just circle around for three, and two, and one. Reverse other way three, and two, and one. Again, reverse forward for three, two, one. Reverse back three, and two, and one. Rest your leg down.
Nice, put your left hand back on the mat, and do your big circles, gran rond de jambe. So hip level. Bring your leg forward. Bring it to the ceiling. Reach it behind you as you grow taller.
Come through to the front. Ceiling, grow taller as it goes back. Go forward. Ceiling, all the way to the back, and reverse. Reach the leg back.
Ceiling. Bring it all the way front. Reach it back. Ceiling, all the way front. One more, back, ceiling, all the way front, and lower.
Very nice. Alright, from the big circles, let's go into a side plank variation. So come up onto your forearm. Bend your knees, and bring your knees forward in front of your hips. Okay, then your other arm can just be on your legs.
Lift your hips up, and press your hips forward, and then lower your hips, and sit down behind. Again. Lift your hips up. Press your hips forward. And then lower, and sit behind.
Do it again. Lift up and press. You're strengthening the lower, outer glute. And sit down. And the whole side of the right body.
And sit down one more time. And then left the hips and press the hips forward. Hold that. Put your left hand behind your head, and just lift your left leg. Off your right, and lower Lift your left leg, and lower.
Lift your left leg. Looks great you guys! Lift up. And lower, last one. Lift and lower, and then sit down. Very nice.
Alright, come up to seated and just swivel around, so your head goes to the other side, and we will start from the beginning of the side kicks on the opposite side. Legs come forward. Lift your leg up to the height of your hip for front and back. So kick front one, two. Reach back one, two.
Front one, two. Reach back, back, kick, kick. Really go for that reach back. It stretches through the front of the hip and extends the hip. Kick front, front.
Grow taller in the spine. Kick front, front. And reach it back. Three more. Pull that hip forward a little, Leslie.
There it is. Front, front. And reach back. One more, front, front. And reach.
Good, return to the center. Okay so place your hand again right at the top of your hip. Press into the hip to lengthen your leg as you lift your leg up as high as your femur is allowed in your hip socket. And lower down. You're just not allowed to rotate the leg.
Lift and lower. Flex through the top foot, so again, you're finding that stand into the ground and the feet. And lower. Good job. Three more, and lower.
Good, Gita, lift and lower. Last one. Little circles three times forward. One, and two, and three. Reverse, three, and two, and reverse again.
One, and two, and three. And again for three, and two, and one. Rest your leg. Put your right arm in front of your stomach. Lift your leg to hip level for the grand rond de jambe.
Big circles, forward, ceiling, and back. Forward, ceiling, and back. Forward, ceiling, and back. Reverse. The leg doesn't ever do this in swimming, biking, or jogging.
We hope. (laugh) But it should be able to! And rest your leg down. Alright, the side plank variation. So come up on your left forearm. Bend your knees. Your knees are forward.
And then lift your hips up, not only up, but forward. So you press your hips to create a straight line from knees to shoulder. And then sit back behind your knees. Lift your hips up. Press them into the straight line, and sit back behind your knees.
And lift your hips up and forward. Really squeeze under that left glute. And sit back behind the knees. Do two more. Lift up and forward.
And sit back. One more. Make sure this left shoulder is drawing down as you lift up. Hold. Put your right hand behind your head, and then lift and lower the right leg.
Up and down. Six times. Three. Four. Five.
And six. And then sit your hips behind. Very nice. Lie onto your backs, ladies. It's teaser time.
(laugh) Stretch your legs straight out in front of you. And your arms out in front of you. Okay, so, we're gonna do an advanced variation, but the arms will be down here rather than above your head. So I want you to take a big breath in, and on your exhale, sink the weight of your waist into the mat. So much that your head, arms, and legs start to get light.
And you just float up into your teaser, reaching your fingertips up towards your toes. Then go back down. Just trace the steps you came on the way up to lower, and your arms are by your side. Big inhale. Big exhale.
Waist goes down. Legs float up. Everything comes up. Nice, and then lower all the way into the mat. Very nice.
And again, two more times. Float it up. If you need to leave your hands down on the mat, you can. Just lift your legs up, and then lower yourself, everything into the mat at the same moment. Breathe in.
Exhale, fold in half. Make your way up to your teaser. And then lower everything down to the mat. Lift your arms up above your head, and take them all the way behind you. And then around to the side, so your palms come down onto the mat, and we're gonna go into the cancan.
So, your arms came up. They come around to the side and I want you to come up so you're either on your hands, or if that's too much on your shoulders, you can be on your forearms. Okay, and then bend your knees. Actually pull your toes in towards your bottom, and your toes touch the ground. Okay, so we're getting some rotation, we're getting the shoulder extension in this exercise.
Knees go to the right. Knees go to the left. The toes stay put. Knees go to the right. Stretch your legs.
Bend the legs. Knees go to the left. Knees go to the right. Knees go to the left. Stretch and bend.
Again. Knees to the right. Knees to the left. Knees to the right. Stretch and bend.
Lift out of the chest. Left, and the right, and the left. Stretch and bend. Again, to the right. To the left.
To the right. Stretch and bend to the left, to the right, to the left, stretch and bend. Very nice. Straighten your legs all the way out in front of you, and come all the way up to seated. Turn into a plank position and keep your head that way, so just flip over to plank for the leg pull down.
We'll do the leg pull down, the leg pull up, and kneeling sidekicks all in the series. So, from your plank position, lift through your abdominals. Lift your right leg up. Shift forward and back on your left foot two times. Then put your leg down.
Lift your left foot. Shift forward and back. So we're working the ankles. We're working the feet, put the foot down, as well as the shoulder girdle, as well as the core. Good, lift the other leg.
Everything a triathlete needs, a normal person needs. Lift the other leg and continue. And one more time. Lift your leg, shift forward and back twice. Then, pause in your plank.
Take your right hand over towards your left hand, and turn your fingertips around. Swivel yourself over to transition into your leg pull up position. Kick your right leg up. Lower it down. Hips lift.
Left leg lifts. And hips and leg. Good hips and leg. Try to reach your toes to the mat when you kick your leg up. One more each side.
Good, now tuck your right leg under you, and turn to the side for your kneeling side kicks. Your shoulder should be right over your wrist. Your hip should be right over your knee. Your left hand behind your head. Lift your top leg up to the height of your hip.
Very important to keep squeezing on the back of your hips to push your hips forward. And to pull your pubic bone to your belly button. First, just go down to the mat with your leg. Lift your leg up as high as you can without changing your pelvic orientation. Lower the leg and lift the leg.
Lower your leg, lift your leg. One more. Lower, lift, and hold it up. Circle. Five big circles.
Four. Can you go above your hip? Two. One, reverse. Five.
Four, press this hip forward. Three. Two. And one. Put your leg down on the ground.
Keep it straight. Come upright, then flatten your foot into the mat, so you have a straight leg. Flatten your foot, and side bend over that leg. Very nice. Come up to kneeling and switch sides.
So extend out the opposite leg and then come down onto the opposite arm. Top arm behind your head. Reposition your pelvis, and lift your leg up as high as you can without changing your pelvis. Lower your leg. Lift your leg up.
Shoulders draw out of your ears. Lower that leg. Yes, you always wanna be externally rotating. Your shoulder loves your ear. And then leave your leg up.
Circle five, four, three, two, one, reverse. Five. Four. Three. Reach the leg, two.
And one, put your foot down. Come up and side bend over that leg. So get a nice opening side stretch. Very nice. Come all the way up, and then sit down onto your left hip.
Legs go over to the side. So we'll do now the side bends. So now you're on your hand, not your forearm. Stretch your legs a little straighter, Sue. Flex through your feet.
You can stack your feet. Less challenging would be to separate the feet apart. From here, draw your left shoulder blade down on your back. Squeeze under your left hip, and lift your hips up as you take your arm up and over your head. You wanna make the biggest rainbow you can with your body.
Make an arc. Then, bend the knees slightly, and sit yourself back down on the ground without letting the shoulder come to your hear. Again, lift, keeping the shoulder engaged. You're working the whole side of you body as you come up. Bend the knees, and sit down with control.
One more time. Lift your hips all the way up. Reach the arm over your head. Bend the knees. Sit down with control.
Good, place your hands behind you. If you can, teaser your legs up and over to the other side. Right hand on the mat. Flex your feet. Knees are slightly bent.
Other palm faces the ceiling. Right shoulder blade comes down. Lift from under your hip. To come up and make a big rainbow with your body. And then bend the knees, and lower yourself to the ground.
Again, lift your hips. Come up. Reach over and out the door, and bend the knees and come down. Good, again, lift all the way up and over. Bring that hip forward, that's it.
And lower. And just do one more. Lift your hips up. Top hip comes forward, ever so slightly. Make sure they're stacked, and then sit all the way down on your mat.
Wonderful, turn to face forward, and do your seal. Come to the front of the mat. Now you should be lots more movey. (laugh) Moveable, mobile, in your joints. Reach between your legs. Get those shoulders between your legs.
Clap your feet one, two, three. Roll back, lift your hips. One, two, three. Roll up. One, two, three.
Roll back. One, two, three. Roll up. One, two, three. Back.
One, two, three. Up. One, two, three. Back. One, two, three.
Up. Good, now roll back, and then come to standing on this next one. Lovely. Some lunges. So stand right where you are at the front of your mat.
Place your hands on your hips. Take a generous step back with your right leg. So you're in a lunge, basically. Now bend the front knee as low as you can, and if you need to kind of scoot your foot forward, you want your ankle right underneath your knee. Then pull your pubic bone to your belly button, so your lower belly's engaged.
Trust is open. Straighten both legs. You're on your toes of the back foot. Both legs are parallel. Just bend the front knee.
And stretch the leg. And again, bend the front knee. As you stretch the leg, lift through the abdominals as well. Bend the front knee. And stretch the leg.
One more time, bend the front knee, and then stay there, and kneel down. Good, untuck the back toes. Put your left hand on your knee, your right arm up by your ear. Lift and side bend over. So we're really stretching into the front of the right hip, and the whole right side body.
Come out of it. Place your hands on your hips. Curl your back toes under again. Lift up the back knee, and then straighten the front leg. Bend both knees, and step your back leg to the front of the mat.
Other side. Generously step back with your left leg. Good, find a deep lunge. You can wiggle your feet to find that. Straighten the front leg.
Bring everything up nice and tall. These are your front splits on the reformer. Bend your front knee, and stretch your front leg. Or the Russian splits. Bend the front knee, and stretch the leg.
Good, two more. Bend deep and then straighten the leg. One more. Bend deep. Stay down.
Put your back knee on the mat. You can release your toes. Put your hand on your knee. The opposite arm by your ear, and lift as you side bend over. The more you push your hip forward, the more of a stretch through the whole front of that hip, your psoas.
And then come all the way center. Hands on your hips. Curl the back toes under. Lift the knee. Straighten the back leg, the front leg.
Bend both knees, and come to the front of the mat. Put your arms in a genie position, and sit all the way back down onto the mat. Lie on your backs, and you have a final delicious stretch. Go into an X position. Arms are out in a V, legs are out in a V.
Take your right hand, roll over onto your left side, and put your right hand on top of your left hand. Yep, so you literally want your hips to stack on top of each other, but you leave your left leg way behind you, and then...sorry your right leg way behind you. Reach your right arm up and away. And breathe. Get more stretch by stretching the arm and the leg away from each other.
Take a big inhale. On your exhale, pull the abdominals in. Come back to the X shape. Roll to the other side. So roll over onto the right side.
Stretch the left arm and the left leg away from each other. You'll feel a lovely stretch down this whole side of your body. Keep breathing. Keep stretching. One more breath in.
And exhale. Bring yourself back to the center and your X shape. Take a big inhale here. Exhale, hug everything in to a little tight ball, head to your knees. Rock forward and back, till you come right up to standing.
All the way up. (laughing) Arms to the ceiling. Inhale. And exhale. Wonderful. Good job, everybody! Nice work! (clapping) Thank you.
So try this before your next triathlon, and see what it gets ya. (laughter)
Intermediate Mat Workouts: +50-Minute Classes
Mention
 |
Carrie Macy Samper (Teacher) |
|
|
Janis W |
|
|
Terese S |
|
|
Charlotte F |
 |
Kylie P |
 |
Carla G |
|
|
Michele M |
|
|
Sharon C |
 |
Sonia V |
 |
Eleanor VonTrapp |
|
|
Veronica H |
|
|
Kathy K |
|
|
Kelly R |
 |
Chanda Hinman |
|
|
Lauren K |
|
|
Denee D |
|
|
Andrea F |
 |
Silke L |
|
|
Debra H |
 |
CADM |
 |
Joanna M Couture |
 |
Ines G |
|
|
Elayne Connery T |
 |
Connie M |
 |
Susanna H |
 |
Anne B |
Comments


You need to be a subscriber to post a comment.
Please Log In or Create an Account to start your free trial.
