Description
About This Video
Transcript
Read Full Transcript
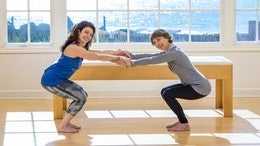
Hello, I'm Rebekah Rotstein, and we're going to do a Cadillac workout today with Meredith who I haven't had the pleasure of teaching in a couple of years, so I actually requested that she be here with me. We're gonna do a Cadillac workout that involves some spirals and uses some of the equipment or potential equipment that doesn't always get used as much, including the fuzzies. So let's get started. In the way that we usually begin. We're gonna start with a nice little release that I have found very helpful for my neck.
Before we begin, I should tell you a little bit about the way I've set this up. I have the crossbar above setup probably maybe about a foot to a foot and a half, a little closer to a foot and a half away from the end where I have the springs. I also have the fuzzies doubled over so they're a little bit shorter, and they are on one side of the bar. I also have this cross bar that's against the vertical frames just a little bit higher than her eye level. Alright, so those are the important things to know to begin with.
I also have two, on the balance body piece of equipment here, I have two arm springs, which are a little bit lighter, with handles that are set up, and we're also going to be using leg springs today, and we're gonna be using the light leg springs as well as the heavy leg springs. So Meredith, I'm gonna have stand up on the Cadillac. You're gonna duck underneath here. Now if you were my height, you could just walk straight under, but we don't want her to be decapitated. And place your hands into the fuzzies.
Open your arms out to the sides, and just get a sensation in your body, taking a deep breath in. Exhale, breathe into your back ribs just a little bit more. Now duck under. Yep. And step forward with one foot.
And lunge forward as much as you want so that you get a nice stretch on the chest with the whole peck and arm sling here. Breathing in and exhale, allow yourself to really hang into it, so it really becomes a sling. Good, and push yourself back just a little bit, because I don't want you to hit your head, and switch legs. It works a little bit better on my height. So forward, good.
What I would also recommend is that you can step forward. This back foot is really just extraneous. It doesn't really matter where it is. So it's not so much of a lunge for the hip. So in other words, come further forward with the back foot.
Yeah, it's really about just allowing yourself to hang in this nice sling of arm support. And what would happen here as well if you were to flip yourself forward rolling your arms inward. Exactly. And now round your back just a little bit and allow yourself to truly hang. There we go.
So did you notice how she just sunk into it. That's more what I want for her to release. And come back up again, and switch feet right there. So you'll bring one foot forward, good, and really hang into it. So we go back to that first side, because I felt like there was a little bit more holding than what's necessary.
And now do the arm rotation. Exactly, breathe in. And I love this because I also notice in my own body when I do this, there's a release, but there's a sudden suctioning in that automatically happens of support throughout that whole rotator cuff area. And you can remove your hands from the fuzzies and step forward. You can sit down.
(laughs) we're gonna start off with a little bit of rolling. So you're gonna grab each of these handles. And I would say maybe even come back a little bit further just so that you're not so far that your head falls of or hits the push through bar. Take a breath in, bend your knees to start. Even more.
Good. And now start rolling back just a little bit, good, so that we get a nice pelvic tilt and then returning forward, and back. And you're not gonna feel much assistance from the springs, because they're not sprung so highly. And now go a little bit lower, and it's gonna get you a lot more into the lower portion of your abdomen. Keep going, going, going, going there, and now start rolling up.
And stay in the small range, and pull from the elbows, rolling the hands back, pull here, and then roll forward, inhale. And exhale, continue rolling, and then returning up. And again, exhale. Inhale back up. And now keep the arms right there where they were and roll back again.
And we're gonna do a little pulse. We're gonna go backward and slightly up and backward, exhale up, and backward, exhale up. Meri is just so strong. When I do this with clients, they're already shaking by now, but I could just wait til dark. (laughs) Four.
(laughs) Three, and two. Okay, now she's shaking, good. And one. I have to work her so hard. And all the way back down, inhale.
Now spiral the hands so that the palms are faced up, and you pull downward. And then you spiral in, and that allows you to rise back up, so that pulls you up, and let's go all the way back down again. So rolling down. And once you get all the way down, you can return to the spiral and push back through your arms, feel the triceps, and spiral forward in order to return back up. And let's do one more, rolling back.
And spiral, palms face up. Now pause here. See if you can experience the distance from one shoulder to the other as a straight line. And envision that line, lengthening and widening. Nice.
And roll your palms back in. Maintain that length though, and rise all the way back up. Let's add in a different type of spiral now. We're gonna spiral with the right arm gong backward, and then we're gonna do the left arm, ad then the right arm is gonna shorten, or I should say roll in and back up. So we go left arm.
Now pause there, now do the right arm. And now turn with the left arm, look up, and up. So you look forward. You're gonna go left, left. To me, right.
Left and right. Let's try that again because I didn't really make much sense with that. We'll start with the right. We're gonna go right, and then left, and then right, and left. There you go.
So it becomes like a flow. It's a rotation, so you go right, and left, and right, and left, and right, good, left, and right. And if you want, you can add your head a little bit. Right, and left, and right, and left, once more, right, left, and right, left. Now as we start with the left, let's make it even more fluid.
So it goes back, and back, and forward, forward. Good, back, and back, and forward, and back. Nice, and forward. Last one. And forward.
Let's go into a little traditional Pilates, rowing. It's gonna be a little bit different from this experience in this angle, but you can straighten your legs out, start to roll backward, making the little fist, widening your arms here, trying not to trip on something that you have right by your side. Open the arms straight out by the sides. Push back with your hands in order to dive forward. I'm gonna come behind you and give you just a little bit of assistance to open the shoulders.
Inhale here, and exhale, start rolling backward, allowing your back to bend as you come up. I'm letting go. And you're gonna return to your starting position. And allow yourself to unleash or unlock the back. So I like to say sometimes as if you're unfastening the bra for women, so that it comes off.
There you go. And open your arms out to the sides. Push yourself forward as your hands come back. Inhale here. I'm gonna give you a little bit of lift through the arms and opening your arms out, and return the control up to the starting position again.
And back rowing, one, good. Open the arms out and pushing yourself forward with your hands go back. Inhale here. And exhale, opening the arms, and returning all the way up. Nice.
You can let go of those. I'm gonna let you attach a light leg spring on either side here. So sometimes I will have that setup from the very beginning, but depending on the height of the person, it can obstructed a bit because of the set up of holding them in the fuzzies. So you're gonna lie down prone with your head over here. We're gonna do something that I find doesn't get enough attention which is working through the front of the hip.
So Meri, bend your right knee, good. I'm gonna place this around the ankle. Okay. And lower yourself all the way down, and push your foot down. So, we're just gonna do some knee extension to start.
The cue that I often give is just to imprint your pubic bone to start, not necessarily squeezing your but. Just make sure that you're not arching your back, and allow the knee to bend, and straight and exhale. Inhale. Exhale push. Inhale.
Exhale push. So there's a couple things that I'm gonna be looking at in a moment. Inhale and exhale push. Now keeping this knee straight, slide your foot out to the side, and back in. So it's interesting.
I finally found a challenge point for Meri after all these years. As you push to to the side, try and keep that knee straight and try and keep this ankle almost in contact with the table. Good. And push. So we're instituting a gliding here at the hip.
Good, keep going forward. And I'm also looking to see what's happening in the rotators within the hip, and one last time. Observing that there's not any extra movement occurring through the rest of the trunk. Now we'll go into small circles. So the whole knee stays straight.
One. Good. And two, and three. So it brings an entire front body experience. Four, five, six, seven, and eight.
Reverse. Breathe in and continue, one. Two. So, very frequently, we think we have to focus just on the posterior lateral hip or the back part of the hip, because the front is tight, but that's not necessarily the case. I lost count, so I'm hoping that you're counting.
Seven and eight. Great. Now take your right hand and reach it out in front of you. Spiral through the wrist and reach, and allow yourself to lose your alignment. So allow your self to lengthen, lengthen.
Allow your head to spiral with it. Breathe, stretch, stretch, stretch, and relax. Bend your knee. We're gonna take your foot out, and we're gonna place the other foot in. That's okay, and we got the ankle in, I should say.
And starting off with the knee extensions, bending the knee, and straightening. And bending, and straightening, and bending, and straightening, and bending, and straightening. Now, straight leg, all the way up. So you can keep the knee straight and you're gonna go up and down. There you go, good.
So we now, we went from knee extension, now into hip extension. And up and down. Is it easier for you on this side? Mm-hmm. Yeah.
I don't know if everybody can notice there's more smoothness in the quality of her movement on the side, and up, and down. As you're doing this yourselves, observe the difference side to side. Perhaps on one side, you might feel a little bit more tension in your back. See if you can emphasize and envision the movement of your thighbone in the socket here. And did you keep count?
Great. Circles. So Meri is not only serving as my body, but as my counter. (mumbles) She says she's very good at counting when she doesn't have to do it, when she doesn't have to talk. And three, and four, five.
The things that I'm look for is making sure that the butt comes a little butt cheek approximates or comes a little bit closer toward the tail bone when she's doing the lift. And that totally, or that informs me of the activation. And once you've done your eight, you can reverse your circles. This is your reverse? I'm a terrible counter.
(laughs) And I think there's three more. And two. My goal, this is now my seventh year at Pilates Anytime, and my goal is that by year 10 I'll know how to count to 10. (mumbles) Meri doesn't either. Relax.
Now we go into your slide. Yeah. So let's see what's happening. She's gonna slide out and in. There we go.
I'm just giving her a little bit of assistance because I notice there's some rotation to her pelvis and trunk as she's doing it. And back in, and out, and in. And I'm gonna give her a little cue of a slight little bit of lift underneath her left lower oblique area. And you let me know when you've done your set. Great.
And now we get to go into the joyest spiral. So you reach your left arm, the same arm that has the foot and the spring in front of you. You spiral it and you reach and you elongate, and you inhale, and allow your head to tilt toward me or to rate toward me, breathing in once more. And exhale and relax. Bend the knee.
Staying right where you are, place your hands on the push through bar that in unsprung in front of you. Place your thumbs on top, yep, just pressing down into your hands. I'm gonna use a cue that my colleague and friend, Jen Zumann, used, who you can find in Pilates Anytime as well, that I loved, which is to roll the ears backward as you start to lift the head. Yes. It prevents you from flattening through the cervical spine.
And you don't even have to come up that high. Yes, and lower yourself back down. And again, you start to float. Yep. You spiral and roll backward, and come back down.
And once more. So we're adding in all of these components that are actually going to help us with a squat eventually. And all the way back down. Now reach out through one foot and lift it on your own. So it's the same thing that we did with the foot in the spring, but now it's slightly different in large part because we're not having the resistance from the spring.
We're having to use the posterior hip more, and back down. And try the other side, inhale. Inflate your back ribs as we do this and back down. And again, inhale, and back down, and once more, and back down. Now palms face one another here, breathing in.
And push down into your hands and start to rise back up for your swan. And lower yourself back down and lift both feet. So it's almost like a little swan dive. And on the feet lower and the chest rises. So as if I were pulling her from a spring or I should say a string here, and lowering down to the chest, and lifting through the feet, and rising.
But it's a lot more shoulder extension than you'd normally experienced, and back down, and last time, up, and back down. I'm just gonna give her a little bit of length. You can lower your hands down and rest them. Yeah, you can take them off that, good. Breathe in and exhale.
Sit back on your... Actually, sit backwards so you're gonna straddle this. So sit all the way back. That was pretty impressive. That was great.
Come even further back, even a little bit further back. I think probably would've had this, the cross bar, a little bit further forward if I'd been able to do it, just so you know. Bring your arms all the way out to the sides, breathe in, and you're gonna exhale and push down. Good, and bring it back up, and push down. And back up, and exhale down.
So we get a nice connection into the whole trunk throughout the arms being cautious not to flare the ribs forward. And last time, stay. Now extend your knees so that your feet flex up. Yep, and then the feet lower, and then the hands rise. And the hands push down, and the feet rise.
Good. So there's your little coordination, down. So, since I'm here in December, it's almost like a little nutcracker. (laughs) (scat singing) And back up, and one last time. And up.
Now small circles with your arms. And if you don't feel that much effort, you can actually slide yourself a little bit more forward if you wanna get a little more tension throughout the springs. Yes, and try circles there. And if it feels too light, another option that you could do is even hold your hands or grip your hands up toward the D rings a little bit higher if you wanted. You're good.
Alright, great. And four, and three. Let's speed it up. And two, and one. Reverse, and eight, seven, good, six, five, four, three, two, one.
Now we're gonna add in for what would be like a seated saw. So, open your feet or lift your feet up. Rotate toward... (laughs) Cramp. Rotate toward me, and keep rotating even further so that you can saw off the leg and look behind you.
And I'm gonna give her a little bit more assistance for the rotation there. Good. And return back to the starting position. And inhale, spiral. And push.
And return. Inhale, spiral, and push. So there's a little bit of challenge on the rotation to the right side there. Yeah, and returning back up, and rotate. Grow even taller.
And push. I like to think of the spiral as if you are unwinding or taking off the bottle cap. So, grow even taller, or removing the cork from a wine bottle, which seems to resonate with her much more. She's like, "Oh, wine, I get what you want now." (laughs) And back up, and return, and relax. We're gonna add in what will be like horseback.
So, straighten knees again. You're gonna flex and push down as if you're gonna levitate and hover, and come back up. And again, as you do this, see if you could push your hands forward a little bit more. Yes. And back up.
And I'm gonna create a bit more flexion through your trunk. There we go. Can you feel that difference. So you really do unfasten the bra back here. You open through the back body and return back up, and now on your own.
Yes, yes, yes, yes. So as if there's a hanger that I'm pulling you up from back here. And again, lifting you up. Good. And back, and let's do one more.
And relax. If you like, we can remove. Yeah, you're gonna remove these springs, just get them out of the way. Or what we could even do, Meri, yeah, let's move them out of the way. Great, I'll take them, and I like you to sit on your left hip now, facing the beautiful view of the green screen window.
(laughs) You're gonna grab the spring that is farthest from you, so, in other words, the one slightly behind you. You'll place the right foot, the ball of the foot, against the vertical pole. That's gonna be your support base, your anchor form which to move. The right elbow is by the side, and you can actually lower yourself onto your forearm if you want, or you can keep your hand here, whichever feels better. And you're gonna push with your spiral.
So be careful. You're not punching. It's not, I think what they call the jab. You're going to spiral and push, rotating through your knuckle. Good.
And allow yourself to get the maximum length here. Good, and then you retract your elbow back in. And again, push and punch. And as you do this, you're gonna squeeze that butt cheek. And that's going to take some of the load off your back.
Yes, straighten that knee as much as you can. That's the key. And come back in and do two more. Push. And back in, and last one.
Push and punch. Hold it, hold it, hold it. Reach for me even a little bit further, there you go. And return back in. Let's try the other side.
One thing that I notice that you might wanna try on the second side is make sure, see if you cannot be quite so flexed at the ankle that you're almost on a slight high heel. It's almost a little bit of plantar flexion, or releve if you fill. So we start here, the elbows by the side, and this really literally translates to a standing position if you were to punch right up. And go for it, push, rotate, and punch. And return, and push, rotate, and punch.
And return, and push, rotate, and punch. Go for it, go for it, go for it. So when I watched this on somebody, I notice if they're deviating off the spiral. So are they maintaining that direct linear spiral, or are they going side to side? And push.
So for you, I'd like to see a little bit more pressure, there we go, on toward your left ribs. Good, and come back in, and let's do two more, and push. Find the spiral. Push, push, push, reach for me even more. Good.
And return, and once more. Push, push me. More, more, more, more, more, more, and relax. Good. Lower your hand down.
We're going to add in now some work with standing holding onto the fuzzies. So rise up. So a lot of this is spiral, but we're also building up to some climactic squats. Stand a little bit closer in to begin, and even a little bit closer perhaps. Now depending on your height, we'll determine how far back you actually should be.
Bend your elbows in by your sides. You're gonna lower your self back very slowly spiraling, so you're just basically hanging back into a plank. Now spiral, pull yourself back up. And again. So we're doing exact opposition motion that we did previously.
Before, the resistance was from behind as we pushed. Now we're doing a pulling action. Good, two more. And pull, and last one, and pull. This time lower yourself back.
Now send your hips behind you, and start to hang. So now we'll have a new shape. Good. Let the knees bend that your tail tucks under. And don't even hold it so much, just hang.
Let your pelvic floor relax. Now push yourself back. And I'm gonna let you roll up so you can articulate all the way back up and pull yourself. So we're gonna sequence and thread that together. You're gonna lower yourself down.
Now send your butt and hang. Good. Let your butt hang back even more. There we go. And now fold inward.
Push yourself back and roll through the spine. Rise and pull yourself up in one piece. Nice, and again. We'll do that two more times. Lower yourself, find the spiral, lower yourself all the way down.
Let your butt hang, let your sit bones widen and release. Let your knees bend and push yourself back, and rising all the way up. Pull yourself in one last time, and lowering back, finding the weight of your tail, and lowering yourself back in, and pushing yourself back, rising up, and spiral your hands into rise. We're gonna go into a pistol squat this time, but it's a nice way to prepare for it because it's really tough on the quads for a lot of people, but it's a nice way to build up to it. So lower yourself back again.
And I'm gonna slide one foot out and try not to flex so much. At this point, yeah, let your butt hang back. Good. Because we wanna stay in that position as much as we can, as this right foot will slide out in front of you and you're gonna lower yourself into a pistol squat here. Good.
And then push yourself back. Good. And rise all the way up, and lower yourself again. And the other foot will slide out. And reach down, flex the foot.
And see if you can find the flow now. So you come up and you go back, slide the foot, and return, and rise. And back, and lower, and return, and rise. See if you can find no pause at all. And down, and swing, and up, and back, and swing.
Good, swing, and up. Last time. Back, swing. I guess I have to do one more to even you out. I told you can't count, and down and return and rise.
Let's have you turn around and face the other directions that your hands are gonna be behind you. And you're gonna grab onto the fuzzies, but you're gonna roll forward. The flexion that you're wanting to do before you're gonna allow yourself to do is you hang. It's almost like a preparation. Not really preparation, but it's like the same motion of rolling like a ball.
So, if you could come back even a little bit further, so that you could really hang here from your arms. That's it. Now imagine that you were bend... Actually, you probably can bend your knees a little bit, and send your butt up. Yeah, there you go.
Lift one foot slightly. As if you were gonna pull yourself up. Bend the knee, yeah, so that it doesn't hike up the hip. If you were to bend this knee here. Oh I see. Yeah.
There you go, good. So you're really feeling the abdominals. And then try the other side. And now bend both knees ever so slightly. Basically, it'll shift your weight forward and lift your heels.
Good. And now lift one knee. Good, that's it. So I don't know if you could all see. There's a whole congealing of everything, and then switch other side.
Good. And if you can do it once more in each side, that'll be great. Everything contracts, but supports you. Good. And come up out of it.
Rising all the way up. Watching your head so you don't decapitate. Step forward, step forward, step forward. You're about to lose your head, and relax. (laughs) Nice.
As long as you're up here, let's add in some leg springs. In fact, you can just add one. You can place it into the center. And I will give you a foot strap as well to attach to that. Alright, we're gonna do a little spiral action for the hip, a little PNF pattern, but in a standing position.
Let's have you place your right foot into... Yeah. Actually, no, why don't you start turning facing the other direction? And now step a little bit closer with your left foot over here. Yes, and place your right foot into this strap.
And let it rise. Yeah, just hang. Yep, let the knee bend. There we go. So, in a natural turned out position here.
It's almost like a dance attitude front, right? So from this position, start to straighten the knee. And you're gonna push your foot back, rotating here at the hip. So she's going from a turned out position to an internally rotated. So it goes external bent, straight internal out to the side.
And so, she let's the knee bend. So she's turned out, so it's external rotation. Adduction because she's crossing her midline. Good, and flexion at the hip. And then she goes the opposite direction.
She goes out, back, and internal rotation. And return up, so there's slackening on the spring, and there's tightening on the spring. End even there's tightening on the spring, I want you to bring, yes, your pelvis back just a little bit, and continue. Two more, up, and then reaching back. Reaching back, reaching back, good.
And up. And I just love the Amtrak train, and back. Once more, up. And reaching back. So we always end it with the slackening or shortening of the spring.
Great. Let's switch feet for a moment, try the other side. And you'll probably wanna step a little bit closer to the edge. Good. So it's the exact same thing, but on the other side.
So you're gonna internally rotate, straighten, and push back. We're gonna bring out to the side just a little bit, and slowly return it back in and up, and out and in. Now bring your left ribs back just a little bit. There we go. So there will be a little bit of reverberation or continuation of the spiral through their whole body, but we wanna minimize how much occurs there throughout the trunk.
And again, take a deep breath in. Nice. So she got the breath into her left side and back up. And again, push. And back up.
Is that four? I think so. Okay. Yeah, do one more. Pause, find your lift there.
Not from your upper back. Great, yes, right through there. And return back in and up. So let's switch feet, but you're gonna turn around to face the other direction. So that was in your left foot.
Now we're gonna put in your right foot again. And come a little bit closer to the edge once more. This time we're doing a back attitude, and then we're gonna straight it out reaching from the heel forward and up. There. And bending it back and externally or internally rotating as you come forward, forward, forward.
There. And returning it back. And returning it forward. So she keeps leaving from the heel each time. And back.
Good. And returning, and forward, pause. Pull your right hip back just a little bit. Yes. Now hold it here..
One, two, three, four, five, and slowly return to the starting position. We'll try it on the other side. Be careful that the knee doesn't bend too soon so that the whole movement sequences together. Because if the knee bends too quickly, you're going from a position, let's see, from here and up. It would be you bend the knee too soon, and then you lose that spiral.
So we get the full spiral and then the knee bends at the end. Now internally rotate, internally rotate, there you go, leading from the heel. Yes. So you just unspiral yourself. That was great.
And returning back. So that's another example of the knee. You're gonna delay the knee bending on the return. So keep the knee straight, and now it bends. So you wait a split second and forward.
So here's your spiral, here's your spiral. Drop that hip. Yes, now push it. Push, push, push, good. And returning and back.
I'll have you unlock this knee ever so slightly, and again. Good. Now last one, you're gonna hold it here. Internally rotate. Push me from your heel.
Push, push, push. Toes inward. Yes, good. And we start to come back. Beautiful.
That was it, that was it. And then the knee bends here. Nice. You can remove that strap, and you can take the entire spring off. She's stuck.
So now we'll apply all of this to some Pilates squats. So please grab the arm springs, and step back so that you have just enough tension. You might have to adjust it. We'll find out. So begin with our spiral theme.
We're gonna reach your palms inward and start to sit back. And as you do this exactly, that's really nice. She's going very low, which is great. The elbows are at a 90-degree angle, and rise back up. And keep them here, and down.
So we'll come back to the spiral in a moment. Let's just set up the initial sequence, and up, and once more. Back and up. This time as you come up, spiral your hands inward to reach your one foot back. So it's most like a warrior three position, sort of a yoga position.
She's doing a terrific job of keeping the hips level, and then return to your starting position. And you can lift your arms up and sit back once more. And we'll try it on the other side, and rising back up, and spiral, and find your sequence so that you reach through your hands while you reach your foot back. Reach your foot a tiny bit higher, excellent, and come back up. Let's do that once more.
Same sequence, and reaching back, and coming up, and reach back with one foot. And this time as you come up, see if you can bring the foot forward. You may only just lift the knee, or you mainly bend the knee slightly for your pistol squat as you bend the elbows in. For some people, you may wanna go all the way down. And then we're gonna once more into the warrior three part, pushing down, and then coming back up into that little pistol, or big pistol.
And let's try the other side. So switch legs. Breathing in, let's do the sequence again. So we're gonna go into your squat. Yep, and come back up.
The other foot will go behind you now as you push down through your hands. And let's see what would happen if you were to push through your heel. Yeah, good. And returning forward, as you come in, let's try for the pistol squat, and maybe just flex a tiny bit, good. And then go back into the warrior three, pushing down.
Great. Breathing into that back body, pressurizing down into the feet and coming back up, and one more tiny little pistol or full pistol squat, and then return down to the starting position. Now push back with your hands. And push, one, two, three, four, five, six, seven, eight, nine, 10. Pause.
Slowly lift your hands up, up, up, up, and relax. Let's end with a nice squat, but also a stretch for the quad. So let's do a bigger squat just before we get up here. Hold on to either one of the vertical pulls and a big wide squat, see what is comfortable for you as you shift. Not quite so turned out.
Yes, good. Now send your weight back into me. Good. That's it. Now bend your knees.
And I'm gonna give a little bit of pressure through the outer knees as you try and pull yourself closer in toward the Cadillac. So Meri is pretty smaller. I have had clients do this and pull the whole Cadillac with them. So just keep that in mind. You might wanna sit on the Cadillac to prevent it from moving, and help yourself rise.
Great. Let's end with a nice stretch for your quad. So, come kneel on here, on your hands and knees. And you'll walk yourself. You'll be off center because we're gonna use the right hip first.
You're gonna walk yourself far back. So that this knee is pretty close. That's gonna be pretty extreme, unless you're able to do that. A couple inches away from the vertical pull. And now tuck the toes.
Now start to come up and use these fuzzies to help yourself as something to hold onto. And then hold on with the other one. You know what, I didn't set you up correctly. Come back down. My fault.
Yeah, your left foot has to be forward. (laughs) And then you're gonna hold on to each fuzzy, and then hold on to the other fuzzy. It's not a hip flexor stretch. So I don't want you to lunge forward. I want you to actually push yourself away from this front foot.
Yeah, do you feel that deep, deep, deep within the quad. This is the only way, actually, that I can stretch my quad. Because if I try and do this type of action where you pull your heel in, I get a torque in my knee. But by grounding my knee and patella there, I prevent any excess torsion. Now pull back a little bit more and drop this hip.
Rotate your pelvis toward me slightly if that's okay. And that's gonna intensify it, and just relax your arms a little bit more. Breathe in. Exhale, send your back ribs backwards so that we can really maximize the relationship of the fascia that's going down through the thigh all the way up through the diaphragm and viscera around here. And then we'll try the other side.
If you can get out. (laughs) And we try the other side, good. So the key is you wanna be down first, because if you try and be kneeling and put your foot up there, the shortening of the hamstring is such an extreme-- (speaking off microphone) Yeah, you can use the bars if you want. Okay. But the point is if you're not...
Excuse me, let me rephrase that. In order to not cramp up through the hamstring, you're gonna wanna start with your hands here. Because otherwise if you're upright and you try to put your foot in that position, the hamstring will often charlie horse. And probably the reason I never thought about using the bars is that I can't reach them. So this is another option that if you don't wanna hold on to the fuzzies, and you are vertically gifted like Meredith is, you can hold on to these bars.
But that still means you have to drop the hip of the supporting leg and allow the ribs to sink back. And you have a couple options too. If you wanna drop your head, you might feel the stretch even more. And then, especially if it's almost like a diving forward and over, I find that, that can really intensify the stretch through my side for me. And come back up.
Good. And you can step off, if you can get off again. Great. Thank you, Meri. So that was our spiraling Cadillac class.
I hope it's giving you a couple new ideas that you can implement some of these into other exercises or just do it as a little workout onto itself. Thank you so much.
The Teacher's Corner: Focus on Fascia


Comments


You need to be a subscriber to post a comment.
Please Log In or Create an Account to start your free trial.
