Description
About This Video
Transcript
Read Full Transcript
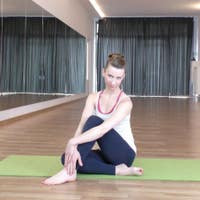
Good afternoon everybody. [inaudible] Gabrielle here with Palladio's any time today's Matt class has got real real people in it, which is kind of the challenge if you are as a teacher, how do you deal with different body types who have two teachers here and three people that are have had a few math classes but they're not necessarily experts in it and one of the things that I have found is that their people are challenged with a lot of body problems. Maybe they have a hip hire or the legs are restricted and sometimes it's hard to apply the technique when the body's already restricted or older or injured and some release work is massively beneficial. NBA being able to apply the technique. So my goal today is to demonstrate for all of you and have you hopefully get tools from this tricks to help your clients deliver an all levels class that anybody can benefit from. We will be working with two balls of balls.
Everyone here is using his tuneup yoga tune up balls but you can use tennis balls. They are very easy to find. And at one point we'll be putting them in a little Baggie to hold them together. But you can use the sock seriously. This is not rocket science. You don't need anything specific. Just fine. Some balls, not lacrosse balls, they're too harsh. Something with a little bit more give, but anything will do because it's going to start releasing the tissue. We're all seeing. We're also working with magic circle, so we will be doing some release work first, then hip, hips and mat work.
Then some release work at the end in May. Your hips never be the same again. So let's just start out. Let's everybody take your little balls lying down on your backs. You want to place him right here towards the top of the pelvis, a little bit above the sacred. So if you're lying down, you lift your hips up and you place the balls there.
I move my hands up so you can see. And this just very gently rock your tail down towards the Mat and then up a little bit and maybe the ball is going to move a little tiny bit. But you're just softening up an area that can get really, really tight and then slightly start moving your hips right and left. So you're putting pressure into the bony structure and loosening it up a little bit. Just kind of stimulating the bone in actuality. Now reach down, grab the balls, lift your bottom up and move the balls down.
So it's starting to be at the top of the glutes, maybe this far part. And again, start moving your bottom from side to side and noticing if there's anywhere that you're a little bit of tension or little knots or tight, painful spot. The balls do tend to want to go wide, so you can bring your hands back and bring them back together. Now move further down. Now you're more or less in the middle of the glute and start again. So notice now when you're going from side to side, the ball is actually tracing from the hip bone all the way to the sacrum. So you're having this sliding, rocking sensation from side to side, loosening up the, all those muscles, they get very tight and they start to grip on the hips. Then lift your hips up, put the balls down, even lower, more towards the bottom of the glute, just above the, the sit bone. So you're going from side to side. And again, clients can get very achy tight areas.
I'm just having a look at everybody here. And now take your balls and bring them together right at that bottom area towards the bottom of the sacrum and lift one knee up and then the other knee up. And then maybe adjust the ball. You do want to be anchored into your bony structure and bring the knees inwards so you're cradling your lower back, your lower back should be dropping down. At this point are you pulling your stomach up and just take your right leg down towards the mat and then bring it back up again. And then take your left leg down towards the mat and bring it back up. And this time bring you right, like down towards the Mat.
Take your left knee with both hands and gently pull it inwards towards you and slowly stretch the leg out on the floor. So we're starting to get into the hip flexor. You'll have different levels of people with the knee. More bend, less bend. You can grab this hip bone and lengthen out the front of this site. This area can get super, super tight for people and you can as a teacher, really help lengthen out this area. Some very, very good.
Bend the knee back in. Pull the knees in, switch your hand, hold and bring the other knee down to the mat. Start with the knee bent. Crim knee to the map. First foot to the mat I should say. And now slowly start sliding that leg out. And notice if the Nida to bent into your chest is moving away. You don't want it to move away.
You'd rather expose where you're tight. Because this whole purpose here is to start to relieve tissue that can be quite restricted. Most of us get super, super tight in the front of our size and that can be a factor for us. Very, very good. Ben, the knees back in. Take those little balls out and put them to the side and that will start strengthening the hips. So put your, take your magic circle. Place the magic circle between your knees and put your feet back quite close to your bottom on the floor. Check that your feet are going straight forward.
Dansky bring the toes in so the toes are going straight ahead. Pull your stomach muscles in and up and squeeze the magic circle and then release it. So start squeezing the circle. And as you do it, I want you to notice that your adductors are starting to work. You're searching for the sensation of the inner thighs working. The stomach is pulling up and also check your pelvis. You don't want the pelvis to rock up and down.
You want that pelvis super stable. So you're really isolating those inner thigh muscles and every time you're releasing it, now add the outer sides to this. I'm just building in layering the intensity of the contractions and now start adding the sit bone. So now we're connecting in all of this area in there. So the bottom of the glutes getting into the hamstrings are starting to be involved with the whole work. Check that your neck is nice and long, your arms along from here. Squeeze. Keep all of that and lift your hips up so you have a long length.
Roll the spine back down. Release your knees, squeeze again. All those muscles you just isolate and now you add the whole trunk to the movement. Roll your hips back down, release your knees, squeeze again. See if you can get that squeeze to come all the way from the glutes and then come up. Roll all the way down. Really see your knees squeeze again. Release your hips up. Soften the sternum to roll back down.
Release your knees two more times like that. Squeeze hips, go up, roll back down. Release your knees and this time you'll stay up there and squeeze and lift up. Stay there. Lengthen the front of the hip flexor. Start squeezing and opening. Keep doing that movement every time you open those knees, try and go all the way out. Pretty challenging. That's it. Just keep working that movement to get those hips to start to really wake up and then roll everything down to the mat.
Take your magic circle, bring your feet into that part and stretch up. Make sure the band of the circle is on the balls of the foot, balls of the foot. Press your heels to the ceiling. Check that your tailbone is down into the mat. You're not looking to curl up. You're pressing your hips down. Everybody bend your knees a little bit. Pull the uh, the deepen the toes towards your knees here.
Maximum flats. Push your bottom into the mat and stretch out to get even more length into the hamstrings. Check that your stomach is law and the hips are grounded into the pelvis. And now take the magic circle, put it on the outside of the knees, feet flat on the Mat. And again, press those knees out. Release. Press the knees out. Release. Press the knees out.
Release. Keep doing this movement. Notice that your pelvis is widening. You don't want the pelvis rocking up and down. You want it flat. The bony structure is flat, the collarbones are wide, the neck is long, and you're starting to wake up this outer band of the thigh. Now we add the bridging to this. Press out. Lift your hips up, roll your hips down, release the knees. Relax them in a little tiny bit. Press them out, roll your hips up, roll your hips down, relax, press, roll the hips up, roll the hips down, relax. Last one, press. Roll your hips up and stay there.
Now Stop pulsing out to your pressing out. Really isolating the outer size. At the same time you want to be typing the glutes. So there's this dichotomy of widening and tightening in it. Can you get into the sake room and lift the hips even higher and lengthen out the front of the groins?
Imagine a hand under your sacrum pushing your bottom up even higher to create this massive length all the way up and roll everything down, down, down, down, down. Very good. Again, take your magic circle, get it around the balls of the feet and stretch the legs up. Pressing your heels up, pressing your sacrum down and your tail down so you lengthen out the backs of the legs. Bend the knees a little bit. Push your heels up even more and tail goes down. As the heels go up. Stretches best you can do, not compromise the ankles for the sake of the knees. So take the magic circle app, bring your feet down and grab your ball.
Now can you bring yourself up to a sitting position still with a figure four stretch? Take your little ball and place it under the right glute. Welcome to right. Gluteny not left glute other side. So just one ball. Yes, they're grimacing. They found the magic spot and now just started working back and forth.
This can be pretty intense and you can feel exactly where your socket is. So you want to be working just on, preferably on top of the socket to be honest. And he plays that hurts. It's good for you because that's where you're tightening up and you've got no hydration and it's blocking the bone. So nice movement across.
Find a super painful spot everybody did and sink into it. Sink, sink, sink, sink. Think lift up out of it. Fun moving micro inch and sink, sink, sink six, six. This is really, really intense and massively, massively good for your hips. Lift up again and move a little bit further and sink down a little bit more and then roll back more to the middle of the glute. Take this right leg out and just move it back and forth.
Putting pressure into the glute. Very good. Take the ball out, lie down on your back. Bring your left foot up. Bring your right knee in, whole the back of the right knee and just stretch the leg into. You're stretching out that left hip. You can lift your head up if you want.
You can keep it down. Give that a good stretch. Put the foot down again. Can you come up? You can move the leg out to get yourself up. Take your ball, put it under your left glute, bend the knee if you can, but it's fine to have it more straight to Dansky if you can, you bend the right, the leg on the floor, the long leg. Yep. There we go. And now you probably want to lift up a little bit onto your hands and you start rolling out into this area. If you find a super, super painful spot, I'm very surprised if anybody doesn't find their spot.
Lift up a little bit from the spot and now sink into it. Just sink and you can control the amount you're going down because you're holding your body with your hands. Lift up again, move a microwave engine some direction and sit down again. And notice that may be, maybe you're releasing a bit. One more time. Lift up and let yourself sink. Now take leg out and just move it out in in a little bit.
Looking to sink as much as you can into that ball. Very good. Now come off, lie back down on your back. Bend your right foot back up to first leg again. Here you are on your figure four stretch. You're no longer using the ball. You can have your hands out to the side, maybe in a position like this, everybody just take that left knee and drop it all the way to the floor.
You drop right down to the floor and now take your right hip and start moving it towards the floor. Very, very deep, intense stretch. Take your right knee starts, stretching it away from you towards the middle of the room. So this can be really, really intense. So movement number one, is the pelvis rolling towards the floor as much as it's ready to do movement number two is the knee. Now Danny is super, super loose so she can get into it. A lot of people can have the knee really, really high. You're going in the wrong direction. Dance, ski, you want to go this way? Cool.
Dorcas as well. Other direction? No, no, no. Same Lake. Same leg. So this leg goes down, so now you take the pelvis and press it down. Then the knee. So a lot of people get confused about the direction. It's really, really common. Come back up, Dorcas, you look all weird. So do not swivel. Jess.
You've got you drop. Then the hip goes down and then they nigos and to very important pay attention. You're dropping in the direction of the foot that's on the floor, not the knee that's in the air. This is very common. Huge amount of Titus can kind of show it ugly face, but it's amazing how much this can release everybody that's on the floor. Please put your hands on your hips and just make a marker for yourself of where you feel the tightness because we're going to revisit that in a minute.
Back on your backs. Get your feet back on the floor and bring the other leg up. So whichever leg was down, I think you're doing different things now. Now have a think very important rocket science intelligence here. The foot that's on the floor, you drop in the direction of that knee and I think Dorcas, you opposite of me so you can flip. No, you have to go in the direction of the knee that's pointing in the air.
So first one would get that knee and foot down down, down, down. Now take the hip pelvis and start pulling it towards the floor. So the first movement is the power service, and you may feel that you're actually sliding around with the hip sockets a little bit. Really, really, really good thing to do. Hips get jam. Take the knee that's poking up in the air and see if you can send it towards the middle of the room. This is a bit twisty. It's rather confusing for people the first time because we don't usually do this kind of stretch. We usually roll in the opposite direction.
Notice where you are tight. For some people it's completely locked up, and if you're working with clients, they may be like this at first because there's so much jam tightness in there, so you just gently help them introduce their body to this movement. Very good. Roll back on your backs. Bend both knees into your chest. Give yourself a hug. That was amazing
Now you're going to put the balls right into that area of tightness and we'll be rolling a little tiny bit back and forth and then down. So here you are, you're on the balls.
So now pull yourself a little bit forward
See if you can come up on your elbows and lengthened up a little bit more. Now you may find that something's releasing in the front part of your body. And again, go side to side. Now you may be gliding more on the full side tissue.
We drive a lot. We in front of a computer a lot in those areas. Get chronically in tight and we need to release all of that. Bend one knee, pull your foot into your bottom.
Press both hip bones towards the mat.
Five, 10 minutes before you do proper plots. It massively raises the bar for your clients. And as we're going to do Matt, with our focus on the hips, this opens them up to the muscles can fire and get tight and strong much more quickly than if they're dead in with a lot of adhesions. So let's have you all come up to sitting. Put your balls to the side, take your magic circle and place a between your knees.
Come to a sitting position. Now we're going to do some of the map work. So sitting up nice and tall. Get the magic circle between your knees. Squeeze those knees together and stretch your arms out in front of you. When we'll roll back to the mat. Tilt, squeeze those knees and start rolling down towards the Mat. Articulating your spine. As you roll down, get the arms to the ceiling. Keep the magic circle being squeezed.
Now deepen into your stomach and roll up. Really squeeze that circle. Pull the stomach in. Sit Up nice and tall and rolled down against. Squeeze the circle first and then roll through the spine. Try and get that articulation with the stomach pulling up nicely. The arms, come to the ceiling and then lift your head and roll up deep and into the stomach and roll back up. And one more time rolling down. Just like this, rolling down, rounding through the spine, scooping the stomach, lifting it up.
And this time stretch your arms back, but keep your back long on the mat. Bring the arms up again. Lift your head forward, scoop your stomach, roll yourself up. Sit Up nice and tall. Take your magic circle. Place it between your heels, flex your feet so you'll have this nice flection and just from it, your hands can be behind you and squeeze the circle and release. Now really easy to squeeze from your feet with the intention being from your feet. I'd like you to see if you can get it coming from your bottom so you actually narrow the hips and the feet are a reaction for this work.
We're really getting all of the uh, powerhouse parts connecting up. Now your arms are long. Squeeze, roll down on the Mat. Keep those hips very involved with the movement. Lengthen your arms back, bring the arms up, lift your head, peel off the mat, and now pull the stomach back as you extend forward. So the stomach is lifting away from the spine. Roll back again.
Armpits are pulling down. Your hips are working really hard. Lengthen. Bring the arms up, lift your head and lengthen forward. Now take the magic circle, put it to the side of you. Bring your feet together and now very slightly external rotation. Say Muscles you were just working on. Lengthen forward. Now how far forward can you go? Lift your stomach away from them, the legs and drop your head down and then rolled back to the mat.
Squeeze your heels together. Roll down, roll down, roll down, roll down. Stretch your arms long. Lift your arms up, squeeze those hips and come forward and stretch towards the toes. And one last time. Armpits to the, to the waist. Roll down. Roll down. Roll down, arms long. Lift your head up, peel off the mat and stretch all the way forward. Nice work. Bend your knees, roll back down to the mat.
Place the magic circle between your knees and place your hands behind your head so your feet will be hip with the part. Squeeze the magic circle and make the work come from your pelvis. So your glutes and your outer size and your inner thighs are holding you. And just lift your head and chest up and lower down. Lift your head and chest up. Squeeze a circle and down.
Lift up and down. Lift up, hold it, stretch arms out in front of you and we'll do some breathing. Hundreds routine breathing in full. Five. Exhale. Three, four, five into three, four, five. Contract the ribs right down in full. Five. Exhale, three, four, five. Press the shoulders down to exhale. Three, four, five. Reach the arms nice and long. Exhale, four, five, one, two, three, four, five, length and nicely out for five into five. Exhale, three, four, five. Last one. Squeeze those knees. Exhale. Three, four, five. Roll everything down to the mat. Relax your knees, hold the magic circle with your hands. Bring yourselves up to a sitting position. So here you are.
Can you bring your knees in? Can you lift your knees up? Hold it, squeeze, squeeze, squeeze, relax and scoop the stomach. Lift. Squeeze, squeeze, squeeze. Relax. One more time. Left. Squeeze. Squeeze, squeeze. Knees together. Roll Down with control. Keeping the hips from. Can you roll down? Roll down, roll down, roll down. Excellent work. Put your feet on the mat. Elbows out.
Now pull the armpits to the waist. Pull the stomach muscles in. Can you use your stomach and your hips to bring your knees up? Only to tabletop. Crawl your head and chest up. Bring the magic circle above the knees. Squeeze. Now when you start extending, this is single leg stretches, but without hands. The purpose is to get your buttocks to work really, really hard.
So your work moving through molasses and the glutes are working. The hips, you're pushing and pulling. Now squeeze a circle. Squeeze a circle, squeeze a circle, squeeze a circle. Bring the knees lower down. Bring your feet to the mat. Very good feet around the magic circle.
Extend the legs up towards the ceiling. Just lying here. Let's have the hands behind the head. Start squeezing and releasing this circle and activate your hips so your glutes and your hips are being challenged. Squeeze and squeeze and squeeze. Buttocks are working really hard every time.
The reaction is what happens in the feet and squeeze and squeeze. Now squeeze and lift your head and chest. Lengthen those legs up. Squeeze lower down 12 inches. Lift up, lower down 12 inches. Lift up, lower down 12 inches. Lift up, lower down, 12 inches. Lift up, bend your knees, hold the magic circle with your hands. Roll up to a sitting position. Very nice work. Now let's take the magic circle here. Place one leg on top of it, just one leg.
So the other leg is a little bit off to the side. How much can you lift your back up and just press down into the circle and feel how they hip and the glute and the hamstring are working. When you do this press now as you do this, can you lift your back up in your stomach? Press and press and press. So this is a massive leg workout today.
Press and press and press. Very good. Bring that leg down. Bring the other leg up, sitting up nice and tall. How much can you lift up? Can you open the collarbones a little bit more? Can you lift about those hips a little bit more? Push down, press and press and press am pressed. So every time that leg goes down, you get a little bit taller and press and press and press.
Very good. Take the magic circle out from under the leg. Place the magic circle in front of you. Legs on width of your mat. Low do flex. And afterwards we'll do point because we all get addicted to one shape in our feet and that's, we never want to be stuck with a way to be in our bodies. We want to be able to do it all. So starting out nice and tall.
You can have one hand on top of the other. If you can figure out a way to have both hands even even better, gently push down and lift your back up. How much can you lift your back up? Now lift your stomach even more. Bend your elbows and press down. Lifting your stomach up. Come back up, lengthen.
Bend your elbows, scoop and lift your stomach to go over and lengthen and elbows wide as you push it down to lift and up. One more time. Press and up. Now linked in the toes. Same thing. Press and I'm press and up. Dork has pulled the ribs back a little bit. Don't collapse so, so it's a tricky thing. You Open your back but you don't. Yes. So you're staying right in the center of the core. Excellent. And one more time and up. Lengthen those. The magic. Circle out.
Bend your feet in whole behind the knees. Now similar to what we did before, you want to curve just a little bit. You don't want to collapse. Just find the stomach. Can you lift one knee and down the other knee? Just lifting it and down. Now without hand, lift the knees.
So we're making deep muscles of the hips. Work other leg. One more time. First leg, other leg. Now hold again. Can you lift both knees, hold it. Find the scoop of your stomach. One leg goes up and down. Other leg goes up and down.
First leg goes up and down. Other leg goes up. Now, no hands. First leg and other leg. Excellent work everybody. First leg, other leg. Okay, rest. Hold on a minute. So just take a break. Deep, deep work into the hip flexors. We need to also make them work. We need to release them and we make need to make them active. So excellent work now. Both legs holding, lip, the stomach, both legs go up. Both legs come down, both legs go up, both legs come down. No hands, both legs go up and down. Cheating is allowed both legs up and down.
Put the legs down. Very good. Let's now roll down. We are going to do Cingular kicks, but you're going to have your face facing each other so you will roll onto your stomach. So let's have your face to the middle and let's come up into sphinx pose. Jess for minute and traction. When you're here, see if you can pull your chest forward and feel your tail and sacred pressing down. You want to open up the front of those hips that could, that can be quite challenging. Now check where your elbows are. If your elbows are too close, unless you're very, very flexible, that's hard. Get your elbows out in front of your shoulders. Dorcas, I suggest, I know you're flexible to get your elbows up. Now when you lengthen, your feeling is that you're pulling your chest forward to the front.
You're not just bending back. You're tractioning forward. How much can you stretch your ribs away from your pelvis? Really, really, really key to lengthen the stomach to create back extension. Now get that tail and press it down. Get your legs together. Keep lifting up and bend one knee back.
Can you get it to your bottom? Squeeze. Take it down. Other leg, benzene. Squeeze. Take it down. One more time. Press and squeeze and down and other leg comes in. Squeeze and down.
And now left-hand in front. You see I've taken this hand up. Just bent it in just a little bit, right hand goes back. Same thing like we did at the beginning. Can you grab your ankle or your foot? First Movement, pull it to your bottom, get it right to your bottom. If you can bury your tail down, can you lift your knee up?
So we stretching that quad with stretching the front of the side. Drop again. Again, lift and down. One more time because the focus today is on opening up the hips, getting the legs to do full range of movement. Very good. Other side, check that your tail is buried. Feel how both hips are touching the ground. Heels are together. Dorcas, if you can now from this position, bend your left knee and bend it.
Bend it, bend it den to keep the knee down to begin with so you can lengthen the tail down. Reach back, hold the foot first movement, pull the foot to your bottom. Make sure your pelvis is still active. You know it's real easy to release in there. You want your tailbone anchored down very powerfully. And only then can you lift your knee up.
Maybe the foot pulls away a little bit so you lengthen your sigh. And again, lift. Very good. Excellent. So we're now lengthening the front of the size of the hip gets more range of movement. That's excellent. Very good comeback. Let's have you back on both elbows and single leg kicks. So tighten your glutes, tighten your heel, pull your stomach up and bury that sacred down.
So I'm kind of moving back and forth with my bottom. I'm hoping the camera could catch the butt work that's going on. So you want this nice length. Bend your right foot in and double kick, kick, kick, left leg kick, kick, kick, kick, kick, kick, kick, kick, kick, kick. More advanced, very the sacred both knees off the floor. Kick, kick, kick, kick, kick, kick, kick, kick, kick, kick, kick, kick. Very good rest. Sit into your heels, stretch your backs out. Lengthen the spine out in this position. Walk your hands to the right of your mat. Okay.
And now take your hand and walk to the left of the Mat. Come back to the center. And now let's take these balls just for final release work. So the focus today has been releasing tension. So you can be an athlete with your legs as a more of this work is about unraveling than working. But hopefully your legs will feel a whole lot better.
You're going to take the two balls now and get them into, it can be a sock, it can be anything. Be Inventive, a paper, not a paper bag, a plastic bag, one of those vegetable bags you mind, you just want them together, anchored in some manner. You can use rubber, a rubber band, an old sock in a rubber band and two tennis balls is perfect. The infamous it band. We're going to start up here and we roll down the side to release all of this tissue. So get the ball. Let's have all of you facing me. Just face me legs.
The head is out, legs are in. So here you are. You can be right on the side. You can have your top like bent up. Whatever works for you. Gonna move down a little bit. Press now in this position. Lift the stomach up, slowly roll over that big bulge of your own bone in the in the thigh. The greater trocanter and very slightly roll forward and back can be excruciating, a painful cause.
Now your dis attaching hamstrings and quads from that it band. There's a bunch of muscles and they all gathered together. Roll down another few inches.
I'm going to come back just so everybody can see they are leaving you because they stretching out their it bands. Just get to the top of the knee and slightly back and forth. This can be the most painful part sometimes right there in the attachments. Okay, come off of this. I hope you still like me. Other side. So now we're going to make the journey back.
Your heads are facing me, Dorcas turnaround on so the ball, you guys can get on it. You ladies is right above the bulge of your bone. So you actually have the pelvis right above. You want to sink into the balls and lift up out of it and then very slowly move down that band a muscle and roll forward and back a little bit because there's so many adhesions. This can be all of this work can be a factor of why your kneecap isn't dry or your hip isn't moving and all of this will change it all.
And then you can be an amazing practitioner and you basically feel so much energy and vibrancy in the legs. So it's amazing pre-work for training. Keep rolling down and he plays, it hurts you roll a little bit forward and back, row, row, row, row, row, row, row, row, row. Never mind. Okay cow. Get to the knee and then come off. Now another place, because we're just kind of draining the blocks out of the legs, the front of the shinbone get super, super, super tight.
So the last part, it's kind of the weird clearing, the residual from the hips down, out through the feet. We're getting the demons out of us. So you will ride down the front of the shinbone. So one ball is kind of in that soft spot on the outside of the bone and the other side is on the inside. So let's take one way. Let's start with the right leg right up.
If you can get all the way down and sit into your heel, great. But if you can just be on your hands and very slowly put pressure into the balls, roll down the front of your shins. Daniela, you're being super brave. She's got all the weight on her hands, but keep going, keep going, keep going, keep going till you get to your ankle. When you get to your ankle bones, sit right into the joint. It's a joint right there that grabs a huge amount of tension.
Sit into it so that you push into it. It huge amount of tension you want this out of use. It can be young and youthful, no matter what age you are. Okay, come on out and we do the same on the other side. Get the ball now left knee, I will turn forward. Maybe that'll help, right where the bony structures char starts under the knee.
If you can sit down, great or not, maybe your bottom is up. Then you come up a little bit and get as much pressure that you're ready to take. Really sink into. Imagine you're separating the tissue from the bone and then move through so you're bringing your knee forward and you're moving through, moving through, moving through. Keep going down till you get, let's see, how should I turn your going? You want to get all the way to the ankle so you stop, right?
There is a point you just keep right about where this bony structures. There's a little place where you can completely feel your own joint. See if you can sit into it as much as possible. Just take a moment. Very good. Get your legs out, bounce your knees up and down. Say hello to your brand new legs. Just bend over from an Etsy what they feel like and good, good work everybody. Thank you very, very much.
That was good work and I hope you really find this like tricks. Gosh, what can I say? These are tricks for you toolkit for your body and for your students. They can make such profound changes that can help people with hip impingements knee problems uses it to compliment everything else that you do. I hope it really helps you. Thank you.
Comments


You need to be a subscriber to post a comment.
Please Log In or Create an Account to start your free trial.
