Description
About This Video
Transcript
Read Full Transcript
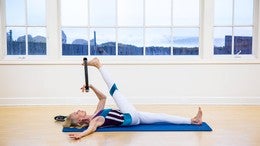
(bells chiming) Welcome to Pilates Anytime. I'm Elizabeth Larkam, delighted to be back with you. This time for a mat class using two rings. If you don't have two rings available, you can substitute a band, an elastic band, a TheraBand for one of the rings. In each of the exercises, we'll be balancing the forces of compression when you press in on the ring, balancing those compressive forces with tension forces, pulling outward, pressing outward on the ring.
And these balance of forces, compression and tension, is part of what makes up biotensegrity, or living biotensegrity in your structure. You can read some of the articles listed as references for this class to understand more of that theory. Clear your mat, and then come to lie on your back. First we'll start with bridging. You'll need one ring on the inner thighs just above your knees, and the other ring will be in your hands, thumbs on the inside of the ring pulling outward.
Plant the soles of your feet so that your heels are greater trochanter width apart. Inhale to prepare, pulling outwards with your thumbs. As you exhale, leave your pubic bone heavy and take a bridge, a neutral bridge. Now, lower your pelvis away from the ring, bringing the back of your ribs with you. Inhale to come towards the ceiling, exhaling, pressing inwards with your thighs, pulling outwards with your thumbs.
And once more coming up now. While you are here, shift your pelvis to the right and your ring to the left. Shift the pelvis left, and the ring right. Left foot pushes, driving your pelvis to the right. Right foot pushes, driving your pelvis to the left.
Shift to the right, stay to the right, lift your left heel, and lift your left foot. Come down, shift your pelvis left, stay left, lift your right heel and your right foot. Shift your pelvis to the right, stay to the right. Lift your right heel and your right foot, shift your pelvis to the left, stay left. Lift your left heel and your left foot, come back to the center as you send your pelvis a long way from your ribs, take the ring a long way from your feet.
Inhale to pull outwards with your thumbs. As you exhale, bring your pelvis up, leading with your ASIS, sending your knees away, and bring the ring forward. Now, pressing inwards with your thighs, and pulling outwards with your thumbs, rotate, turning your pelvis to the right and steering the ring to the left. Turn your pelvis to the left, and steer the ring to the right. So you have rotation in two different planes.
Aiming your sitting bones towards your knees, so that both sides of your waist stay long. Come to the center and land. Inhale to prepare, pulling outwards with your thumbs. As you exhale, send your knees away, take the ring high above your head. While you are there, reach one leg long, and come down.
When you're about to lift your right leg, reach your left hand, your left thumb further, pull more with your left thumb. So pull with your right thumb out, and press in with your thighs, when your left foot comes up. Inhale, pull outwards with your left thumb. Exhale, reach long with your right thigh. Come to the center, and land.
Now, change the ring on your thighs, so now it's on the outside of your thighs. Previously you were pressing inward, for compression forces, now you'll be pushing out for tension forces. With your thumbs on the inside, and your fingers on the outside, inhale to pull outwards with your thumbs. As you exhale, leave your pubic bone heavy and come to a neutral bridge, taking the ring high above your head, integrating your lowest ribs with your pelvis. Now rather than pushing inwards, you're pressing outwards, and shift to the right, and shift to the left.
Bring the ring forward as your pelvis shifts to the right, transfer your hand ring to the left. As your pelvis shifts to the left, transfer the hand ring to the right. So you have a lateral translation leading the way with your greater trochanter. Come to the center, shift pelvis to the right and ring to the left. Stay there, and lift your left foot up and put it down.
Shift your pelvis to the left, the ring to the right, stay there, lift your right foot up, and put it down. Shift your pelvis to the right. Stay there, stand firmly on your left foot, pull strongly with your left hand, and pick your right leg up. Shift your pelvis to the left, transfer the hand ring to the right, stay there, stand firmly on your right foot, pull strongly with your right hand, and lift your left foot up. Come to the center and land.
Inhale, carrying the ring high above your head, wide to the back of your lungs. As you exhale, leave your pubic bone heavy, and integrate your ribs with your pelvis as you come up. Now pressing outwards with your thighs, turn your pelvis to the right, turn the ring to the left, turn your pelvis left, and steer the ring to the right. Rotate and rotate, turning in front of your sacrum to the right, turning the front of your sacrum to the left. Now turn to the right, stay here, stand firmly on your right foot, pull strongly with your left hand, and lift your left foot up.
Rotate your pelvis to the left, pull strongly with your right thumb, stand on your left foot and lift your right leg. Turn to the right, stay to the right, stand firmly on your left foot, pull both thumbs outwards on the ring, and lift the foot of the side to which you're turning, so that was turning to the right, and lifting your right foot, and then turning to the left, and lifting your left foot. Come to the center and land. Now of course, you'll note that this ring has been twisting like a skirt, that's waistband is twisting off, but you still get the benefits of the compressive forces and the tension forces, so it's alright if your ring migrates just a little bit. You'll note that using the hand ring and activating your hands pulling outward on the ring, makes the balance through the whole structure, the balance through your pelvis and legs, actually easier, a good indication that when you activate more of the myofacial continuities, you have an easier balance throughout your whole structure.
Not that it's simple, but a little bit easier when you use two rings. Now, let's go to bridging with articulation. Instead of a neutral bridge, you'll have spine articulation inflection. Place the ring again, against your inner thighs above your knees, and the arm ring goes at the base of your skull, just at the occipital area. As you inhale, open your elbows wide to the side.
As you exhale, broaden between your shoulder blades and bring your elbows towards the ceiling. Nodding your nose downward, gaze down, eyes down, tongue down, aim your gaze through the ring, and then a little bit lower towards your pubic bone. While you are here, peel your pelvis and spine up. So roll up your spine as your pelvis lifts higher, your shoulders and head come down. Inhaling wide to the side.
As you exhale, press inwards with your knees towards the midline, inwards with your elbows towards the midline, roll your head neck and shoulders up as you undulate your spine down. Take turns here peeling your pelvis and spine up as your thoracic area, shoulder girdle and head comes down. Exhale, nod your nose downward, and roll through your spine. We'll do two more of these. You will note that you'll be wending your way towards the head end of your mat, and that's just physics.
That's just life in the body. Time now to change up the leg ring. Work your way back onto the mat, and now the ring will go on the outside of your thighs just below your knees, so your thighs will be pushing outward into abduction and then the arm ring, hand ring is behind the base of your skull. Inhale to aim your elbows wide to the side. As you exhale, shoulder blades go wide, elbows come towards each other, nod your nose downward, roll your head, neck and shoulders up.
Keep your torso here, and pressing into your heels, aim your pubic bone towards your knees, roll your hips up. As your pelvis and spine lift, your ribs, shoulder girdle and head come down. Keeping your pelvis high, pushing outwards with your thighs, nod your nose downward, roll up, each vertebrae gets its own turn to descend with your ring. Let's leave the bridging now, and come to side lying. Come to lie on your side with your knees bent, and you'll have the ring on the outside of your thighs.
And then the other ring in your hands like you have a submarine window, no that's a little too high, peek-a-boo! No instead have the ring around your heart, right? The ring around your sternum. So your hands will press inwards on the ring. When the palms of your hands press inward on the ring, that will activate the floor side of your ribs so that you can lift your ribs and waist up off the ground. So you're pressing in with your hands, pressing outwards with your thighs, lifting up your ribs, lifting up your waist, and then lift your heels up, and lift your knees up.
So turn your knees towards the floor, and your heels to the ceiling. Turn your heels towards the floor and your knees to the ceiling. What's implied here is a little bit of the rotation of the arm ring also, so both rings roll to the right towards my head, and both rings turn towards the feet. Heels up, hands up, lifting up your ribs, and lifting up your waist. Now, take your float, the leg ring up a little bit, and aim your legs back and forth, so steadying yourself with the arm ring and your shoulders, so you move a little bit in hip extension, and hip flexion, and hip extension and hip flexion.
Now, as your knees go towards the ceiling, turn the hand ring towards the ground, and as your feet go to the ceiling, your knees go to the ground, feet to the ceiling, hand ring up, so now you're turning the two rings in opposite directions. Preparing for the era of self-driving cars? Probably. Now, let's take this on the other side because this has been plenty of work for your lateral cervical flexors. Change now to the new side.
Put the ring on the outside of your thighs just above your knees, come to lie on your side, and place the ring, not in front of your face, but in front of your sternum, in front of your lower ribs. Lifting up your ribs, lifting up your waist, you alternate heels up, and knees up, heels up, and knees up, doing your best to stay balanced on the side of yourself. Now you swing into hip flexion and hip extension, and hip flexion. Exhale to go back, inhale to come forth, pushing inward on the ring with your hands, pressing outward on the ring with your thighs. And now you steer your leg ring and your hand ring in opposite directions.
Probably inhale to steer them away from center, exhale towards center. Although if you did the opposite breathing, you would also benefit. Let's change to the first side again, and now you'll be in side lying but stretched out long. Now lying on your side, you'll have the ring between your shins just above your ankles. So now it's your inner thighs are pressing inward and your thumbs will be on the inside handles pulling outward.
Here you are balancing on your side, and that may be just all you need to do. After you've balanced here for a few breaths, it would be exhale to hover your legs, inhale to lower. Exhale to hover your legs. Now you can help to stabilize yourself, she said, by pressing inwards with your hands just prior to lifting your legs, so steady first with the compressive forces of your hands on the handles, as you lift your leg. Exhaling, pressing in with your hands, then reach long through your inner ankle bones a long way from your pubic bone.
Twice more, exhale to hover, inhale to lower, exhale to hover and lower. Change now to your new side. The ring goes between your shins just above your ankles. And you come to lie on your new side, which in my case includes a mic box. Pressing in with your hands, then your legs can lift.
Exhale, it's as if the floor inner thigh is encouraging the top leg to come closer to the ceiling. Exhale to lift and hover, inhale to lower. Flexing your feet will make a dorsiflexion of your ankles, will make a stronger connection with your abdominals, and also will help you stabilize your knees when you're in contact with the ring in this way. Stay up there, lifting up your ribs, and lifting up your waist. Next we'll change to quadruped, to hands and knees.
Bend your knees, bend your elbows, and take ahold of your rings. Come on to all fours now. You will have one ring on the outside of your thighs, and then you'll have the other ring on the outside of your elbows. So, suit up and put the ring just above your elbows. So here you are pressing outward with your arms, and pressing outwards with your thighs.
Palms wide and fingers spread. You could either have the tops of your feet on the mat, or your could dorsiflex your feet. If this is a comfortable position here, you can use the contact of your toes on the mat for some increased stability. Pushing with your left hand and your left knee, shift your whole torso to the right. Pushing with your right hand and your right knee, shift your torso to the left.
So you shift your whole central axis, the light from your chest bone over your left hand, the light from your chest bone over your right hand. Now shift so far to the right that your left knee can hover, and put it down. And shift so far to the left, that your right knee hovers. Shift, anchor and lift. Shift, anchor and lift.
Stay in the middle now, don't shift, press with your left hand, hover your right hand, press with your right hand, and hover your left hand. Keep the light from your chest bone directly between your thumbs. So this is without a shift, a slight rotation of your thoracic spine will bring each hand to hover. Now, with a minimum of shifting, stand on your left knee and hover your right knee. Stand on your right knee and hover your left knee.
So it's a minimum of shifting. Stand on your left hand, your right knee, hover your left knee, stand on your right hand, your left knee, and hover your right. So you have now a little bit of rotation facilitated by the outward pressure. With a minimum of shifting, stand on your left hand, hover your right hand, stand on your right knee, hover your left knee. So now you're creating a base to stand on.
Your left hand, your right knee, but your right hand, your left knee are off. Plant your right hand, your left knee and hover, whoa, hello, hover, so you take turns planting a base to stand on, and a diagonal to move from, a base to stand on and a diagonal to move from. Balancing your forces of all the myofascial continuities, the anterior and posterior oblique sling systems here. Now, shift so far to the right, that you can stand firmly on your right hand and your right knee and hover your left hand and your left knee up off the ground. Come down from here, not a moment too soon.
Now to shift to the left side, move the light from your chest bone over your left hand, and move your hands a little bit more towards the left because the ring makes a strong constraint on your elbow. So the light from your chest bone is over your left hand, the light from your pubic bone is over your left knee. Hover your right knee up, so now you're standing firmly on your left knee. Spread the fingers of your left hand, and hover there, standing on your left side. You'll note by now that sometimes the use of the ring makes your movements easier because you're able to access more of your myofascial continuities, but in other times, the rings provide a constraint, and so the exercises are more difficult.
We only have one more action to do in quadruped now, which is walking or crawling really. Hover your left hand, your left knee, your right hand, and take a little step forward. Crawling forward towards the top of your mat, and then crawling back. Minimizing your lateral shift. Now, we've finished in quadruped, and it's time to come to sitting.
Take the rings off of your knees, and you'll put one ring on the outside of your shins, and the other ring will be at the bottom of your chest bone, your sternum. Now, pressing outwards into the leg ring, turn your pelvis towards your right, so to drive your left heel forward, exhale center. As you inhale, push outwards with your legs into the ring, and drive your right heel forward. So you're facilitating rotation of the pelvis to the right, the sacrum turns to face the right, the left sitting bone forward, the right sitting bone back. Inhale to rotate, exhale center.
Inhale to rotate, exhale to center. At the moment, the pelvis is driving the rotation and the thoracic area is going along with it in the same direction, at the same time. Pressing inwards on the ring, as if to hug the ring towards you with your little fingers, inhale, turning pelvis, ribs, shoulder, but keep your head, neck and eyes steady ahead. Exhale center, inhale, pelvis turns, you spiral a little bit taller with your spine. Exhale center.
Now, turning your pelvis and ribs in the same direction, and your head, neck and eyes in the other, exhale center. Pelvis and ring goes one way, head, neck and eyes go the other. As your pelvis turns to the right, press your tongue down to the left and move your eyes up to the left. Exhale center, as your pelvis and ribs turn left, press you tongue down right, and your eyes up to the right. Next, as your pelvis turns right, turn your ribs, shoulders, head, neck and eyes left.
So you turn your pelvis and your thorax in opposite directions as if you could unscrew your pelvis from your thorax, and your thorax from your pelvis. Pelvis turns right, ribs turn left, head, neck and eyes turn right. Legs press outward on the ring, pelvis turns left, thorax turns right, head, neck and eyes go left, turning pelvis, thorax and ribs in opposite directions. Pelvis, thorax and head, neck and eyes in opposite directions. Now, let's leave the rings as they are, but go for the Pilates Saw, the seated exercise of rotation and flexion.
As you inhale, push outwards with your legs, draw inwards with the little finger side of your hand, your arm, your shoulder blade, drawing the arm ring towards you. Turn your pelvis towards the left, turn your thorax to the right, and now take a nose dive, bringing your left ear as if it could listen, towards your right hip. Inhale, pelvis turns right, exhaling, right ear listens towards your left hip, and come up, inhale to rotate. Pelvis one way, ribs the other, a small amount of flexion. Inhale to rotate, exhale to come down.
So the benefit of this if there is one, would be that the constraint of the rings provides some focus for your proximal control and sometimes without the benefit of these compressive and tension forces, it's possible to get a little fascinated with the distal choreography, and less organized in the proximal area. Let's come into prone now for some spine extension. Put one ring towards what will be the head end of your mat, and then come to lie on your front. Once you get onto your front, lasso your own feet, your own legs, and press outwards with your feet, with your lower legs into the ring. Have your hand ring just barely above the top of your head like it's a low-lying halo.
A halo that's about to descend over your eyebrows. Inhaling, elbows wide to the side. As you exhale, press down with your thumbs onto the hand ring, tongue up, eyes up, gaze up, and press outwards with your legs into the foot ring. Inhale to come down, lifting your thighs up, as you exhale, press down with the ring, and bring your ribs, shoulders, head, neck and eyes up. Inhaling, elbows wide, thighs lift.
As you exhale, push down with your thumbs, in with your elbows, while you are up, turn to look over your shoulder, there are your feet waving at you, and then turn to look over the other shoulder, and there are the same feet waving at you again. Let's leave spine extension now, and come to lie on your back. For that, straighten out your legs, let go of the ring between your feet, and come to lie on your back. You'll have the ring between your shins above your ankles, and the ring in your hands with your thumbs on the inside. Inhale to prepare, as you exhale, nod your nose downward, hover your legs up, and bring the rings so that you can see through both rings.
Inhaling, lowering your legs and your arms away from each other, as you exhale, nod your nose downward, pressing inwards with your thighs and outwards with your hands. Inhale to take the ring high above your head, as you exhale, tongue down, eyes down, gaze down, match the rings. Inhaling, gaze towards the ceiling, as you exhale, bring your hand ring to the outside of one thigh. Inhaling towards the ceiling, as you exhale, bring the ring to the outside of the other thigh. Inhale to prepare, as you exhale, roll up and grab the ring.
Time now to come to standing. In standing now, place one ring just above your ankles on your lower legs, plant the soles of your feet, particularly the soles of your big toes and have the idea that you're drawing your femur heads inwards, towards the midline. Like sure, I always have ideas about my femur heads. Well now's the time. Draw the tops of your thighs, your femur heads, inwards towards each other, so you put a proximal force of adduction drawing towards a center line rather than being all focused on the distal pressure on the ring.
When you draw your femur heads towards each other, that will go through your whole inner leg, and then that will put a little bit more weight towards the big toe side of your foot. Place your thumbs on the inside of the ring, so that while your legs are drawing inwards, a force of adduction, your hands will draw outwards, drawing outwards as if your collarbones could get wider. Draw your shoulder blades wide and high. Inhaling, bending both knees, exhaling, press down with your feet, pull the ring up and back behind the back of your head, and hover your heels up. Tongue up, and come down.
Inhaling, bending both knees, as you exhale, draw from the ground out through your shoulder blades and hands, take the ring high above the back of your head. As you inhale, bend your knees forward over your toes, but turn your pelvis, ribs, shoulders, head, neck and eyes, so your knees stay forward, and you look at that gorgeous early January ocean clarity. Inhale to rise, as you lower your heels, turn pelvis, ribs, shoulders, neck, head and eyes to see a different view of the gorgeous coast. Exhale to come up, pulling outwards with your thumbs, downwards with the little finger side of your shoulders, pressing inwards with your femur heads, and you come down. The next standing exercise involves a very light touch on the accelerator, so you stand one foot on the mat, and the other foot on the magic circle.
Put the ring at the bottom of your chest bone, and bounce a little bit. Hover here. Aiming in this case, the left sitting bone towards the inner right ankle. Easy now, come down from this and change to the new side. Plant the sole of your supporting foot, put the ball of your other foot lightly on the circle, and bounce a little bit.
Balancing your forces of tension, pushing outwards, and compression, pulling inwards. Thank you so much for joining us. I look forward to being with you next time on Pilates Anytime. Bye now.
The Teacher's Corner: Focus on Fascia


Comments


Have you any proven exercise movements that reduce discomfort due to arthritis in the hip ball and socket joints, apart from surgery (No thanks!)?
Hope to hear from you with thanks.

I was so honoured to meet you in person and do your workshops which has opened my mind with my teaching to my clients. I am so grateful 😘 Trish Adelaide Australia

In gratitude for all you contribute to my understanding of human movement potential,
Amy
You need to be a subscriber to post a comment.
Please Log In or Create an Account to start your free trial.
