Description
About This Video
Transcript
Read Full Transcript
Hello, everybody. My name is Niedra Gabrielle. This is a hip focused reformer practice that I've been doing as part of a rehab from hip replacement, which I had four months ago, And honestly, you don't have to have hip replacement to do it if you want to work on your flexibility and really focusing on hip strength and balancing everything. The props I'm using are a magic circle and a box and a stick and I'm working with a grass machine today, but you can do this with balance body. I have light spring tension.
I have one spring for this first part which is to stretch out and open up my hips. On a balanced body, you would be doing red and blue most likely. Honestly, just give yourself enough resistance to feel stable. So I'm standing with one foot on the floor and one foot out. This is for lateral stretch opening up the hips. It's a form of dealing with one leg at a time.
And I'm taking my leg out to get a nice stretch in my adductors and work my hips forward and backwards. If you watch the tutorial, it was a similar sort of variation. So over and over again, I want to get this widespread of my hips kicking in. And this is a nice way to control it. You can bring your hand down.
If you're super super flexy, you can go further. Just enjoy it. I'll do the same on the other side to balance out the hips. Now one leg can be quite different from the other and you can play with an internal external rotation to find where where are you tight? Also, I am checking that a sense of evenness in my hips that I'm not over focused in one area or the other and getting into where I can feel a real nice, juicy, healthy, fanciveness of the hips. Honestly, I love this feeling because for so many years, this was not in my repertoire.
Now, working front back splits in an easy intro level. I'm getting I'm checking the foot alignment and bringing my hip under to open up my hip flexor as my start point, mother foot's in front and bend as far down as your body will let you to get focus here first. Notice that I'm pretty vertical. And then as I go back, my pelvis tilts more, so I'm kind of allowing my body to work into this. But the more vertical you are in this realm, the more you will be stretching into the hip flexor, your psoas, and then your thigh.
And this again feels fabulous. Enjoy. And let me come in and do the other side. This is just opening up my joints, opening up my body, stretching a bit, watching that my hips are even, bringing my hip under, One leg is very, very different. The Slaside tends to be more stiff and takes me a bit longer to open up the quad. So but it opens every day a little bit better.
And I'm getting that nice stretch into the area. So I love these stretches because it's very safe, they're easy for beginners, and you can kind of get in touch with what your body desires. Make sure you have a magic circle close at hand because we're going into footwork. I'm putting a conservative amount of tension on right now just to warm up. I'm on two springs on the grads, I would have two reds, maybe three reds on a balanced body. Then you just want to feel comfortable and work with whatever you're normally working with in the Pilates V.
Just going out grounding my spine and making sure my hips are really working into the external part. Now, it's easy to get your legs externally rotated from your knees, but can you feel those little muscles under your glutes turned on and and contributing to this moment because those are the muscles that you really want to get very familiar with. Here's the arches. This is just a little warm up. Doing 10 repetitions, making sure that your spine stays stable. So if you have really tight hip flexors, your back will start arcing and changing shape.
So I'd rather you work at the at the lesser level and stay within the range you've got so the leg muscles get long. And then you'll be able to go further on your heels. Working the range of motion. Again, this is just considered a warm up in in my mind. I'm just approaching it to just activate the muscles and get them more alive and the tendon stretch going out, zippering up the inner thighs, and down and up. Making sure the full range is available and lifting up.
So 10 repetitions of these as well. And now we get into using the magic circle. And we work mostly quads and hamstrings now adductors' feet are hip width apart, getting the magic circle, in the middle, you start bringing the knees together. Now, a lot of us have our adductors rather lazy. So this movement can be done with the energy of the knees and other muscle groups So get your hands between your thighs and check. Is this the dominant muscle that's tightening and then get your mind and that muscle connected up so it's really working because now you will add your glutes to squeeze your sit bones your glutes and your outer thighs as well. So the it's like you had solo performance of the adductors and now the full orchestra is starting to be part of this energy. And then add rolling up and rolling down.
So, whoops, squeezing, get the glutes, the adductors, and the articulation of the spine turned on, very important. And can be very fulfilling. Now when you tilt, every time, challenge yourself to get more rotation, you're basically sliding the pelvis around the hip sockets And many people just kind of settle into one spectrum of movement, but you can increase it if you put your mind on it and every row try to get more rotation, more length in the low back, more ability and flexibility can make a big difference. Take the magic circle, stretch your hamstrings, stretch your calves, give a nice little stretch. Glide the magic circle into the outer thighs.
So, not these. Now we're going from your knee to your hips and get those muscles turned on. Really focus on what's working when you're pressing out. Big, big, big difference in muscle groups and you want all of them part of your vocabulary in your body. Then keep those thighs out and same thing. Roll up. Keep pressing out with those knees.
Do your best not to zigzag in the hips. Really focus on the stability and evenness of the movement. I zigzag because there's such a discrepancy in the right end of side that I'm still evening out. So really, really important to get as stable and as even as possible and then find your lift, not terribly high. And now keep that pressure out.
If anything keep increasing the pressure out, as you go, only three quarters of the way, do not go to fully straight legs because you'll jump into a different muscle group. You want to stay with this abduction which is so important for strong, healthy gait, healthy standing, healthy hips, healthy posture. So we've done we're done with the magic circle. And now single leg. So here you are, here I am, and one knee in tabletop, lifting same roll of the hip up and down do your best not to to torque. If you look at the hips, they should be even to the ceiling and people often will be kind of shocked how much adjustment, either the hip will go way over to one side or they will dip. And it takes a bit of thinking to really figure out how to stay stable.
So after five, six, eight reps, same thing out and in, checking that the knee and the leg that's working is tracking with your hip. The knee is not rolling in. It's not rolling out, and you will know that you're building massively healthy body alignment. Same thing with the other side. Stable hips.
You work a huge amount around the glute to stabilize and you work a huge amount in your core to keep everything functional. So just stay really concentrated and don't just do the move, study your own logistics, your own biomechanics, and you will figure out if you find yourself sloppy, you'll be able to figure it out. And then once you've gotten a stable hip alignment out and in. Again, tracking knee and hip and foot. The most important is hip and knee, and some people will find that for a while the foot is going out But that's secondary.
That's a different repair job. Right now, we're focusing on this part, the femur in the hips. So that was great. You should feel seriously worked. And our next one is the long stretch series.
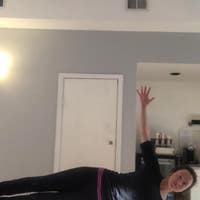
Remember this sequence is to focus on strong hips. So headrest is up. I've got two springs. It's a grass machine on a balance body, maybe two reds, two reds in a blue. When I step into the first position long stretch, I get my shoulder right over my hand. So this front area is balanced, and I just take the leg because we have different body lengths. And I just want a long straight line and then I take my other leg up.
So now I'm locked like a steel rod in a straight line and then the hips are locked And without anything moving, I'm pressing out and in. So watch it because if you're just a little bit out of that line, the force of the springs is not building power in the body. You're bypassing the alignment. So and you go as far out as you can go without losing this control. Then one leg up and one leg up just like we did in the tutorial without the hips moving and coming down. To down stretch.
Down stretch is like plank from the knees. So same alignment. You want these hips under, so the hip flexes are open, and then you bring the hips forward and you open up the front body. Tighten those hips. They can be sloppy.
So you're gonna press out and in without losing this lock that you have in the pelvis and in the hips. And up stretch. I will say that I like to get people way in to open up the shoulders even though we're working on our hips. Do you see how much I'm locking my hips before I start? I'm clamping them together and then bringing the hips down. They have to be locked here.
And then you can control the body over the bar. I'll do this one more time and bring the body over the bar. Honestly, this took a while for me to be ready for this because I had to build up the strength again. Position of elephant, I like way forward, way pulled up and clamping the hips together. So the wrap of the glutes around the pelvis is very strong. And the only then do I work the legs out and in?
And to build up more strength now, notice a change in my body alignment. I went from a complete flexed position to lengthening out, but now I'm locking my hips again. And without the pelvis moving, taking one leg up and working the leg. So the hip has to be really, really anchored. To the side, keeping the pelvis grounded, and to the front.
So all of this is building a lot of stability around the socket. So long spine. He leg lifts without any contortion. This happens all the time. Don't do it. Figure out where your hips are, block them and very slowly lift up without any movement changing in the waist, in the hips, in the balance between right and left side.
Bringing the leg to the side, this leg is weaker. It doesn't go as far, but I am focused on my alignment because I know Oops, I lost it. Did you see that? Even I have to be very careful because everything can go wonky so easily, and this is such an opportunity to really understand your physiology. Now, short box is amazing because we are having to hack certain aspect of our hips, which most everybody compromises with. So this is something that I have found students love makes them feel safe. You want the box on.
You want as many springs as you're comfortable with. The purpose of the springs is just to make sure you're safe. And feet here. Now, where you sit, you do need space here. I don't care where you're sitting, but when we start the round stretch, a lot of times the low back is a little vulnerable. Also to cues around this, but I would like you to put your hands on the box. Start going back.
This is the place where you get that tail under. So you see, I'm literally organizing my pelvis to open my hip flexors maximally. And instead of rolling back, Swifty, I'm using my hand to lengthen my low back. Do you see how much the lumbar spine you're being pulled? The hips are being opened evenly, and then I can relax down very safely, and the back opens.
Coming back, I'm getting into the box, lengthening my waist and then curling up and rolling up. This is the way you don't need a teacher to block you, but it can go so deep because it sets your pelvis under So this is not a way to pass an exam in short box, but it's highly, highly effective. A lot of clients are afraid to go back. They feel vulnerable. It keeps them feeling very safe.
So even if this is as far as you're going, This is what you're looking for. This big opening and then an expansion of the chest and coming up. I've yet to meet anybody who didn't absolutely love this variation of self improvement. So once you've done a few of those, flat back is just to get that nice stability of the hips, and you're gonna go back. The further back you go, the more you lock the hips, notice what I'm doing. So everything is even.
Just it's kind of like your hips are like the roots. You clamp them and then you have power. And safety. If they're not clamped, you're kind of uprooted, honestly, is my way of seeing it. We're going right into tree because I'm building on that round stretch that we did to begin with. We are always struggling with how do we get both sit bones evenly for tree? So first of all, you want the leg up And you want to position yourself so your hips, the sit bones are just roll back for this variation of how you can do it.
And you check, look at your own hips, are they even, and check very much this knee. Remember, I said people's knees go the femur rolls in, rolls out. It's got its kind of automatic pattern, but we're looking to use the Pilates practice to refine the alignment to get really optimal. The most ideal physiology our blueprint can offer. So I'm attempting to get this as close as I can. So the my lumbar spine is long. And then you'll just give yourselves a a stretch.
Watch the kneecap. Because the kneecap will roll in so often. Don't. I don't give the legos straight. I don't care how much you stretch. You want to stretch intelligently to optimize your alignment.
And then work here. Now, here's where we get into the next level. So I am using my hand. I hope you can see. I'll do it on the other side to check that the left leg is straight and the right leg isn't going all over and my lumbar spine. I'm using this hand for the, in the same way. This is what happens so often to people.
The moment you open here, and you're tracking two tracks with your legs, the tissue unwinds, massively. And that can be a game changer. Do this a few times. I wanted to see if I can demonstrate on the other side So here I am. I'm taking my sit bones and rolling them under in order to open up my lumbar spine.
I'm looking at the line of the knee. This needs to track straight, and your knee needs to track straight. And we don't. We're all crooked in different ways. So once I have this set, I'm using this hand to keep me from twisting and honestly I was pretty crooked when I came back from the other side. And I knew that my fashion, my muscles can reshape themselves if I demand it of them.
If I don't demand it, they stay where it's easy. So can you see how much I'm opening the hip flexor? I'm even. This knee to hip is even. The leg is long and I'm lengthening, and then I open everything out.
And it's an amazing, amazing stretch that freeze up a lot of con congestion from the body. I hope you enjoy that one because I have founded a game changer in my personal practice to really up level where my body wants to go, bring back skills that I really didn't think I would ever gonna see again. Me stretch, awesome, and it is a game changer as well in a very simple way. This is for strength. That was for flexibility with good management of alignment. So two springs, I'm checking, knees, and hips.
I'm checking all of this round openness, and I'm leaning back. And then just pressing out an end, so gets into my glutes, and I'm attempting to keep as much roundness in my body as I can. In archival books of Joseph Pilates, he said that this was It used to be called jumping tiger. So I want you to think if you've watched an animal before they jump, they crouch, they tuck, and then they power up. So I want you to be inspired by that quality.
And now here we go flat back. So now there is you're just having those legs work without the spine shifting shape. If you have it in you, after this, we're going to go into thigh stretch, which is a variation of the stretch we did before, but now we are in a much tighter position. So if you can't get into this and have your legs tracking straight, put yourself into a wider gear. I had to go into second gear and third gear.
For a while because I was very, very tight in my hips because I just weren't loose enough, and they've loosened up amazingly with all of this work. So a lot of people struggle with it. They can't or the IT band is straight. They can't get their leg out So make the machine bigger. Give yourself grace and find the angle that will work for you.
And I'm noticing I'm on two Springs. As of right now, this is still tight for me. So I much prefer shifting to a lighter weight so I can actually get the range of motion coming in and working into the angles of the leg. I'll do this again. So use the springs.
I know in trainings, we're given formulas. The springs are amazing, but also common sense. Is amazing. So here we go. This hip wants to go up. I'm squaring myself.
I'm stretching this hip flexor and bringing the hips forward just this is a serious and beautiful, juicy stretch. And as I'm going out, the goal isn't to get the leg straight. The goal is to get the hips low between the front and back. So it's very much emulating the shapes that we practice in the tutorial, if you can recall. And it's such a lovely stretch into the pelvis and hips banc hamstrings and size. And to finish my favorite, which is the same stretch that we started with, but now I'm up on the reformer.
And it's side stretches. Side splits, I should say. So I actually have one spring. So my tendency is to be here. I have to make sure my hips are even.
If you cannot get your legs out, bring them more in. But first and foremost, make sure these two hip bones are even to the floor and you're mildly engaged in the glutes and then you can go out and as best you can go evenly between both legs. Check because the sensation can be so different between one leg and the other, and that's glorious. You want to find those imbalances in your body, they exist in all humans. None of us are perfect, but this work and these machines provide such an opportunity to refine and make a hybrid out of our physiology.
So this side, I've been on one spring, as I mentioned, because my legs are weak, but I'm gonna put two springs on because the difference between right between The legs when you're standing on the machine is not as extreme. So here I am and I'm on two springs for strength. So here I am. I'm getting my hips even, checking my position, And now I've got two spring tension two spring. So the the resistance is much greater. And honestly, to begin with, I personally started with this tension because I didn't want I want I knew that I needed stability in my form before I increase my range of motion.
So this is it for me. I hope you're going further, but wherever you're going, it doesn't really matter because you're not in competition with anybody else, but you're inspired by the vision of the best you. So I hope you enjoy this. Enjoy the work and keep growing and keep loving who you are now and who you you are becoming.
Intermediate Reformer: 30-Minute Classes


Comments


You need to be a subscriber to post a comment.
Please Log In or Create an Account to start your free trial.
