Description
About This Video
Transcript
Read Full Transcript
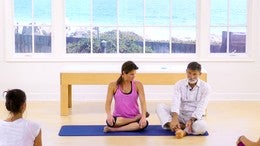
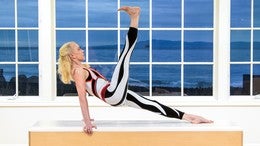
Welcome to Pilates Anytime. I'm Elizabeth Larkham, honored to be with you for the sixth year now, and really privileged to be with Pilates Anytime and our global Pilates community. Let's work together on a mat class with two rollers. You can see we've got two rollers and two mats. Here's why that is: when you lie on one roller, or when you lie on one mat, it's useful to have a non-skid surface for your rollers.
The rollers, when they roll, also slip and slide. And you'll have an easier time managing the rollers when you have a mat for them. Come to lie on your side, and have one roller even with your hip joints, so that you have a support for your knee, your shin, and your foot. Have the other roller a little bit higher, so that your straight elbow arm can go forward. Now the rollers are at different distances from your body because your outstretched arm is longer than your femur, than your thigh.
So don't have the idea that you should line up the rollers, because then your elbow will be bent, and it's preferable to have your elbow straight here. As you exhale, roll everything, pelvis, ribs, shoulders, neck, head, and eyes, rolling forward, turning your arm palm, thumb down. And as you inhale, roll back, keeping your elbow straight. As you exhale, your pelvis turns, your thoracic spine turns, and you roll both rollers forward and inhale, you roll back. Now that's undifferentiated rotation, moving everything in the same direction, at the same time.
Now, we change it up a little bit. Pelvis leans forward, shoulder girdle, and thoracic spine follows. Pelvis leads back. Thoracic spine and shoulder girdle, pelvis leads forward. Thorax and shoulder girdle follows.
Pelvis leads back, and you follow. Now, the thoracic area and the shoulder girdle go forward. Then the pelvis follows. The thoracic area leads back, and the pelvis follows. As you exhale, roll forward, thumb down.
As you inhale, roll back. Now, the next variation. Pelvis starts, shoulder girdle follows, shoulder girdle leads back, pelvis follows. Pelvis starts, shoulders and ribs follow, shoulders and ribs lead, and the pelvis goes back. As you might predict, the shoulder girdle starts, the pelvis leads.
The pelvis goes back, and here comes the shoulder girdle. Shoulders first, pelvis next. Pelvis first, shoulder next. Then you move your shoulder girdle and thorax in one direction, and your pelvis in the other. As if you could unscrew your ribs from your hips, and your hips from your ribs.
Roll towards your back, as if your chest bone could illuminate the ceiling. Roll towards your front, as if your chest bone could illuminate the ground. Now stretch out and bring yourself to the new side. Let's take on all of those variations on the new side. When you come to lie on your side, you'll have the roller even with your hip joints, and with sufficient hip flexion so that your knee is directly forward of your hip joint, your shin, your ankle in contact with the roller.
Your straight elbow arm is forward of the bottom of your ribcage, thumb up. The leg on the ground is outstretched, even with your pelvis. Everything moves forward in the same direction, and back at the same time. Two more here, thumb down. And thumb up.
And thumb down. And thumb up. Pelvis and ribs. Pelvis and ribs. Pelvis and ribs.
Pelvis and ribs. The third time will be the last time. Change. Ribs, pelvis. Ribs, pelvis.
Ribs, pelvis. Ribs, pelvis. Rotating your arm, pronating and supinating your forearm and your hand, pelvis leads, ribs go forward, ribs come back, and there comes the pelvis. Pelvis first, ribs second. Ribs return first, pelvis follows.
Ribs lead, pelvis follows. Pelvis leads back, and ribs. Ribs lead, pelvis follows, pelvis back. And ribs, once again, thoracic spine rotates. Pelvis leads.
And now, moving in opposite directions. Pelvis forward, thoracic spine rotates back and forth. And back, and forth. Last one, coming up here. Now, you might wonder: why would one do that?
Because, it's so useful in life to be able to rotate the thoracic area and the pelvis in opposite directions, for every step you take. In your Pilates practice, you may not have many opportunities to differentiate the ribs from the pelvis. It will serve you well then, to augment your Pilates practice with some of these moves. Now, come to lie on your back for bridging, and one roller will be the roller for your spine, and the other roller will be the roller for your feet. (chuckling) You'd think, if I could get organized.
Okay, so have a seat on one roller. And come to lie on your back. Here you are, outstretched on your back, with the soles of your feet even with your greater trochanter, heels fairly wide apart, and wipe your heels laterally. As if, just slightly, your big toes are aiming inwards, towards the midline. Now, roll the roller away from you, exhaling.
And roll the roller toward you, inhale. External rotation, internal rotation. dorsiflex your feet, as you go away, and keep your feet dorsiflexed. Reverse, internal rotation and external rotation, internal rotation and external rotation. During the internal rotation, you would anticipate more abdominal support required, so that your pelvis doesn't follow your legs.
Keep your pelvis at home. Now, let's go with a hamstring, a neutral bridge, focusing on your hamstrings. As you inhale, roll the roller towards you, drawing your heels towards the sitting bones. As you exhale, send your knees away from your pelvis, roll the roller away from you and towards you. Away from you, and towards you.
Elbows bent, away and towards, away and towards. Palms on the ground on either side of the roller, hands upwards towards the ceiling. Palms away from the top of your head, elbows wide. Land your sacrum on the roller, adjust your foot roller as you'd like. Now, I just, I so much wanna lift my head and look at this roller, because this overhead camera is so illuminating, that I know that my left side is the weaker side, and I know that it's not doing its job.
So I'll do my best to behave myself. Now, as you inhale, roll the roller, sitting bones towards your, heels towards your sitting bones as you exhale, plant the sole of your midfoot on the roller, lift your hips up. Planting your palms down firmly, plant your right hand, stand on it, lift your left leg up, and come down. Plant your left hand, lift your left leg up. Whoa, don't put it down so fast.
Right hand presses so you're standing on your left foot and your right hand. Now stand on your right foot and your left hand. Do your best to keep your pelvis level and steady, not shifting your weight conveniently from side to side. We know that trick. Now.
Cheating a little bit. Where we're aiming with this, where I hope I can go, is palms together, fingers interlaced, roll the roller towards you, lift your pelvis up, internally rotate just a little bit. Oh my gosh, and press your right hand to the left. It's gonna be short, but, ah... Good luck to you.
You can see that I'm not that good at it, but I tried. And you saw me go down. Alright, now external rotation and internal rotation, external and internal, internally rotate, externally rotate, internally rotate. That's the hamstring intermission. Palms down, fingers spread, collarbones wide.
Roll the roller towards you, as you exhale, send your knees a long way from your hip joints. Push with your left hand, shift your right greater trochanter to the right. Push with your right hand. Shift your pelvis to the left, or the left greater trochanter. Push, anchor, shift.
And center. Push, anchor, shift. And center. Rolling the roller towards the left shoulder blade, and rolling the roller towards the right shoulder blade. Shift to the right.
Stay steady. Lift your left leg up and down. Shift more to the right. Stay steady. Lift your right leg up and down.
Shift to the left. Stay steady. Lift your left leg up, and down. Shift more to the left. Steady over there, lift your right leg.
Again, inhale, shift to the right. Exhale, lift the left leg up, put it down. Inhale, shift more to the right, and lift your right leg up. Put it down. Inhale, shift to the left, stand your ground on your left foot, lift your right leg up.
And down. Shift more to the left, stand on that left, ah, right leg, shifting to the left. And lift your left leg up and come down. Exhale, inhale, externally rotate, internally rotate from your hip joints. Away and towards, and away and towards.
What's coming up next is quadruped on the rollers. Roll your roller away from you, interlace your fingers, tongue down behind your lower lip. Internally rotate just a little bit. Eyes down, and roll up. Now, you'll be on all fours with one roller underneath your shins and the other roller underneath your forearms.
Start, yeah. (chuckling) By keeping your shins steady, and roll the forearm roller away from you and towards you. Press your chest bone up to the spine between your shoulder blades. As you exhale, palms down, inhale, palms up. Exhale, palms down. And inhale, palms up.
Now, to prepare to keep the shoulder girdle steady and the pelvis roller moving away from you, you'll need to have the roller closer to your ankles, not so close to the knees, where I was earlier. Pressing your forearms into the roller, as you exhale, internally rotate so that you're not rolling on your shins, but rolling on the, not directly on the bone of the tibia, but more on the anterior tibialis, of course, right? Bringing your navel up to your spine, dorsiflexion of your foot, feet, and tongue down will help to activate your abdominals there. Now, it would be lovely, I hope, to do both rollers moving in opposite directions at the same time. You have your forearms on one roller, and your shins on the other.
Exhale to go away, inhale to come towards. Exhale to go away, inhale to come towards. Exhale away, and towards. Exhale away, and towards. Now, let's take care of the shoulder girdle and the thoracic spine, since they just had to do a lot of stabilizing work.
Put one roller underneath your knees, place the other roller underneath your forearms. As you roll the roller away from you, aiming your elbows back behind, change your spine into flexion, lumbar, thoracic and cervical flexion. As you bring the roller towards you, lifting in the direction of thoracic extension, starting at the tips of your elbows, exhaling, gaze downward, dorsiflexion of your feet. Inhaling, plantar flexion, anterior pelvic tilt and palms up. Exhaling, gaze slides across the floor, across your toes, across your shins, across your knees to your abdominals.
Rock your pelvis over the head of your femurs, twice more, exhaling, turning your palms outwards, your thumbs downward. Inhale to come up. Exhale down. Inhaling up. Now, hands wide apart, on the roller, roll the roller behind you and come forward.
This is what I was doing similar, what we were doing just before, but now with longer, lever arms, exhaling. Pelvis, lumbar, thoracic, cervical flexion. Inhale, pelvis towards an anterior pelvic tilt, chest bone and gaze lifts. Exhale, tongue and eyes down, dorsiflexion. Inhale, tongue and eyes up.
Twice more, exhaling down, palms up to the ceiling, inhaling, palms forward. Exhale, palms down. Inhale, palms up. While we're here, working on the mobility of the spine, let's use just one roller and focus on the internal rotation and external rotation of the hip joints, while we use the roller to move some fascia around on the front of the thighs. Having the roller very close to your knees, flex your knees, dorsiflex your ankles, and roll the pelvis, turn the pelvis, so that you're rolling, ah, the thighs over the roller in internal and external rotation of the hip joints.
Now, to this you add knee extension roll back, and knee flexion roll up. Knee extension roll back, and up. Twice more, back and, forth and, back and, forth, change. Both knees one direction, both knees to the left. Both knees to the right, both knees left.
Wending your way off the mat, maybe. I hope not. Okay, now, come back onto the mat and we'll take a related version of that, and then be on our way to supine on the roller. This is starting at your, ah, starting at your knees in external rotation. Both legs into internal rotation, both legs into external rotation.
Spine extension, spine flexion. Spine flexion, spine extension. Spine flexion, spine extension. Now, come off of this and come to lie on your back. As before, you'll be lying on your back on one roller, with the soles of your feet on the second one.
Have a seat at the tail end of the roller, at one end of the roller. Level your roller as best you can. And come to lie on your back. Feet are, lateral ankle bones are to be lined up with your greater trochanter. Now, interlace your fingers, hands behind your head.
Inhale with your elbows wide to the side. As you exhale and your bent elbows towards each other, nod your nose downward, press the tongue into your lower lip and aim your gaze to your knees, to your mid-thighs, to your hip joints. While you're up, roll the roller away from you. Internal rotation. And then roll the roller towards you and roll down.
Lots of rolling (laughing). Inhaling, elbows wide to the side. As you exhale, tongue and eyes down to the right, roll up partially, aim the roller away from you, and towards you. Roll down. Inhaling, elbows wide to the side, collecting your lowest ribs.
As you exhale, tongue and eyes down left, elbows towards each other to the left. Internally rotate, roll the roller away from you. And come back in. Elbows wide to the side. Arms up, palms together, elbows straight.
I said that badly. When your palms are together, and your elbows are straight, your hands are in line with the chest bone, with the bottom of the chest bone, the xiphoid process, as you inhale, turn your palms away from you and press the roller away from you as well. So you're outstretched, on the roller, in dorsiflexion. Now, press the little finger side of your hand against each other to draw the shoulder blades down, nod your nose downward, press your tongue, and press your thumbs together and press through your heels and roll up, probably, some time today, on the roller. Inhale to prepare.
As you exhale, point your feet, turn your palms away from you, begin to roll down. And when you need more abdominal support, flex your feet, press your thumbs against each other. Oh, there's a bobble, and roll down. Inhaling, press your palms away from the top of your head. Settle the back of your lungs down towards the roller.
As you exhale, press the little finger side of your hands against each other, drawing your shoulder blades wide and down. Nod your nose downward, press your thumbs against each other, press out through your heels, and roll up your spine. Inhaling, point your feet. As you exhale, draw your shoulders down, little fingers start, thumbs take over. Okay.
The first time, you know, the first time I set off to the right side, bobbled off to the right side, that could be just an anomaly. But if I did it twice in a row, that means it's time to go see Jean Claude Westin and get my spine improved. Palms together, fingers interlaced. Starts the same, taking your arms high above your head, as you roll the roller away from you, lengthening out. What's that called in the business?
Ah, axial elongation. As you exhale, press your palms against each other. Eyes go down, right, but tongue goes down left. Because we need some counterbalance here. You can use your tongue to activate the stabilizing abdominals on the left side, and use your eyes to encourage rotation to the right.
Maybe. Hm, good. As you exhale, tongue goes left, eyes go right. Pressing your thumbs against each other. See, that was my easy side, so I can do that.
Inhaling, and let's check out the other side. Point both feet, palms above your head, as you exhale, tongue goes down right, eyes go left, pressing your thumbs against each other. Roll up to the left side. Today, or as you can see from the windows, tonight. As you exhale, tongue goes down right.
Eyes are down left. And you roll down your back. Ha, done with that. Inhale, palms above your head. As you exhale, roll right up, you can just stick your tongue out because we're celebrating that we're done with this.
Okay. It's time to come to standing now. Make your way up to standing and place one roller between your shins, above your ankles. Center the roller best you can so that neither end drags on the ground, but if one end drags on the ground, it's not a problem. The roller is here as a placeholder for your ankles, for your shins, and if the roller bobbles to either side, that could be an indication that the pelvis and the legs are rotating.
It'd be preferable if they stayed straight ahead. Have the idea now that integrating your ribs with your pelvis, the heels of your hands press into the roller and press the roller up, up, up, up, up. Now, as you inhale, your eyes will lead up and to the right. Turn from your ankles, your hip joints, your pelvis, your ribs, shoulders, head, neck, and eyes. See behind you, and come back to the center.
As you inhale, press the roller up from low in your shoulder blades. Turn from your ankles, your hip joints, your knees, pressing the roller high, high, high, high, high, above the back top of your brain. Now, have the idea that your pelvis and legs turn to the left, as your thoracic spine turns to the right. Pelvis and ribs turn in opposite directions. And pelvis turns to the right, ribs, shoulders, head, neck, and eyes turn to the left.
Keep the roller high above the back top of your brain. Easy now, come down from this. Place the roller on the mat, press the tops of your inner thighs towards each other, anchor the soles of your big toes. Rise to your toes, have the idea that the back top of your head goes up to the ceiling as you reach your heels down. We'll take that same idea now with the heels of your hands, pressing the roller high from the bottom of your shoulder blades.
As you inhale, press the soles of your big toes, you shoulders descend and widen, as you hover your heels up. It's a good thing you can catch yourself. I tell my friends, my clients, my students, if you're gonna fall, make a big deal out of it. I'm going down. And also, if you're gonna fall, far better to fall forward than backward.
Let me try again. Take your arms high above the back of your brain. You know, if I'd used my tongue down, that might not have happened. Let's try: pressing into the soles of your big toes, pressing out and up with your palms, your hands, tongue down will engage the abdominals. In addition to looking fabulous, right?
Okay, bend, and once more here. As you inhale, press the soles of your big toes, lengthen up from the back of your brain, and make your way down. Thank you so much for being with us on Pilates Anytime. I look forward to seeing you again, and always look forward to hearing from you. Thank you now; bye-bye!
Mention
 |
Elizabeth Larkam (Teacher) |
 |
Maria P |
 |
Murielle P |
 |
Rachel |
 |
Marta H |
 |
Glaucia Adriana R |
 |
M.Cristina F |
 |
Genya F |
 |
Ronda P |
 |
Dolores L |
 |
Ingrid J |
 |
Lynn P |
 |
Ewa |
 |
Debi V |
Comments


And... where did you get those beautiful clothes from? They suit you to a T


You need to be a subscriber to post a comment.
Please Log In or Create an Account to start your free trial.
