Description
About This Video
Transcript
Read Full Transcript
Hi, everyone, welcome to class, I'm Claire Sparrow, and today we're doing a pre-Pilates class with no props, and we're gonna start with breathing. With your legs crossed, sitting as tall as you can, close your eyes. I'd like you to imagine that you're sitting back to back with one of your closest friends, maybe someone you haven't seen for a while, and bring the back of your body up against their body, and feel how much taller you can become. Very gently taller. Feel the back of your head meet theirs, the back of your shoulders, and the back of your pelvis.
Feel the length, feel the warmth, feel the comfort of sitting there. And as you feel your back against their back, I want you to encourage your breath there. Gently encouraging your breath into the back surface of your body. Each inhale is an opportunity for you to gently explore the back of your body, the back of your head, your neck, your shoulders, your ribs, your pelvis. And as you're breathing, you can also set an intention for your practice today.
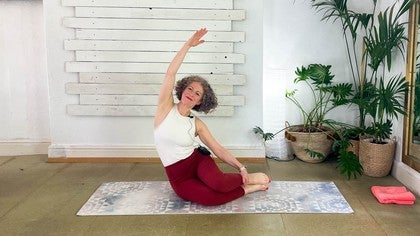
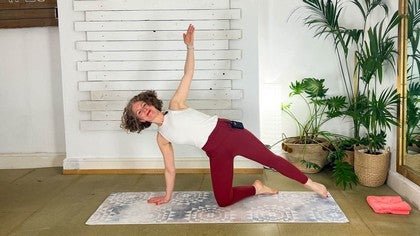
So in class, what would you like to achieve? Maybe it's just focusing on yourself. Maybe it's noticing more about the two sides of your body, whatever that is, set that intention. And then you're gonna gently blink your eyes open, and sweep your legs over to one side, so you're in this kind of Cleopatra-style position, or a mermaid sitting on a rock. Grab onto your top shin with your top hand, and then take the free arm up and over.
From here, use your legs to gently press the mat away and yawn open the side of your body. So the whole side of your body is side bending. Be mindful that this isn't a rib flaring forward opportunity, you can just let your ribs hang out behind you and to the side. And then we're breathing here, breathing into the side of your ribs, breathing into the back of your ribs. Thinking about classes we've done before where we talked about your ribs opening in two directions, can you explore that here?
And then go ahead and rotate 'round, grab your top shin with your other hand, and if it doesn't reach, just grab wherever you can, so that you can hang off your legs, and breathe into the back of your body here. So your head is long, crown of your head forwards, you're not letting your chin drop, and you're breathing into the back of your ribs. Imagine that you're inflating a balloon underneath your ribs, expanding and creating as much movement and teasing out the tissue between your ribs as much as you can. And then go ahead, come back to that side bend, maybe you've got a little bit more there, and then release. Sweep your legs to the other side.
And we go again on this side, so you've got your leg swept to the side, grab your top shin, and hold onto it. Take your free arm up and over and use the underneath leg to just gently send your mat away and bring yourself into that side bend. Your head is with the side bend. Sometimes we lose our head, so can we keep, in Scotland we'd say keep the head. So keep your head on your spine, breathing into the side of your body and into the back of your ribs, especially if you're like me and you're a rib flarer, instead of forcing your ribs can we open the back ribs to encourage the front ribs towards them?
That's it, breathing into, inflating that balloon. Stay in your legs. And then we rotate around, grab onto your top shin, and if you can't reach it, grab the bottom knee or somewhere else instead, allowing you to just sit back into the back of your body, it's almost like you're sitting into the hammock of your skin in the back of your body. Again, keep your head. Breathing into the back.
Enjoying this opportunity to wring yourself out from the inside, out. Last big breath here. And then come back into your side bend, maybe there's a little bit more in there, and then release. Okay, great job. You'll need a towel or a cushion to go underneath your head, and you're gonna lay down on your back.
Bring your arms by your sides, and just settle in for a moment. Close your eyes. Feel the back of your body meeting the mat now. Feel all 10 toes on the mat. And your feet are a comfortable distance away from your pelvis, so you don't feel tension through your hips, or your lower back.
And then extend your left leg along the mat. And what we're doing is pointing our toes forwards and then pulling your toes towards your nose. Toes forwards, toes to nose. As you do the movement, it's sending your head in a little nodding motion, and it's moving your hip up and down as well, so we're hitching up and down. Sometimes what happens as we do this, our inner seam, our top of our inner thigh, doesn't follow along, so bring your awareness there, and encourage your inner seam to go along.
Your heel's gonna stay firm on the floor. You're just pointing and flexing. Let's go with two more, pointing and flexing. And then bend your knee. Notice how it feels from one side to the other, and then go ahead and change, so we're pointing and flexing.
And we've got the benefit of hindsight, 'cause we've done one side. We know what to expect or what to look for, we might not get what we expect. And you're gonna think of your inner seam like we did before. Lengthening it forwards with your toes, and then it comes back with your toes to nose. and your heel is definitely staying on the floor, sometimes if we've got extra flexibility, we can do that movement and lift our heel off, I'd really like you to keep it on, so we keep the energy flowing all the way up, and all the way down.
The more you practice, the more you'll feel the flow where your head just gently nods with the movement. Let's go ahead and do just two more. Reaching and flexing, and then bend your knee, compare sides, and then interlace your fingers directly above your sternum, so about mid chest height, interlace your fingers, find the roots of your fingers, and hold on. Reach your hands up towards the ceiling until your shoulder blades lift off, and then spread your shoulder blades onto the mat and bring them down. We go again, breathing in.
And breathing out, melting. Your arms are gonna stay straight. Okay, I know, they may have been bending and that's okay. Now we know better, we can do better. Keep them straight.
And your shoulder blades get the opportunity to move more. And glide more on your ribs, last one, breathe in to go up, breathe out to come down, and then we're gonna go up and take them over your head. So you take them over your head, your shoulder blades glide into your armpits, and then they come back around and down onto the mat, reach up, glide your shoulder blades into your armpits, and then glide them back around again, one more. Reach up and over, and back. Loosen and take your hands away, so we're giving our hands a good stretch.
We're gonna do some snow angels, hover your arms just off the floor, and take your arms out to the side and over your head. Take them back out, as if I need to tell you how to do a snow angel. We don't get much snow in this area, but I know we've all had the chance to do a snow angel of some sort. Going over. Or a sand angel, maybe.
Taking them over, last time. And all the way down, okay, hands on your pelvis, extend your left leg out along your mat again. We're going to do our pelvic yawning. It's a bit like doing bridging, which we've done before, but with one leg straight, you reach your right shin forward, which just knocks you over to the left side, and then you roll back again. Your right shin reaches forward and you roll to the left.
Sometimes what happens is your right leg wants to go with you, really want you to focus on not letting it, so it's reaching forward, and you yawn open the front of your hips, okay? So we reach forward and yawn, now bring your arms down by your sides. Not only are we thinking of the yawning, really like you to think about the return, so your thigh bone on the right is dropping deep into the socket like an egg in an egg cup, it sinks down. And then it yawns out again, such a lovely feeling. Now we're gonna add a roll of the head to the right.
So you yawn left, roll your head right, and then it comes to the center. This is one of my favorite movements to do, because it's got a little bit of choreography to it and we could do just it, just this one little exercise. And it gives so much to your hips and your pelvis, and to your spine as well. Adding in turning your palm, so your right palm turns up. Opening your hand, so you're making that starfish with your hand.
And your whole arm turns up. This means your shoulder will hug the back of your ribs on the right, as you turn your palm up, let's do one more And rest there. Straighten your right leg out, feel the differences from one side to the other, so our brain can go whoopee, I like that, we'll save that for later. And let's do the other side, so your right leg is straight, your left leg is bent, and we start with that basic, find your foot on the floor, reach your shin forwards. Perhaps on this side, there's some little differences you notice just take a note of that for yourself for your own practice, your own awareness.
And as you're yawning, you leave your shoulders on the mat, as your hips, you're yawning. And again. You can breathe either direction, I like to inhale yawn, exhale roll back, inhale yawn, exhale roll back, dropping your thigh bone in, remember, we used the image of an egg dropping into an eggcup, it's there to house your thigh bone, let's turn our head, so your head rolls left as you yawn right. Head turns left. And enjoy the movement.
Then add your arm. So your whole arm and palm turns up, and then down. Spreading your hands, spread your thumb away from your little finger and all the fingers in between. We get such a lot of tension in our hands that we don't even know about as well, from holding mobile phones and devices. These are activities that our hands were not designed for, so it's good to give them a good stretch and open too, this is our last one, you've done great with these.
And then straighten out both legs for a moment, so you can feel the difference. And then bend your knees, hands on your pelvis, ready for bent knee openings, we're doing both knees opening. Rolling to the little toe side of your feet. And then spreading across to the big toe side. Rolling across your feet, and then spreading to come back.
So you feel your footprints on the mat when you come back each time, so your knees end up pointing to the ceiling. Let's inhale open, and exhale close. So we know from doing bent knee openings before that we only take our knees open as far as our pelvis will allow, so it's not tipping for words or back as we do it. And we're gonna use another image today with this one, of sliding doors, so your sitting bones are like sliding doors opening and closing, opening and closing. One more time.
You could use our butterfly image as well. And let's do our single legs. So the butterfly image is, your pelvic diaphragm and your inner thighs are the butterfly, the wings of the butterfly. And so you unfurl the wings. And then that's my favorite.
You can really feel the connection of your leg to your pelvis, pelvis to your leg, and your leg beyond. Once more either side. Such a useful exercise to do. Okay, take your little head cushion or towel out. Arms down by your side and edge your heels a little bit closer to your bottom for this next one, which is bridging.
Standing into your feet. Find your tailbone, waking it up today. And then your sacrum, your sacrum rises like it's lifting your organs up towards the ceiling, your hips yawn open, your bottom is as loose as you can. And then you melt back down, lengthening your tailbone forwards towards your heels, as you come down, and let it go, you can think of the sliding doors opening. And again, stand into your feet, tailbone, sacrum, lifting your organs up towards the ceiling.
And then slowly back down. This time we'll stay at the top. Tailbone, sacrum, stay at the top. We're gonna do those bent knee openings, so make sure that you've yawned open your hips, you're not clenching your bottom. And you're gonna open your knees, roll to the little toes, and then close.
Roll to the little toes and then roll back, you're balancing on your shoulders. So we felt our shoulder blades before, when we did our arm movements, so stay balancing there and on your feet and arms. Now, bring your attention to the front of your pelvis between your pubic bone and your belly button. As you are closing your knees, think about a gentle zip coming up towards your belly button like you're putting your skinny jeans on. It's just a little feeling, very light, very gentle, to keep your pelvis lifted as you're closing your knees.
Let's go ahead and do this one more time. And then, slowly come down to just before the mat, we've done this before with the adaptor hug, so just hovering. And then we do the same thing again, opening and closing. Remember the skinny jeans zip. Gently zipping between your pub bone in your belly button as you close your knees.
Do that with the exhale for best efficiency, two more. One more. And then come all the way down, isn't that amazing? Okay. Lying on your side.
Scooping your underneath arm in to support your head, and coming into a zigzag position. Just check that your feet haven't come forward into a chair shape, that you do have your feet underneath you. Pop your hand on your hip for a guide. We're gonna have flexed feet. Start off with a couple of fire hydrants and use this as a way of just getting set in the position, so the bottom of your body goes down, and your top leg hovers up.
The bottom of your body goes down, and the top leg floats up. This time, we'll leave it up, and you're gonna turn your knee down towards the bottom knee, and then bring your foot back down, knee up, foot up, knee down, foot down. So we're doing a winding movement. Open your hand, put it on your bottom. Feel what's happening as you're doing that movement.
Are you rocking forwards and back or are you able to find your range of movement, today, of your leg in the socket, without knocking you forwards or back? We talked about your inner thigh before lengthening, can we get a little sense of that here too? So your inner thigh lengthens. I know, it changes it massively, doesn't it? And then we think about our sitting bone at the back.
There's a feeling here of your sitting bone opening away from your middle passage. So often if we've had a birth injury and there's some scar tissue in there, it doesn't want to lengthen out as much, so just by bringing our attention there, middle passage to sit bone, it's gonna help you to bring length there, go ahead and make this your last one, and rest. Wow. That's warming. Let's spin round to the other side or roll over.
Scoop your arm in underneath you, check your legs like we did before, we don't want them forward, heels under your bottom. Feet flexed, hand on your hip. And go ahead and do a few of your fire hydrants, just to settle, and use them as a way of aligning yourself, checking that you're not slumping out, that you are standing into the underneath surfaces of your body, because when we meet down, we get an oppositional lift, which we've felt before, and it's really important. So let's go ahead, make this the last one. And then we lift and pause, ready to wind, knee in, foot down, knee up.
And you can explore your hip socket here, when you do the movement. And then take your hand, open it wide, put it on your bottom. And feel what's happening, and of course, it's gonna be different one side to the other. It's different for me too. I'm making little adjustments as I do it, thinking, oh it's not my best side, this side today, and that's okay.
It is what it is, okay? Let your head be heavy in your arm. Spiraling your thigh. And think of your inner thigh lengthening away as your knee comes up, lengthen away as your knee comes up. And maybe that's the cue on this side that's more meaningful for you.
Or maybe you need to bring your awareness to the back of your pelvis, to your sit bone to middle passage and that feeling of length when you turn your knee in. And you can breathe all the time (chuckles). Yeah, just make sure you do. This'll be your last one. And then rest there.
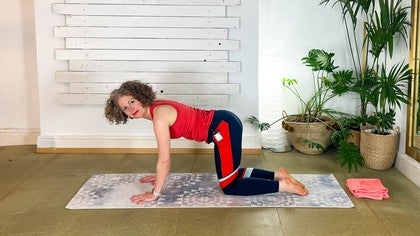
Coming onto all fours now. Hands under your shoulders and spread your hands out, find the space between each of your fingers, your first finger's gonna point forward, thumbs are pointing more towards each other. And your knees go ahead and come underneath your hip socket, so your knees will be narrower than your hip sockets. You're gonna extend your left leg out behind you. And we're gonna do that same sort of rocking movement we did at the beginning.
Reach your heel back, push through your toes to come forwards. Keep breathing throughout, and the opposite leg, really stand on that shin, so you're not flopping over to it, but you're standing on it. This is a bit like our leg pull in the mat work repertoire, so all of these movements that we do, last one, bring it in, switch sides, all of the movements that we do in the pre-Pilates are designed to get you to our traditional movements in Pilates. They're a stepping stone. Something that's really important to me, definitely, is progression, that we're moving forwards.
So this is creating that foundation, whereas to move forward from. Okay, bring that in. Then we're gonna take your left leg out to the side. Find the place to the side where it doesn't feel too stretchy, but it's a little bit stretchy. And then you're gonna rock here, so we're doing that same rocking movement, but with your leg to the side.
If you need to bend it, that's okay too. Find what works for you and your body today. And any time you do class, do what feels right on that moment. As you go back, like we've done with our rocking before, think of your sit bones widening, tailbone goes back and fans out. Last one.
And then we switch to the other side, leg goes to the side, and then we rock. Rocking back and forth, on the edge of your foot, breathing in as you go back out, as you go forward will help you to widen the base of your pelvis. Last one, and then return to the quadruped. Sit back for a moment, circle your wrist, 'cause we're gonna do another movement on our quad or in our quadruped. Come back, spread your hands.
Extend your left leg back and keep your toes pointed, so it's not a flexed foot. We're gonna do the yawing movement that we did at the beginning. So this we did on our back, and now we're doing it here, so you open your pelvis, and then bring it back. You're gonna keep your gaze towards the mat just ahead of your hands as you do the yawning of your hip. And you send your right shin down, to roll away from it and then roll back on it.
Now this one's gonna be really useful for something that's coming up in one of our other classes. So enjoy this one, and rest there, switch to the other side. You really feel the warming through your hips on that one, so your right leg is back, toes pointed, and we're yawning open. You're opening your pelvis and your hips to the right, and then you square them. You're moving your pelvis around your left hip, your left thigh.
It's like you've turned the egg and the egg cup upside down. Yawing open. Send the left shin down to help you. Beautiful, really great, all of these things for combating the sitting that we all do. Last one, and rest there, well done.
Take your left foot forwards, and spin your knee and your foot toward the right, so they're slightly crossed. Put your hand on your hip wherever you can, and just encourage it down, 'cause you're gonna get there with your hip up and we're gonna encourage it down. Take your right arm by your side and you're gonna lean forward and bring your arm forward. So keep your hand in your hip, because that's gonna help you to encourage it to behave. Your knee and your foot are going right as you're gently coming forward.
Any discomfort in your knee, you just angle your foot and your knee slightly outwards. Okay, on the next one, stay forward and pause. And then we're gonna do a little bit of our mermaid that we did at the beginning, and I'm still encouraging my hip to go down as I do that, one more time. And then rest, let's do the other side. Any discomfort on your back knee, you just need to put your little towel underneath there for support.
Turning your right foot, right knee across to the left, hand on your hip to encourage it down. Even when you think it's not, it is, Alright, and then we're doing the lean forwards, arcing your arm, the range that feels good for you, remember we talked about ribs before, so keep your back ribs opening back, to encourage your front ribs to towards them. And then on the next one, pause in front, and we're gonna do a little bit of that mermaid, keep encouraging your right hip down, as you're mermaiding, one more. And rest there. We're gonna come up to standing now.
Bring your feet and your knees together. Place your hands on your hips. And we're gonna do little bounces in place, like you're gonna jump, but you're not really. So you're just bouncing in place. Little bounces, keep your knees together.
Let your breath be free, keep bouncing, keep bouncing, keep your knees together. That's it, and keep bouncing. Keep bouncing, keep bouncing. These can be little ones up here, or you can go a little bit lower. Feel what's really good for you in your body, it's fine.
And then slowly up. Take your left foot forward and turn it across, like we did when we were in the high kneeling position. That leg's gonna come across. This time your free arm is gonna rotate around. So you're gonna lunge, and turn around.
Lunge and turn around, so you're spine twisting. And your arm is about shoulder height. And you're lunging, lean into it, I've still got my hand on my hip to encourage it, 'cause I know it wants to misbehave. Yeah, last one. And then we switch.
So right foot goes in front. It's coming across your body, hand on your hip, left comes across. Twisting 'round, twisting 'round. Smile (chuckles). And we've got one more.
And then rest there. Stand with your feet slightly apart, close your eyes. Take this moment at the end of class to check in with yourself. How are you in mind, body and breath. Did you achieve your intention that you set at the beginning today?
Did you learn something about yourself? And then gently blink your eyes open and thank you again for joining me in class and I will see you in our next class. Bye everyone.
Pelvic Health: Pre-Pilates for Whole Body Pelvic Health
Mention
 |
Claire S (Teacher) |
 |
BOO WILLIAMS |
 |
Wendy R |
|
|
Copycat |
|
|
Diane S |
 |
Kathy Jo Parsanko |
|
|
florinda andreucciflorinda andreucci |
|
|
Cynthia G |
|
|
Sharon C |
 |
Vicki O |
 |
Melissa W |
 |
Eveline D |
 |
Silke L |
 |
Kathleen Fitzgerald Henry |
|
|
Janice M |
 |
ShiQing Fan |
Comments


You need to be a subscriber to post a comment.
Please Log In or Create an Account to start your free trial.
