Description
About This Video
Transcript
Read Full Transcript
In this tutorial, we're going to progress now to the action of the posture tilt and standing and what it actually can do to your thighs and how it might, uh, make your action of hip extension actually less okay. Because if you turn sideways the action of a posture, your tilt, okay. When you pull your belly in and you tuck your bottom underneath you, the action of a posture tilt is actually hip extension. And for some people, when they do this tilt of their pelvis under and their shoulders sag forward, I know that doesn't look the best, but this is not an uncommon posture. So we want to do is let the front of the thighs lengthen. It will feel like your buttocks is coming back. And that's okay because what we want is the front of the thigh to be long.
And we want the weight to be over the heels. So play in with this position. Posturally we're going to use this band and put it around the posture, your ribs, and you can see this in another tutorial of the posture, your ribs. And as she pulls her arms forward, I want you to ma fee. See these posture, your ribs, come back into the band.
So relax the shoulders here. Push forward from under your arms and pull your lower ribs back. Very good. And now grow up very tall and let the front of your thighs come backwards. There you go. And then grow up tall. Now push your back ribs back in.
There you go. So now we have this glute area. That is whatever area it is. Some people's glutes are bigger than others, glutes. Some are firmer, some do more work. But the most important thing is we want to have access to them in their full range of motion. So again, I'm going to have a relax and tuck her bottom underneath here you can kind of see how the thighs bulge in front. Then we're going to take the thighs back, the ribs, come back, put weight over your feet, shoulders back, grow up through the crown of your head, and then really manage these. Post your your ribs back over this pasture, your pelvis, so you can't get sidetracked by a size or a shape of the glute. We need to be respectful that the posture, your ribs are over the rim of the pelvis.
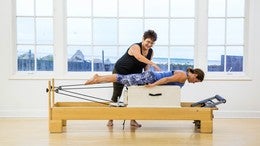
We'll take this now into a standing exercise on the reformer. So I'm going to take the band. Let's walk around to the other side of the carriage. Now standing right here, kind of in line with this foot rest. You're going to manage your weight just a second.
Manage your standing leg so it's parallel. Then this leg is going to bend and come right here on the shoulder. Rest there. So what happens here is that it's the standing leg that needs all the attention. So we could put this band back on, but I think you remember when that band was there. Is that right? I don't want to put words in your mouth.
So why don't you to take your ribs back. There you go. And then what you can feel is the action right here in the side of your bottom. Can you feel that? Okay. So let's take the hands behind your head just to make it a little bit more challenging. Please grow up tall in your right leg. Yes. Even taller. Yes.
Now tell the carriage to move to the left. Move it hold, and then it comes back. So you're gonna take the whole package of this left thigh and pull it out to this side. As the right side stays connected. So the right star side stays firm. Don't let this thigh bulge forward. Leave your thoughts it front ribs. Two back ribs. Very good. Now we're going to add a challenge.
Leg stays, leg stays. Twist your trunk towards your bent knee. On an inhale. Exhale, center. Push the carriage back out with your left leg. Very good. Yes. Inhale, twist to the side of your bent. Negro up tall on this right leg. Keep it back. And then exhale, center. Good.
So twist your trunk towards the bent knee. Inhale, exhale, center. Press the left leg away. Very good. Don't lean. No Linsey's good. And then twist to the bent knee. Grow up any bit taller. Very good. And then bring yourself back center as you press your left knee. And any variation of that starts to give you an awareness of the standing hip joint, which is right here, and your groin being underneath your pelvis.
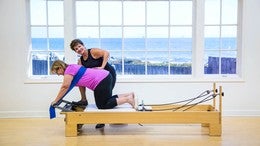
Okay, we're progressed this now to standing splits, so take your leg off of there. We'll put on a couple of Springs. Now the goal of the standing splits now in this particular exercise, come on up here please. Is I want the Springs to be kind of heavy. Okay? So she's going to put her right foot over here and I want her to feel safe here. So I'm going to put on a green and a red because I want the exercise to be felt in her hips. So I'm going to have you put your hands on the sides of your hips lid.
And let me guide you here. So put your hands like this. Okay, you're looking straight ahead. Remember when that band was here, show me you can bring your ribs backwards. Show me you can put more. There's your back body. Could you feel that? It almost feels like you're going to fall backwards. Sometimes. Okay, now grow up tall without arching your back. Push your legs away from each other and hold good. You feel that in the size of your hips, and then release slowly. Good.
Push from the sides of your heels. Good. Feel how that transfers information to the side of your bottom right. And then do that two more times. Push less gripping of your toes. Very good. More working in the hips. Pause right there and then return.
Now I'm going to make the carriage be just a smidge lighter for a second. You're going to push out and hold the out phase. If you hold, that's a lighter out. Now manage your rib package. Yeah, so the ribs have to come back. Ribs have to come back. There you go. If you how that gets a little wobbly because that's a relationship you're building between your ribs, your core, and your hips and your pelvis. Goodness gracious. Lots of stuff to think about. Bring yourself all the way in.
Go ahead and step back with this leg onto the floor. There you go. So the importance of the side splits when you have heavy Springs and you push really hard, sometimes it makes that pelvis change of position. So you have to manage the spring tension. Okay. Manage the load to make the optimal force be created in the pelvis and the hips.
Oftentimes what gets lost in your client is their rib position. Like they'll want to stand up real tall and stick their chest out, but they'll lose that posture, your rib connection that's over the pelvis. So these are a couple things that you can do to help manage that load and a, you can work from there.

Comments


You need to be a subscriber to post a comment.
Please Log In or Create an Account to start your free trial.
