Description
About This Video
Transcript
Read Full Transcript
So I've got to go through some things that can be done to help open up the shoulders and the upper back and area that naturally curves. Most people's chest shoulders start to be rolled forward and the problem is bigger than the shoulders. It's really that the rib cages starting to be contracted down and collapsing a little bit. So there's a lot of things to shift. The upper back, it one of them being getting this length of the diaphragm and the sternum starting to come back up to the vertical plumb line can be up because from a vertical plane, the shoulders can sit naturally on the side body, but they cannot do that if the chest is collapsed and starting to be too tight. So a lovely way to start to get some stimulation of this is actually working with the ball where you lie down and you place the ball right above, right at the base of the sternum. Just a bit above this, a void process where you, first of all just rape, intuit and feel the whole chest widening and then what? Some moved down a little bit here with the arms forward in the feet should be a little bit wide.
Then lifting up the chest and as you lift up the chest you can feel the rib cage rock forward and have the arms long. So there's this sense of extension up through the chest. Now holding it here and taking a few breaths. And every time I'm breathing in I'm breathing into the ball. So I'm filling up those lower lungs and as I breathe out, I length in the chest forward and also breathe out and feel this connection into the ball. Then taking the feet, walking them a little bit back so the ball rolls higher up again.
Lifting up, taking a breath in and breathing out. Feeling that length coming in and the lift and the sternum. Breathing in, pressing the sternum in to the ball. I'm breathing out an Ilan gating the chest away from the hips and again walking the feet back while keeping this traction of the sternum. So it's a wonderful, very nice way to get this length starting to come in. So the shoulders of broad breath and breathing in and lifting the sternum and pressing the sternum into the ball. And as you breathe out, feeling the length and elongation in the front body. Breathing in and breathing out. And one more time. Breathing in into the ball, lots of links and lift into the sternum and then breathing out.
And last time with a ball was almost up under the collar bones and I can feel this beautiful stretch of the chest forward. Breathing in, filling up the lungs, pressing into the ball, breathing out, creating this length. Breathing in, breathing out. One more time. Breathing in, really lengthening the sternum forward and breathing out. So that first one, there will be a sense of a lovely stretch in the whole front of the body area. That's very seldom elongated with traction into the tissue. So really nice to do. So an area that accumulates a huge amount of tension and gets contracted is under the collarbones with the shoulders coming forward.
And often people do weights and tighten into the packs or they spend a lot of time sitting and everything gets contracted. So this area gets tight, the shoulders are slumped, and even though people want to be more vertical or get mobility in the upper back, this compression of the front body is what holds them from the freedom of movement in the upper spine. So a way to open up is with a slightly smaller ball. I mean in a pinch you could even use a tennis ball. It's nice if the ball has a little bit of softness.
But to demonstrate how you would want to use this is all to get this off. I'm placing the ball under the collarbone just off to the right of my own sternum with the hand out to the side. And then I'm slowly starting to roll to the left. And as I roll to the left, I'm just taking, ideally you want to take an inch at a time and breathe into those upper lungs so you feel the pressure into the ball and then the soften and sinking into it. So breathing in, creating expansion in the lungs, pressing into the ball and the breathing out, softening into it.
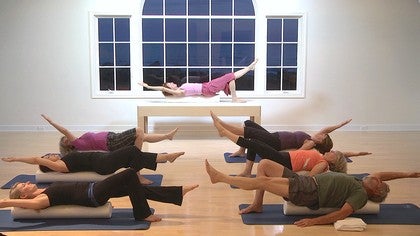
As I start to get close to the arm and the deltoid muscle, I bring the arm above my head and start rolling through. And this can be a very painful area for people rolling through through the armpit. And then on the way back, perhaps holding the back of the head and you can feel the ball pushing the shoulder blade onto the back, rolling through to the spine, and then coming back. As you go through the side body, the arm goes up to break up this tissue that can get very, very tight in the armpit and coming back up. So this would be done a lot more slowly. But this area, most people have a lot of tightness. The lymph glands, I hear the connection into the nerves, into the heart and into the side. Lungs can be very compressed, so it's very, brings a lot of relief. And often if people spend three or five minutes, they sit up and they're already more vertical, more broad and more capable of applying the principles of the exercises.
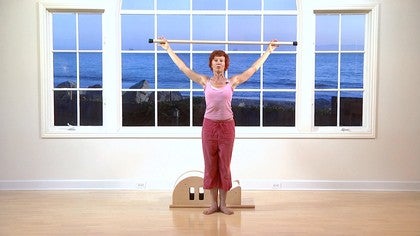
One of the wonderful traditional exercises called the series done with the broomstick where you take a broom and you place it so the broom is kind of placed at the base of the shoulder blades. You want to watch it because most people will go up higher, so nice and low and if you notice what that does is it allows the top of the shoulder, this area right here to point upwards versus forward, which is where most people live. If the body is not ready yet, they will be an Archie shaped that the body goes into. That is fine at the beginning stages because you're really dealing with this upper shoulder girdle area. Later on you start to pull the rims in and attempt to have the trunk long because this is really where the shoulders should be in everyday life.
So with this placement doing roll down as so you're rolling down against the wall rolling down and rolling back up again is a fantastic experience because the shoulders cannot collapse down. The stick is literally holding people there. The shoulders in the right place in the trunk and powerhouse work so much more effectively than lifting the sternum and very slight back bend. And again, rolling forward, rolling down, rounding the spine but not letting the shoulders come forward and lifting and arking back. So doing that three to five times. Then a nice lift through the chest and literally bending from side to side. And the marvelous thing is that the broomstick keeps the shoulders from coming forward, something that happened all the time and it starts to open up those parts of the body that may never get addressed because the shoulders that are in a compensatory pattern, then staying nice and tall, keeping the shoulders wide first variation of the twist.
You keep the hip bones facing straight forward to the pelvis is stable and you just articulate from side to side looking in the direction of the stick as you go. And then letting the body twist full range of movement all the way from the ankle. So you really ringing the body out, opening it up. So these are just a few simple ones that really open out the chest and allow the, the ribcage and the shoulders to start to get stimulated. Young people, old people, everybody loves them. The next one is to start to release the shoulders a little bit further, bringing the arms up over the head, lengthening through the spine, and then widening the arms as much as you need to to take the arms all the way back and all the way down.
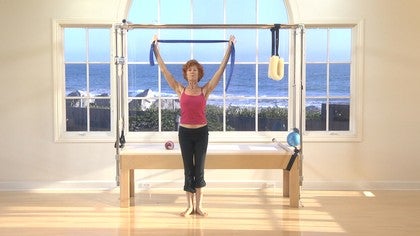
So some people may need to widen the arms a lot because the chest and the shoulders are so tight and that is fine because a right about this angle is where the pecs really grip. Some people may not even be able to get very far behind their head. They may find that this is it, this is as far as they can go. Totally fine because you're starting to restore range of movement that should be available for anybody anytime. So full range if possible, up and down. So wonderful to do, frees up the shoulder and chest quite quickly. And for some people the next level of this can be addressed with the theraband, which I have right here. So same principles, same idea, just taking it to the next level, taking the arms up so the spine is long, pulling the band apart, taking it slightly back so it stretches across the packs and then letting the band release, opening the band, taking it further back and letting the tension release so it's a huge stretch in the chest, out, lower down, letting the band come together.
One more time, pulling out, coming down and together and then reversing it. Opening, lifting, coming together, opening, lifting, coming together, opening, lifting, coming together and bringing the hands down. The beauty of this one is it stiff? People can participate as well. They just widen as far as they need to to get the movement because anybody can do it. If you widen your hands far enough, so already a lot more mobility, a lot more openness starts to come in to the chest and the shoulders. Very often when the back starts to round and the shoulders start to droop forward, the muscles between the shoulder blades and muscles that are pulling them together start they atrophy and for quite a lot of people they may have this very broad back and the shoulder blades are why, but they have absolutely no concept of how to pull the shoulder blades together and because of that they stay in this frozen position and by that time the skeleton starts to tighten up and possibly freeze.
So they usually don't have much movement in the upper back. So this to pull the shoulder blades together is very key. My teacher, Ramana, I used to say she wanted you to crack the walnut. The image was that you take your two shoulder blades and squeeze them together and chest expansion of course was a classic one that would ask for that. There are different ways to interpret chest expansion, but with that concept in mind, the most important thing is the arms that coming back is not just to keep the lats engaged in the side body end gates, but to really squeeze the shoulder blades together and pull back.
So you're getting that pinching movement of the shoulder blade, activating, pulling back and coming back. And for quite a few people that can be regulatory because they've never worked those muscles. Now I found that those muscles can be so weak that arms springs or Cadillac springs are just too strong for those little tiny delicate muscles to start to fire. And that's where working with lighter tension and less restriction is very, very helpful as a gradient to prepare the body. It's almost like a pre plot is to get them up to speed to be able to do the full exercise.
So one of the ways to do this as if you have your third band at about shoulder height and you pull the band back into what I would call a square shape with the focus on the shoulder blades coming together, you start to make those muscles start to work so broad. It's very tempting to do this movement and the goal is to create this complete square again. The elbows may drop down and the hands come in. This is very common and it's avoiding the shoulders. It's less an arm exercise, it's more the focus should always be in getting those shoulder blades to start to pull together. So again, this broadening on the chest and squeezing the shoulder blades together to get those muscles to learn to fire. And once that's done doing the same thing, just chest expansion from a slightly lower position, the band can be placed anywhere that's going to work. But same thing, tall chest, squeezing the shoulder blades together as the arms go back.
And of course there's always the option of adding head and head and straight releasing so that the whole spinal column and the full exercises being interpreted. So these are wonderful, wonderful exercises to just get the upper back to start to fire, get to understand the different parts and of course any extension swan or flying eagle is a wonderful exercise to add in. So just to finish, a lovely exercise can be Flying Eagle on the Cadillac with the roll down bar. Not often done, but if you have the bar right here, just lying with the shoulders pulled up. So there's a slight compression in the shoulder blades. It really opens up the chest, lifting the head and chest stop and then working the shoulders down the back to get the upper back to start to bend at work, pulling the shoulders back and the same thing we worked on on the ball.
Really bringing the sternum forward and then lifting the arms and lowering back down. Very stimulating. It depends upon how high the Cadillac is. This, this roll down bar is placed pretty high for me. If I had someone stiffer, I would definitely have it lower down than I do here. So if I had someone sniff, I would place the bar.
I had one of these talent spotting Cadillacs, I would be working much lower down because it allows a lot more freedom of detail if the back is very stiff. So again, just pulling the shoulders down the back. Same feeling like it was with the ball lifting and bringing the sternum forward and lowering down in one more time. Shoulders down the back, lifting up and lowering down. So these are just some ideas. Keep the back very flexible. Dress the shoulders, addressed the upper back in order to get it more mobile. Hope you have fun with the material. Thank you.
Stretch & Release: Open Your Chest
Mention
 |
Niedra Gabriel (Teacher) |
 |
Lisa Press |
 |
Charlotte F |
 |
Pat S |
 |
Michele P |
|
|
Elizabeth S |
|
|
Wendy K |
|
|
Stacey B |
 |
Susan R |
 |
Marsha P |
 |
Suzanne R |
|
|
Jeri Ann Alexander |
|
|
Robin Lim-Healy |
|
|
Kimra Z |
 |
Keirsten S |
Comments


what a beautiful name you have.

You need to be a subscriber to post a comment.
Please Log In or Create an Account to start your free trial.
