Description
For "Matapalooza," our regular instructors came together to share their knowledge and different styles with each other and our members. This series is about sharing the love of Pilates, friendship, and moving to feel good. Make sure you try the classes by Adrianne, Monica, Niedra, and Meredith as well. You can do them by themselves or put them together to make longer classes.
You can find all the classes on the Matapalooza Playlist
About This Video
Transcript
Read Full Transcript
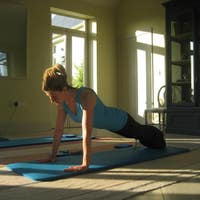
Hi, I'm Amy and I'm here with the wonderful teaching staff of the regular teachers for Polonius anytime. Monica, Meredith, Deandra, Adrian and myself. And we are here to give you a little collection of ourselves and I'm choosing to do some fundamental teaching today. Just a nice general warmup. And we have the rare opportunity today of being together as a group. So I'm going to give you about 10, 15, 20 minutes of fundamentals and each one of us, I'll give you something quite special and I don't know what they're doing. So it's kind of fun for me too. And um, get ready. Thank you.
So these are my favorite fundamentals and there some of the things I learned in physical mind, which, um, that's where my background starts. So let's just get down in this position and a yeah, fundamentals today. So about 15 minutes or so. So just kind of absorb yourself in the simplicity of them. Um, they're really good exercises, I think to root into the larger exercises that might show up in a little while. Uh, get you connected into the center of your body, into your back and into your breathing and your mind. So we're gonna just take five breaths here, working on expansion of the back of the rib cage and into this side, and just encourage your, the weight of your bones to hang over your leg.
So we'll take a breath in through our nose and exhale again and just let yourself get heavy onto your legs. You don't even have to pull your abs in at this point. This is really feeling the expansion or thinking about the expansion of your body.
Yeah. Two more breaths guys.
I'm putting the heel of your hand right on the right hip, left on the left hip index fingers together and the thumbs together and just put that diamond right on your pelvis. Basically walk your feet a little further than what we would set up for pelvic curl and we're going to just let those shoulders drop back and we're going to start with a little bit of pelvis motion and pelvic rocking and I do use the image of the bowl of water that the pelvis is a full bowl of liquid or water. And let's just start by gently tipping that back and forth. You choose which direction you'd like to start tipping. So either lifting the pubic bone up or [inaudible] letting the pubic bone rock forward.
Just think about this more as a bony action than a muscle action. Just feel yourself shift playing with the weight shift idea and might choose a little exhale when the pubic bone rises in an inhale when the pubic bone rolls down and an exhale as the pubic bone rises and an inhale when it rocks down. Now just now go into a little more thinking of muscles and I'm going to reference from the right hip bone over to the left hip bone that those muscles get closer together horizontally across the middle of your your pelvis. And just keep the rocking going. Just start to feel like you're almost pulling your hands closer together on the front of you and maybe one more in each direction.
And then we're going to change planes instead of a front and back. We're going to try going side to side. So find the place right in between. You've got a, your bowl is level now and then let's tilt it left and right again, you choose if you want to start right or left. So if you think about it as liquid sloshing from side to side inside the bowl, but you'll feel your bones of your pelvis kind of come up into the palms of your hands. Perhaps feel the bones
Yeah. Okay. So our bowl is filled with liquid. Let's move all of that liquid around in a circle. You choose which direction you want to move your circle into and where you want to breed. So it's motion right in the center of the body where our limbs attach first of course at the pelvis, we'll get into the shoulders in a minute, slosh the liquid around on your inside.
Feel the weight shift of your bones across the back of your pelvis. One more in the direction you're going. And then start to move that sloshy movement around the other way about four times
And then find the place again where that pelvis is still or the bowl and the liquid is nice and level and still and take a nice breath in through your nose. So as we exhale, we're going to now tip that liquid all the way down the front of your body and go into the bigger articulation or the bridging. So I'm going to lift that pelvis up and start to bone by bone. Motion up and tell them about the middle of my back. We'll take a breath and then exhale. As we start to come down, you can think about each bone at a time or just feel like you're trying to bring your right and left hip bones closer together on the front of your body.
A fundamental image. We'll do two more and the exhale, the right and left hip bones are coming closer together and you're rolling and if you're not rolling, just notice if you aren't or not. Ideally, as we get better at the articulation, we roll smoother and come on down across the bones of your spine to all the way to that level bowl. One more to go and tip that bowl, slosh that liquid right up the front of your shirt. Inhale at the top and exhale coming down. When you come down. Once again, commit to the level position and keeping your legs right where they are. We're going to lift one leg. You choose which one you'd like to lift and it's you're coming up right from that hip joint. I learned it as a knee fold. My knee is folded at, the hip is moving and then go ahead and set that foot down.
We're going to alternate legs and let's exhale as we lift. The opposite leg objective is to keep that liquid, that level bowl and inhale as you set it down. And the exhale proceeds the motion of your leg. And inhale as you lower, no design of your foot, just really easy, relaxed. You're learning about the hip, hip joint and lower. And again, exhale as if your right and left hip bones are coming closer together on the front of your body and lower down. And let's just do one more on the other side.
We'll come back to that knee fold image in just a moment. But as we do different one of the leg, choose one leg and let it sway out to the side, away from your center without spilling your bowl of liquid and then bring it back into center. Let's do the other side. You might choose an exhale on the opening and inhale on the coming in. So bringing awareness really into this control area of the middle of the uh, body, the torso, lower torso where the legs attach. Let's do one more of those. Nice.
Weighs out to the side and bring it center and then over to the other side and bring it center. Now we learned the knee full. Bring the knee full back up one of them and try to now the sway of that femur or that thought. You might not have as much motion or you may have a lot and do two or three. See if you can just really let the f the legs sway without tipping your bowl. There we go.
And one more easy foot and just bring it in. Lower that down without spilling your bowl and the second side, exhaling it up. Three or four sway the thigh and way the thigh. Yeah, and those right and left hip bones trying to come closer together in the center right underneath and naval. Bring it home and then lower that leg. Okay, so we're going to move up to the upper body and the head and the neck for a second. You can keep your hands there if you'd like to or just put them down. Make it comfortable. I'm gonna Start with the image of the nose circle. And so if you want a big marker, magic marker on your nose or your Pinocchio or something, um, just easy circle of your nose.
It is going to make the head move in a little bit of a circle. It's kind of tapping into the muscles around the skull, on the back of the skull, specifically giving a little awareness in a wake up to those back there at the top of the spine. And to make your circle go the opposite way. You can keep your jaw relaxed. Alright, so the no circle I always do before a cervical nod, I learned it as saying yes. So if you take your head and you say yes, pick up your chin, look down the front, maybe down to that bowl and then lower the head back down and then right back up to the ceiling. Let's breathe first and exhale and Knob the chin. See? Yes, look down at the bowl. It's your beginning. That very first phase of flection of our spine. And let's roll back down.
Add One more without any specific arm motion yet and look right at that bowl and observe how nice and level we are and then coming down. So now clasping the hands behind the head for a little more support. We're going to exhale cervical, non again. See if now maybe the muscles in the front of the trunk can from like chest to pubic bone, move toward each other. So you're probably going to come up a little bit higher.
We're going to hold that position looking at that nice still bowl. Take a breath, pick a leg and bring it up into that knee fold position and hold it. Inhale. Let's exhale. Pick up the other leg and join side by side. Now we're just going to hold this for five breaths. Relaxing the feet on the exhale, that image of the right and left hip bones coming closer together.
Inhale and again, exhale, deepening the sensation right in the front there. As we know, those muscles get utilized intensely in more of the classical exercises. We're right now giving blood flow to those muscles that prepare us for the larger exercises. So guys, let's go ahead one more exhale, set one foot down the other foot down, and then go ahead and bring your head all the way down. Lower you bringing your arms straight up are going to work on our shoulder girdle. Reach up to the sky, peel those shoulder blades off the mat, and then just easily slide them to the mat, imprint them, reach them off the mat for a stretch of the upper back, and then feel the weight of the shoulder blade bones. Press into the mat two more times as if you're trying to leave your bony shape on your mat surface.
Imprint that there one more time and go back into your pelvic bowl and just make sure that that is nice and level. We're going to do a scissor arm, so one arm by your ear, one down by your hip. So the scissor arm fundamental for me is learning about the muscles across the ribs to keep the back imprinted down on the floor and just easily moving your arms from one scissor to the other. Your bowl is level, the middle of your back is imprinting and it's as if those muscles through the ribs are embracing and hugging through you here and holding you nice and close. It should feel secure. Let's go one more pass of the arms, one up by the ear. It's easy. Motion of your shoulders and one down and lower. Okay, so taking both arms, palms, space down.
Lift your shoulder blades up towards your ears so it's as if the hands are going to slide on the mat and then move the arms the opposite way. Reaching fingertips toward heels. Three more you can inhale as you shrug your shoulders up and notices you shrug down that there should be a tone, muscle tone change right at the side of your armpit in your ribs. Two more later. Be Finding those reach, keeping your bowl level and last one, sliding the shoulders up and sliding the shoulders down. Again, nice secure rib cage with your arm motion. So we'll flip over to the tummy. Just easy. Does it right on over. Stack your hands in a way that's comfortable for you.
Separate your legs just a little bit and pick up the water that's lost out on the floor maybe, and pull it back up into your bowl. So I'm going to start with the head float and it's an easy, just very small. On Your exhale, lift the weight of your head off of your hands. You're still looking down at your a met and just hold and then lower back down. So the beginning phase of the back extension, take a breath, exhale as you float your head off your hands. It's just so small, just unweighting skull off the Hams and lower down two more times. But notice as you lift the weight of the skull, what might radiate down the middle of your back, those strong back muscles that can help hold up your head and we lower down.
And one more time lifting the weight of the head for the head float and just pause. Let your neck lengthen up. Out of your shoulders. Let your shoulders melt down, away from your skull. Pick up that water that might be have spilled out of your ball. Feel the relationship of your front to your back. Here we go, and then lower the head down where it's going to stay. Going into no prone hip extension.
Learning about how the leg moves from the pelvis when we're faced down. It's very tiny. As you exhale, reach one leg long, like a half an inch longer than it is now and lift it from the where the leg meets the pelvis right there at the lower but high leg and lower it down. Alternate legs. Exhale the other side and lower down the keep in mind I'm going to bring you to those bones again where your hands first were holding your pelvis. You want those bones really in contact with the mat, pubic bone, right and left hip bones. Exhale the other leg and possibly go back to that feeling or thought of pulling those hipbones closer together on the front of the body. Exhale, one leg up, pick up the water that may have spilled out of the bowl and lower down. Exhale the opposite leg and just go upstairs and do a real quick shoulder check and see if that neck is still as long as it was a moment ago. Lift one leg, hold it there, lift the second leg, hold it there, and then we'll pick up that head and just float.
That's floating the weight of the head slightly off the hands. Move those hands now down below. Um, along the sides of your body. Palms facing up. We'll lower our legs, we'll lower our head. So we'll go back to the shoulder blade motion. Lift him up to the ears and as we slightly lower the shoulders down, start to reach the arms more from the sides of the back end. Do the head float.
I call that flight. This is what we learned as flight. And we inhale as you come down. Allow some relaxation of the shoulders. It might be that they go back up by your ears when you breathe in. Reach with the exhale they slide. Notice that slide. We'll invite the head to come up into the float.
Is your water still pulled in to your bowl? Are you still on those bones and lower down? We'll just take a two more inhale. Enjoy the shirt shoulder shrug if you like it, and exhale, stretch, connect to your lower extremities and even know what your toes are you long and stretched. Breathing in as we come down and here's our last flight. Exhale and reach. I'm just experienced lifting your arms, maybe an inch off the floor and what more muscles you might feel in the sides of your shoulders. The sides of your back, behind your arms.
Just take notice of the front of the body. Is it connected to the back? And we're coming all the way down to rest. Here we go. We're going to flip back over on two arms back again. And let's actually, I'm sorry guys, come on up to sitting. I'm going to face you and just have a cross legged position and have your hands on top of your head. Okay, so trunk rotation or seated rotation.
The reason I like to put the hands up here so we don't overuse our arms, but we really learned where our trunk is and how to turn the trunk. So choose a side to turn your trunk to keep reaching your head up into your hands and just notice whichever direction you go to anchor both sides of your pelvis to the floor and then come back through your center position and go to your opposite side. And all the while the head is stretching up through those hands and you just keep going down the stairs to your pelvis and check those bones and come to center. And again, exhale as you rotate your trunk seated rotation. Inhale, center connecting to the ground, connecting to the sky. Other side. Exhale down energy and up energy in hill center.
We'll just do one more each direction. A basic fundamental of trunk rotation. Just notice again the relationship of the front back muscles, possibly even more now on your sides and center or your shoulders low. And one more to the opposite side. And then back to center. And the last fundamental exercise I like to teach is the cat.
So find yourself up to your hands and your knees. Hands are right below. Shoulders, knees, right below hips first. Just try to see if you find that long line from head to toe or head to heel. Should say head to tail bone. Yeah, and we're going to start with the cervical nod. So from that position, just like we did align flat, if you nod your head Yes to your bowl and then pick up this contents of that bowl up toward the sky. Or if you'd like to think of your tailbone, you can tilt it down. We'll just open up the back of the spine like their big eyeballs back.
They're really seeing the sky. And then do the opposite. You can lift your tail, drop the contents out, set up your bowl a little bit and stretch your chest forward and lift the chin. And just two more of those. We can exhale cervical, nod. Open the eyes of your spine.
Let the content spill out. Stretch yourself long from head to tail in one more to go and exhale, cervical, nod, open up the back of the spine, big eyeballs, and then opposite direction, Chin tail length from head to tail. And just to give yourself a little finish, you can open your knees a tiny bit more and just sit back and just take about three to five more breaths, let it go. So those are very, very basic fundamentals that I love to teach. Or if I have, you know, 10 15 minutes and I just want a little mellow collection into my body, I'll give myself those, maybe a warm up for someone else's class. One more breath in and choose how you'd like to roll up to finish.
Thanks guys. Good fundamentals.
Girl Time with Kristi and Meri: Matapalooza


Comments


My name is Rashida. I'm excited to be a part of this online community. I chose this as my first class and my body feels very alive and awake afterwards, so thank you. I'm hoping to be able to use these comment boxes as the place to ask/leave feedback that I would if I were there in class with you.
Towards the beginning you did a lengthening pose that was pretty difficult for me because of the shape of my tummy. Should I just get in the habit of attempting to modify the poses until I lose some of the excess weight there?
Also - as a beginner, how often should I be doing a 20-30 min class? Daily? 3-4 times a week?
Thanks so much for any guidance. I look forward to my next class. It's clear you all love what you do!
Radiantly, Rashida
Yes, these comment boxes are for you. Modify anything that you feel you need to, yes. As a beginner....I would suggest 2-4 classes per week so that you build your foundation. The shorter classes are good, but maybe try one longer class too.
Yes, we ALL love what we do and we love hearing from our students/members as well, so please don't be shy in asking anything you want!! Hope to hear from you soon!
Amy

You need to be a subscriber to post a comment.
Please Log In or Create an Account to start your free trial.
