Description
Monica starts with an assessment to find out more about Tara's injury. The movement part of the class begins at about 5:20.
About This Video
Transcript
Read Full Transcript
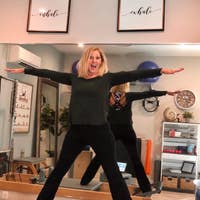
Okay, so I'm here with my friend Tara. And I've been wanting to work with her for a long time, because she actually practices some Pilates work on her own. But I've never been able to teach her. And she has a bad back, and I don't know anything about it, but I wanna find out right now and help her. And I asked her to be one of my bodies today, to be able to work with her also, because I have a few videos of when you have a bad back, or a weak back, and we stay extremely basic.
But if you know Tara, nothing holds her back. And she is actually extremely active, and does everything, and still has a bad back. So, and that is actually, I was telling her earlier, my passion of why I got involved in Pilates. It's not too hard to actually challenge somebody who's healthy, but what if they are that advanced, or that mobile, or that active and they have an injury, can you still challenge them safely? So, we're going to enjoy a little time together.
So we're gonna find out about Tara, and we're gonna get started. So you can lie down with your head here. And just lie on your back, and knees bent, feet flat. So, first off, does that feel okay on your back, to lie flat? Okay, so lying flat's a good position?
Good. So what happened to your back? What would you say is your back condition? Okay, so from holding your kids, or other kids too, from plain bad posture and sitting, just I know for as myself, after having each kid, I felt like I had to go to rehab square one, And build up my strength the whole time. And if I didn't do that properly, I always felt so thankful and so blessed that I had the knowledge to do that because I had no idea how moms do it just carrying on if you didn't get your pelvis right back into alignment, and build all the foundation and the strength.
So did you ever get diagnosed with something specifically for your spine, like a herniated disc? Okay, so what did you get diagnosed with? Herniated disc. Herniated disc. And they think hip dysplasia.
Okay. (laughter) Fun. That you're born with, apparently Yeah so hip dysplasia that they might not have caught when you were learning to walk and your gait and everything. Running, and all the years of abuse, yeah. Do you still run?
No. You don't run, okay cause it really hurts, yeah. So do you walk fast? Yes. Okay, so you walk fast.
Probably like a year ago your back went completely out? Two. Two years ago. That must be frustrating, Yes. Because I know you used to just charge up the mountain, and hike and all of that, okay.
So when I hear the things that you're saying, I would immediately turn to a magic circle, so I'm gonna go get one, Okay. 'cause that helps a lot. And if you don't have a magic circle at home, you can always use a ball or a towel, or anything that really makes you aware of hugging a midline, 'cause that's unfortunately part of it. Obviously not hip dysplasia, but you know, your body relaxes and expands, so you have to pull yourself back together, so hugging a midline is super important in our rehab here. I'm just gonna check a little bit your range of motion.
Okay. Okay? Does it feel good to round your back? Sometimes. Where is your herniated disc?
Do you know what number? L five. L five? Okay, and does it feel good to round that area, where L five is, or does it feel better to arch? Probably to round it. Probably to round, good.
Alright, but flat feels great. Yes. Okay, good, alright. You have no problems with your arms? Arms are good to move in any direction.
Love it, good. How about when you lift your head up, does that hurt your neck? Does it like start pulling and straining? Yeah. It does?
So if you lift your head up now, does that bother it? Nope. Okay, and lower it down. Good, and then which hip did you say? The right one?
So when you bend in a knee, does that bother it at all? No, it feels okay. It feels okay? Good, alright. And what about straightening it?
Does that feel good? And if I circle it, does that bother it at all? No, and the other way? Okay, good. Then we're gonna see your left.
Good. Yeah, so good? Mhm. Alright, so I'm obviously gonna teach you today, like you've never done Pilates before. Because there's all kinds of things that I want to make sure you know, so I don't want to skip anything.
But yet, I want to get you moving, because you're here to kind of work out, too. (laughs) So we have, in Pilates, a line from one shoulder to the other, and from one hip bone to the other, and it's really important in your hips that that line's straight, Okay. and that your shoulders are straight across. And then, to take care of your spine, you really wanna make sure that these hip bones are right under your shoulders Okay. That they're not standing on a hip, like I caught myself a few times right now when I was talking to you.
But that you're having them right under, okay? So super important. The other thing that might be a little different than the work, or might be the same style of Pilates that you do, 'cause there's many different interpretations, I teach from how just Pilates originated, and so I want to make sure that your belly pulls into your lower back. You really wanna feel like you have a corset on, and you feel safe and secure, that your stomach is supporting your lower back. I won't want you to create any tunnel under your lower back, I will want it flat. Okay.
Okay, awesome, good. We're gonna keep, that is what we call your powerhouse. I'm gonna call it that. Some people call it your core, but we really refer to this like weightlifting belt area. Alright, so the first exercise that we do in Pilates is called the hundred.
I want you to stretch your arms really long, good. And I want you to take a big breath. And I want you to exhale, and relax every vertebra onto the mat, like let them go, melt into the mat. Nice, and inhaling. And exhaling, so even between your shoulder blades, between your ribs, and behind especially L five, solid onto the mat.
Does that make sense? Mhm. Good. And in with the air. We're basically inhaling for five counts, and then you're exhaling for five counts.
Good. So I'm gonna put a magic circle between your ankles. So you've got the breathing, good, and then just put your feet down, good. Alright, good. And I want you to take a big breath again, 'cause I've added this little thing, and then you're gonna exhale and melting down, good.
Now we're gonna add, we're gonna just keep adding all these little elements to the hundred building blocks. Now you wanna pump the blood through your body, so this is our one warm up exercise for the mat work. So strong arms, and they're gonna pump like this. So now we're gonna try to breathe while we pump. We're gonna inhale, and exhale, L five going down to the mat, and inhaling, very good, and exhaling, beautiful.
On the next exhale, I'm gonna let go here, you're gonna lift our head up, to look at your belly button pulling into L five. That's awesome. And big breath, and on the next exhale, we're gonna squeeze that circle, and bring your knees up over your hips, yep and we're gonna stay there. Good, yes. So the feet are at the same level, you're still breathing, exhaling.
(laughs) and instead of rolling your knees in, I want you to turn them out a little, and squeeze your bottom to squeeze the circle, and then add those inner thighs, you're doing good now. Good, keep everything going but your head, I want your head to go down. Go ahead and lie our head down to the pillow. Good. And exhale, this is the most important thing, then I wanna see if you can add feeling your bottom squeezing.
Big inhale. And I want you to see if you can feel the inner thighs squeezing the circle, awesome, even your outer thighs. And one more here, big breath, and you're gonna lift your head up on this exhale. Good, beautiful, I'm gonna let go of your feet, and you're gonna hold all of this from here. And big inhale.
And exhaling. Awesome, hold underneath your knees, and pull them toward you as you rest your head down. Good, so that's the hundred. Did you feel it in your stomach? Yeah. Good, good.
Did you say it's different from the one you've done? Okay, alright. Now we're gonna, does it hurt to sit up straight? 'Cause sometimes it does to just sit up, so you can roll over to our side and sit up, so whichever way is more comfortable, but I want you sitting up. Good, alright.
So now we're gonna bend your knees, and put your feet flat and put the circle between your inner thighs. That's gonna help you stabilize your hips. Want my feet together? No, we're gonna have them in line with this bone and that bone. Okay, I would like I just a little higher up on your thigh.
Awesome, good. Now you're gonna put your hands underneath your knees. Good, and I want you to almost touch your forehead to the circle, and round your back. Make the letter C with your back. Good, excellent, good.
And relax your arms, we're gonna leave them out of it, they're just gonna be there, good. I want you to think about your belly button literally trying to pull into L five, okay? Awesome. And that is the most important part of your body right now. I want you not to move all of this, and I want you to try to reach this down to the ground, to the mat behind you, okay?
So how we're gonna do that, is we're gonna start by squeezing your bottom. And now you've got a nice strong pelvis, and then pull your lower belly into here, and we're gonna roll back this bone, good job, and this bone, and this, and you're gonna keep your hands where they are, and you're gonna stay here, I want you to take a big breath. As you exhale, try to sink into that bone, oh I loved that. And big breath. On the next exhale, sink into it so you really engage this, and use it to come forward again.
That was awesome, really good. Hurt? No. Good, no pain. We're gonna press your hips together, round your back, and we're gonna do that again.
We're gonna move this more than you'll move your upper back, and you're gonna roll down here, and this one and this one. That's better even than the first one. Take a breath, exhale. Pull away from me, so you really pull, and then round forward. You're doing an awesome job.
So this is called the roll back, and it'll eventually be the roll up. We are rolling back one bone at a time, in a straight line. Then you're gonna roll up one bone at a time, okay? So we're gonna go a little further this time, but not skipping any steps. We're gonna touch your head to the circle, we're gonna pull our belly button in, we're gonna squeeze the circle so that we have a strong pelvis, and pull into L five as we roll back.
Good, and once you have that, you can slide down your hands a little. To the bottom of your shoulder blades, take a breath. Exhale, look at this upper six pack, use it to curl forward, and then pull in, pulling in, awesome. Very, very good. So that is the point of what Tara needs strengthening on.
So that's where your challenge is, that's as far as we're gonna take this exercise. We're gonna do four more, did any of that hurt? Nope. Good. So you're gonna squeeze, and you're gonna round your back.
We're gonna pull into L five, right? And we're gonna roll down, once your arms are straight, then they can slide down a little, but you're always pulling into here, and then we're gonna come forward, yes, fantastic. And three more. Press your hips together. Good, keep your upper body there so that you roll back, exhaling into here, good.
We're gonna go next bone, next bone, next bone, just down to there, take a breath, and then exhale to pull into your back, pulling in, yes. You really wanna use that exhale, I'm gonna hug you in, yes your back needs that. Just two more, not easy, very hard. Press your hips together. Yeah, that's awesome, yes.
Pause when you hit the bottom of your shoulder blades with a big breath. And exhale, scoop and squeeze the circle for some extra strength, oh yeah. Keep rounding here, that's very important for you. One last one. Squeeze the circle, and head goes down, good.
And you're gonna feel your inner thighs, and your pelvic floor maybe, and your lower belly. This time, I want you to keep doing all the great things you're doing, but go another bone, another bone, don't get scared, scooping in. Rest your neck and head down, and that is the best way to roll completely down, with control and using your powerhouse. Bring your knees together, good. And now you're gonna keep pulling in L five, keep your box on the mat, and you're gonna just hug in the right knee to your chest.
Perfect, hug it. And then we're gonna straighten your leg up the ceiling, and put your hands behind your thigh, good. Pull it towards you again for a stretch, awesome. Okay, we wanna, this is really good for your hip, but it's very detailed. Right now, your whole bottom is up.
Let's get your bottom down. Good, and now you're gonna feel the difference. Your right hip is a little hiked towards you, it's not a straight line. So this leg's good, but we're gonna slightly turn out this leg. And now that they're even, this one's overworking a little, stretch the right one back towards you, try to pull it, don't move the hips though.
Pull it towards you without, very good. Yes thank you, pull the leg towards you. Good, so go ahead and hold it here, and feel the stretch, and I'm holding your hip correctly, but now let the hip go and let the knee roll in, the leg's gonna stay straight, but you can roll it in, and that's how you were stretching it earlier, with your hips off alignment. So there's no integrity gonna be formed here, it's not gonna get stronger. So we're gonna hold it like this.
The knee's gonna point a little bit towards that shoulder. Then this hip's gonna get stronger. Press your arms down on the mat as a sharp pencil. We're gonna draw a circle on the ceiling, without moving your box, pulling into L five, I'm gonna help you, I'm gonna demonstrate. But your most important thing is this stays glued, and that knee stays a little turned out for you, so that we can help your hip.
'Cause we don't want this line to get short, and this one to stay long, 'cause then your box is not a box anymore, it's a rectangle. We're going to cross the body, around and up, that's all we're doing. And you're trying to do that, with keeping your belly button in. Yes, and now we're gonna go the other way. And one beautiful, and two.
Now I'm gonna hold you from here, and three. Yes good knee, don't roll the knee in as you cross the body. Thank you, one more, good for you, hug the knee in. Good, and we're gonna put the foot down. You looked really good today, but each time you get stronger and stronger, then we keep advancing that exercise and it gets harder and harder.
And straighten this leg up, now you know a little bit, so you don't wanna roll that knee in, good, as we stretch it, good for you. Good, now we're gonna press your arms down, keep your box. And we're going to, good, circle one, so this has to draw in, two, good. It's like it drops anchor into the mat, beautiful. One more, a little less knee rolling in, reverse.
This also really leans out the thighs and hips, so that's always a good thing. But all those benefits are extra benefits of the groundwork. One more, I'm gonna keep your hip more like that, yes and hug the knee in. How we doing? Good, good good good.
The next exercise in a mat, that you would be capable of doing, is rolling like a ball, but we're not gonna be rolling for a little bit. Rolling is not so great when we're getting over a back injury, okay? No rolling, no twisting, and no back arching. I want you to hold onto this knee, and is your belly button pulled into L five? No it wasn't. (laughing)
Are we back now? Good, can you put this foot down, and grab your other one, without letting go of your belly button? Awesome, can you do that again? Good, and again. Good, hold here.
Can you do that with your head up looking at L five? Good so remember I'm gonna want you to keep that square box. Good, is this hurting? Nothing, good. Now we're gonna put this foot down and switch, oh yeah.
That's what I wanna see, nothing moves in the shoulders. You're just pulling into the mat. And nothing moves in the hips, 'cause we're not using the other leg to pull in, that leg's just hanging out. Yeah, good, now we're gonna stay here, and because the other leg's not working, we're gonna straighten it like that. Good, and squeeze right here if you can.
Good, and switch. Pulling your belly into L five, most important, and switch. Yes, and pull in to switch, you're doing perfect. Yes, and switch. And switch, and switch, scoop it in.
Keep it scooped as you switch. Little fuzz bothering you, and switch. And one more set, come on, scoop, and last one, good, hug both knees in. Rest your head down, good for you. That's called single leg stretch.
We're gonna do the double version of it, okay? But I'm gonna give you a magic circle, 'cause I want you to work on those hips getting stronger. So we're not gonna roll the knees in, we've already avoided that, right? Just like the single leg circles I was saying. We're going to go ahead and pull your belly in, lift your head up, good.
Almost like this exercise you just did, but now straighten both legs forward. We're gonna go forward, yeah. Scoop, scoop, and bend them in. Awesome, this goes down, and you press your hips together. Really good, scoop in.
No feet, feet don't help too much. Squeeze the seat instead of the feet. And squeeze, good, and in. Alright, now I want your arms to go straight up to the ceiling, can you do that? Oh yeah, let's rest your head down for a second, good.
So stay there, and the legs are gonna go here, and we're gonna put your hands on your ankles. Awesome job, you can put your head down. I'm gonna make you work in a second. Arms up, and scoop. Very good, arms up, and scoop.
Now you've got it. Can you bring your head up using your belly? Perfect, knees wider, good. And you're going to take your arms up, and grab. Now eyes on your belly.
Scoop it in, don't let it rise up like a loaf of bread in the oven, and bend in, I know you can pull it in more. You're gonna scoop in and protect your back. Thank you, two more. Scoop in and protect that back, yeah. One more, it's working, huh?
I mean your belly's working hard. And in, and rest your head. Perfect, good. Now we're gonna do spine stretch forward. So you're gonna either roll to the side, or roll straight up, but you're gonna sit up.
Good, and you're gonna open your legs so that they're a little wider than your shoulders. Alright, and arms are gonna lift up shoulder height. Perfect. So I need you to think about your back. I want one bone on top of the next, okay?
I want you to start by pulling your belly button into L five, beautiful. You've got your corset on. I want you to squeeze up off your bottom. Lift up like you're on a bed of nails, and you're like, oh I don't want to get pricked, okay? Now we're gonna bring your head to your chest.
And exhale, trying to touch your head down to the mat here. Oh yeah, beautiful. And then pull into here to inhale up. I love how you're coming up one bone at a time. Take another breath here.
Exhale, draw it in, and exhale down, yes and rolling forward. You're really allowing this area to stretch, and we're gonna roll up. Something super important for you to start learning how to do, Tara, is how to not let all of your weight, which I don't think you do anyway, but we're trying to not let our weight cave. You've got a herniated disc, we've got cartilage squishing out, you don't wanna squish any more out. So you wanna pull into that injured disc, and you wanna try to use your belly to create space, and then head down, and exhale, beautiful.
That is so good, yes. And then as you roll up, pull your belly in, and lift off your seat, awesome. And give yourself a little break. We're gonna do one more like that, that was really good. You're gonna pull into your back, and try to give, with the belly, give yourself space, that's what I wanted to see.
And then head down, and exhale. She's trying to create space between each vertebra. And pull into here, and lift using your belly, lift off that seat, and relax. Really really good job. How'd that feel? Complicated.
(laughing) I agree, totally complicated, it's a complete mind and body workout. You got it, that's right. I want you to lie on your right side. You know I've talked about your box? We're just gonna flip your box on your side.
And I want the side of your body on this back edge. Good, and I want you to bring me your shoulder back three inches, good. I want you to bring your elbow back here, and rest your head on your hand, fantastic. So from your tailbone, to your head, I'm gonna want a straight line. Pull the ribs back little more.
Then I'm gonna let your feet come all the way here. I'm gonna give you a magic circle to work on strengthening your legs and your hips for your back, okay? We're gonna put it right here. And we're gonna relax this. See how your foot wants to go in?
(laughing) You're like, yeah what is up with that? We actually strive to work in parallel, but when you're learning Pilates, and getting stronger, I'm gonna have you work a little on turn out, because we need to develop this muscle, okay? Good, and so that naturally, from this bone, it's like a spiraling, I call it a barbershop pole, like the red and white stripes? Like it's all spiraling, and then that knee looks up a little more to the ceiling, and then those toes don't go down. Okay, it all trickles down.
So we're gonna pull into L five. And you're gonna try to bring those two pads together. Pulling in, and we're gonna squeeze down and hold it, two, three, four, five, and release it. That was awesome. So from here, and then try to feel this, and the knee slightly up as you squeeze down, two, three, four, five, and release.
Got better, didn't it? Stomach pulls in, and squeeze down. Even use the bottom leg to kind of squeeze also, yeah. And release, good for you. Now I'm gonna put it on the outside of your legs, so we're gonna bring this down.
Good, and here, there we go. Hip stays stacked, pop into place. Got some good work for you. Alright and we're gonna stay here, and same thing. We're gonna keep your shoulders, we're gonna pull in, and then from this bone, I want to see the spiral.
Oh yeah, good. Now I want you to really make this part of your thigh burn. You're gonna pull in, and I want you to use this to stretch the circle, try to stretch two, three, oh you got it, that's it, and release. Two more, scoop in and use this part of your hip to stretch. Fantastic, release.
One more, scoop it in, and stretch. And release, good job, both legs together. I'm gonna take this, and you're gonna roll onto your belly to go to the other side, same exact thing. How's it feeling? Good.
Good, so we're gonna have maybe a little, two more inches back if you don't mind. You won't fall off, I'll keep you, good good. And the feet way forward, so then you'll feel more stable, too. Alright, keep the hips there. Your hips actually have to come back just an inch, not this at all, but bring your hips back, yes there you go, good.
Alright so this hand's kind of like a kickstand to hold you. And I'm gonna put the circle, good. This hip is your right one, right? So this line, I have kind of mentioned it earlier, it got a little short, so we gotta make it long again. 'Cause these hips have to be right on top.
And your cute white waistband on your pants were a dead giveaway, too. We gotta keep this hip right here, and we're gonna spiral it down, spiral spiral spiral. We're gonna use your inner thighs and your bottom, first of course is powerhouse, pull into L five, and then squeeze down for one, two, three, and release, awesome. So you're pulling into your back and you're squeezing down, squeeze, two, three, and release, so good. One more time, stomach in, and you're gonna squeeze, two, three, and release.
Really good, Tara, great hip work. Now we're gonna put it in the outside. And this leg's gonna come up to here, good correction, love it. So now we're gonna make this part of your thigh burn. You're rolling back a little with your shoulders, there you go, good.
Pull your belly in always, and then stretch, and release. Love it. Stomach in, and then use this to reach, don't roll that knee in, it's dying to, I know. And we're gonna push up with this instead, yes. Can you feel that now?
And release. And stomach in, and spiraling, you're gonna stretch up with this to that outer thigh, and good, lie down that leg. Turn onto your back, and I'm gonna crawl up there with you, to finish with something called teaser. We're gonna get you nice and centered on the mat. Good, good good.
Thought you were gonna get next to me. Oh, snuggle next to you? No (laughs) I usually do all this on a lower floor mat, but I wanted, since most of the work was right with you, I got you on this high mat. We're gonna bend your knees into your chest. Good, and you're going to rest your feet on my thighs.
So we're gonna straighten your legs, good. And this is one that you kind of can only do with me for a long time. But because you are active and strong, I wanted to give you something that was still challenging but can be safe for you, okay? I want you to give me your hands, and I want you to lift your head up and pull your belly button into L five. Is it there?
Okay, and now I'm going, I'm gonna, I don't want you to help me, in fact, I want you to try really hard to pull your belly into L five and keep it on the mat while I pull you up. Don't let me pull you up, keep pulling into L five. That's it, that's it, that's it. Awesome, beautiful. Take a breath, exhale, pull me down with that.
Less arms, I can feel arms, more powerhouse. Now, can you see a little bit that when you roll down, you rolled more to your left side? It's kind of like the same as a roll back and the roll up, that you wanna roll down in a straight line, so we gotta keep the box square. So we're gonna, how are those feet, they comfortable? Yeah. Okay.
We're gonna lift your head up as you look at L five. Good, and now keep it on the mat, keep pulling it in. So right now you're on your left hip, stay on your right hip, beautiful. Pulling in, yes yes yes, fantastic. Take a breath, and stay on your right hip as you pull me down.
Keep staying on your right hip, beautiful. Beautiful. Nice job, one more. Take a big breath, and then I'm gonna pull you up, you stay down. It's like this really intense scoop of your belly, you feel that?
Big breath, and pull me down, staying on your right hip, fantastic. Stretching out that back, lying down your head. Bend your knees in, and this feels good too? Good, alright. How did all that feel?
Great. Good. Alright. Really good. Good. Can we do this every day?
(laughing) We can do it every day. So working with the midline is super important to stabilize those hips, really making sure your focus is on pulling it into your herniated disc, right there, never doing anything opposite. Okay. Okay? Doing a combo, and then we're just gonna keep on building on this.
That was great. That was great. Good, thank you!
Back Care: Back Care for Beginners


Comments


Flexion was the choice for this client.There is plenty of flexion in Pilates Mat.
Would you show how we should choose moves for "extension" pron with herniation. I was told 25% belong in this group.
Some of this group feel pain even in "imprint". They are happy in extention.
Unfortunatly, some people are not aware enough to figure out if they feel better in flexion or extention. So we chalange them in "neutral", till able to feel their preference.


You need to be a subscriber to post a comment.
Please Log In or Create an Account to start your free trial.
