Workshop #3775

Aston Postural Assessment

60 min - Workshop
143 likes

Description

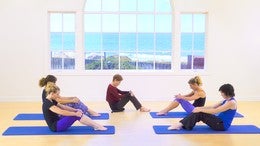
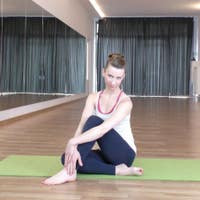
You will learn how to smooth out uneven movements in this postural assessment for Pilates work by Judith Aston. She gives you tools that you can use to see body patterns so you can understand what is happening in your body. She also shares how you to find your best neutral so that you can experience motion throughout your entire body when you use ground reaction force.
What You'll Need: Yoga Block, Table Chair, Pilates Pole, Reformer Box

About This Video

Transcript

Read Full Transcript

Chapter 1

Introduction

Welcome to asked him postural assessment for Pele's work. I'm just delighted to be back here working with blotches anytime. It's always so much fun to see how this work and the work that you do with your organization and all of the lessons that you provide online help people all around the world. So good. Good for you. Thank you for inviting me. I started teaching at a College Long Beach Community College 55 years ago. Actually it's almost going to be 56 coming up soon and so much started there for me in terms of all the classes that they asked me to teach.

So they asked me to design and teach to create and teach movement education for the Physical Education Department, the theater department, the music department, create a dance department and community education. So since I was just barely, I was just over 21 when they hired me. Um, the piece there is that it just allowed my creativity of creating so many different courses and one of the courses that seem so important to create was for acting students in the theater department. It was so fascinating because I realized that the students being between 18 and 20 for example, years old sometimes didn't have the life experience to actually be able to put on a characterization that communicated what the body would be doing along with the script. So perhaps in, in the character that they were playing, the person who was supposed to be really, really strong and powerful and the words were powerful, but the person doing it, the student would look like this. And I would look and I'd say, do you know what you're doing with your body?

And they say, no. And I say, could I help you get into a stronger position to portray that character and so on. So sometimes people have the opposite, their chest was up and it would be arched. And yet the portrayal was supposed to be as someone very shy and very quiet. So I created this class seeing body patterns in 1964 actually, and a, I've been teaching that for all of these years to fitness people and, uh, teachers of movement disciplines and structural integration practitioners. I had the opportunity to create the early movement program for all of them. Um, and people that do fitness training, people that I'm trying to think, um, coaches that work with runners, et Cetera, et Cetera, all need to learn how to see.

So today what I've done is take just some of the concepts and begin to introduce them to you, whether they're for yourself alone or as a teacher so that you can begin to see what's going on with your student and make certain suggestions. For example, if my pelvis were and my hip were high on this side of my body and low on this side for my chest and head to be aligned with this angle, okay, I would be like this. You can see that my chest is now an angle with the height of my hip. But usually that's not what happens. The body tries to center itself, so itself corrects like that. But when you can begin to see what's going on with the body, you can begin as a teacher to make certain suggestions.

Can you just see about pushing off the ground and lengthening your leg on the right and see if that helps your hips feel better. Can you begin to just let this side of your chest relax or this side linkedin by inhaling up this side and exhaling down the other? So there are certain things that we're going to get into in this lesson today that allow you to play with some of these ideas to facilitate yourself or perhaps one of your students. Okay, let's get started.

Chapter 2

Shifts, Tilts, Rotation, and Dimension

Let's get started with the lesson. Okay.

So I've put dots on my body segments in terms of at the pelvis, midline at the navel, at the sternal notch, and at my forehead. So just using these dots to assist you with this idea of seeing where the body is positioned in space or the placement of body segments to each other. Let me demonstrate a few of these things. So if my pelvis were to shift to the left and my chest to the right, I might then let my head negotiate this by tilting in the opposite. And many times people will go into a casual stance like this and this seems to make it work.

Right now is this obvious that you can see the shifts of the body parts? Okay, close your eyes for a second. Let me take a different position and now look at what, what do you see? Is one leg out further than the other? Which way is my pelvis going? It's going to the right. My chest is going to the left.

My head stays over my chest to the left. Okay, so sometimes just putting dots on the body centers can reveal a lot. Here, let me do this side view. Here's my hip joint. Here's my shoulder, here's my waist. Pelvis is forward news, her back chest, his back head is forward. This might be an obvious pattern that you may see with a lot of people to have this anterior to posterior displacement we call shifts.

Okay. Can you see that and see what I have to do to come back to more neutral position. When the body is off center from its neutral or central position. For example, you might have taken a fall where you impacted and fell on the right side of your body and it shifted your pelvis like this and while the bruise may heal, this pattern could be strongly suggesting compensation in other parts of the body, but what might happen is you can see with my body in this position, my pelvis is going to, my left, my chest is going to my right. This makes uneven use of my legs, so you may notice that after a fall like that you think, oh, it's just because I fell on this side, but actually look at yourself in the mirror because it could be the suggestion of that fall took you way off center and that's going to change the strain pattern in the legs.

It's the sooner you can get back to your more neutral position, the safer it will be for your joints to heal in a better place and also for your workouts. Good. I'm taking my doubts of now. Yeah. The second category, the second category of looking at the body's postural pattern, one is shifts. The second one I want you to think about is tilts. I started the idea before that one shoulder may be high and the other shoulder low and the opposite in the hips with the body trying to come back to center. Many times people will try to correct this by adding a lot of effort.

For example, some we could say pull your left shoulder down that now you are level. But what might happen is it's not the problem with the left shoulder. The problem is that somehow this right side got tight doing something and many times that something is our job. We sit, we face this way, the printers there, we're always leaning right? We're always leaning right all day long and it shortens the right side of my body. So this person may need to lengthen an exercise and stretch this right side to become more level. It's not the problem.

Maybe with the left side coming down, you'll be able to figure this out. So one way to look at the body is until it says, I said and sometimes it starts with one knee being high and that often goes up to the hip joint, up to the crest of the pelvis, and in many times somewhere in here it starts to shift going back and then the head often tilts again. So if you take like a straight dowel or this is a walking stick and you're just looking at that in the mirror and crisscrossing and see what you see, you'll begin to appreciate how your body is utilizing tilts that may be taking you off center. Okay. The third category in looking at postural assessment is rotations. And many of us in some way, we know about rotations in the sense that in sitting in sitting, for example, we know that we like the left leg over the right. Yeah.

And that the right one just doesn't go that way. It doesn't have a place to hold because maybe we have this pattern of not only that the hip is high on the left, but we rotate internally with this leg. So that makes this position really comfy and familiar, not necessarily good for us because in a sense it just keeps reinforcing the same pattern. So rotation, um, I distinguish whether or not the rotation is going forward on the left, toward the right or it's going forward on the right toward the left. So in this case, I was going forward on my left where the right, my pelvis and leg were legs were rotating that way generally that would, if your trunk were aligned with your waist, it would be facing this way. So usually there's a counter rotation going on.

Many times it's in the chest, sometimes it's mainly in the shoulder. So instead of the shoulders looking like they're open, matching the chest being open, you'll notice that one shoulder and the arm rotate in. Begin to look at this in terms of rotations going on in the body. So we've looked at tilt, we've looked at shifts, tilts, rotations, and the last one I feel most important for now is looking at the body's dimension. Every segment of the body has its own true proportion and natural fullness.

So my chest naturally is about this fall. Okay. But if I take it because I was told, particularly as a young ballet dance student that I needed to be here, then I worked very, very hard to hold this position and you might see that while my chest deepen the back of my chest. Now that very shallow, yes, because I have all the fullness in the front. This would be the opposite for the chest, that the chest in front is really not very deep and the chest in back, the chest and back are quite deep. These have different consequences on the body. When I am so full to the front and my dimension is so much greater to the front, you can appreciate that when I jump or do dance or do whatever exercise I'm doing, where I'm going to be going up and down, I am loading the back in a way that really creates quite a bit of stress.

Likewise, when I am in this position and I take up running, the impact from the running probably bypasses most of this and goes right to my chest, my neck and my head. For example, so looking at the body from these four perspectives, shifts, tilts, rotations and dimension. Then gives you a an opportunity to start to see what's going on with your own body and how you might want to pay attention to it when you're doing your daily activities or your fitness work or your Pilati set up as we're going to look at it a little bit today.

Chapter 3

Finding Your Best Neutral

Let's get started with some of the movement designs so we can use some of these concepts in finding the best neutral for you. Now, before you do whatever particular exercise you're going to do, you find your best neutral. So let's start with a pretest. Jia and Amy are going to help us now. I've asked them to participate in doing some pretests for us.

In one of these pretests we'll be standing and feeling where the weight is on the feet, the weight. So whether or not your weight is on the balls of the feet or on the heels of the feet or one leg more than the other, one foot more than the other, I mean, or maybe the ball of one foot and the heel of another one often can reveal rotation. So I'm going to have them do that first where you go ahead and come to standing and just see where your weightbearing is right now. And just tell me where that is. Geo, do you want to tell me where that is? A little more in my left heel but in both heels but more in my left side. Okay.

Alrighty. And you were way on the outside of my left foot inside of the rhyme and the heel. So interestingly enough, both of them have a little bit more weight on the left ball of the flood and heels stronger for Amy and g heels, just mainly heels. Okay. What I'd like you to do now is to do the roll down and just go ahead. Let me get out of the way of the camera here and also have a look at you from the side. Go ahead and just do the rule and go ahead. When you're ready. Go ahead and come on up. Great. Andy can, was there anything that came to your attention while you did the, like is there some area of your back you're kind of aware either doesn't move or moves more than another? I'm aware my lower back does.

It doesn't curve as much. I feel like I get really flat right there. Oh, okay. Okay. I'm missing Shane. Okay. All right. We're filing that away. And lastly, if you come to the floor and we're going to have you use the props. Sure. Or do you want to just do it once without or do once without, okay. Once without, um, I'd like you to do the trunk rotations with your arms behind your head.

Can we head to your, okay, good. So these three pretest of weight bearing, the roll down and trunk rotation, we will be coming back to in a bit. Right now we're going to start the movement designs that I've brought for us to do and to learn today. Okay. Go ahead and get your prop and come back to the floor. Yeah, the first exercise is called arguing, which by the way, to the audience, I want to say that. Um, I did, we did a group class, a class number 2123 a couple of years ago and that would be a great class to go back to and go through that as well as this. We're kind of moving forward on this particular lesson, but do go to 2123. Okay.

I just wanted to not forget that. Okay. So first of all, will you place your hands on the crest of your pelvis with your thumbs facing back and push down on your pelvis a little bit so you wiggle and you can feel that weight bearing and push your pelvis back. Pause right there and come out of it. So right now it's just a pelvic articulation. There you go and forward again this time as you roll the pelvis back, let your chest fall forward and down. And let go and exhale, roll your pelvis back and come back to your starting position.

Great. So you can just rest your hands on your lap. Now you can do this exercise on any surface where you can sit the edge of one of the platforms, the box, your pad, um, a bolster, a chair. Wherever you are sitting, you want to mainly focus that you're sitting on your pelvis more than the back of your legs. When you sit on the back of the legs, it tends to roll the pelvis back to start you. You want your pelvis to be able to roll if you want, particular the lumbars to be able to stretch and get loose. Okay, so many chairs to design where we're sitting on the seat all the way to the back of the knee and it's always rolling us back while we're working on a computer. So remember this little tip about sitting mainly on the pelvis and not the back of the legs. Okay? So for in here, as you begin to let the pelvis roll back this time, let your chest gently fall. If you can do this without contracting the ABS, place your hands here and Gla.

Grasp the tissue in the abdomen and see if you can juggle it and ask it. Let go for a moment for my spine. Let my spine move. So now let your pelvis roll back. Keep this soft and that chest. There you go. There you go. Are you able to go further? Can you feel that? Go ahead and now just roll your pelvis back. Beautiful.

Very nice. Do that by contracting your abdominals. Now contrast this by contracting and feel what happens to your range of motion. What happens? You can draw you. The audience can probably see it. Can you tell us what you can't go as far? The contraction from the front is inhibiting the freedom of the spine.

So when we do most of our day wanting to have good tone devs, there are times we need to let them go, to be able to facilitate this fluid movement and range of movement in the lower back and spine. Good. Okay, so keeping that in mind. Now go ahead and let yourself just push off your feet a tiny little bit to let your lumbars start to go back. Roll back, soften the belly. Let your chest go. Let your head go about their ladies. Now Inhale and notice that the movement might go into your back if you let it. And now exhale again. One more time. Inhale into your back.

Exhale again. Slide your hands up to your pelvis. Lean forward now. Push off your feet. Push off the heels of your hands. Go into extension. Inhale up the front. Ah, and release the hands and settle into your neutral, not your head. And see how that feels. Do you feel the Mo Movement? Go to your pelvis. Very nice. Contract your abs.

Now nod your head. Do you feel it go the same way? So what they're just experiencing and what I'm wanting you to experience is that when I let go of this, the extra holding around this area, my spine gets massaged with this jiggle of just even moving my head, let alone the exercise. One more piece for the exercise this time because as the body, as the skeleton comes into the re the spine, as the rib cage comes into the spine, there are all these vertebra and fossette joints as we know, and if we try to do some movement always, exactly bilaterally symmetrical. Our life has created asymmetries within that spine. If we allow the asymmetry to be honored by just slightly feathering down, right, left, right, left, right, left, right, left.

What happens is you are again, we'll get more emotional. Let's do that from the beginning, so we'll take it from the top. Start with your pelvis and as you start to fall down, your pelvis is moving back. Just feather ever so slightly and slowly, slowly as you want. Get to the bottom and exhale. Inhale into your back. Exhale entail, come forward. Lean forward a little further. This time, Jia, there you go.

Push off your hands, push off your feet. Inhale, stretch to the front without leaning back. So you extend in length and now settled back to your neutral. How's that feeling? Nod your head. What's happening now. You, you, you feel all of it moving. We did not rehearse this, honestly did not.

It's so much fun because you two are so toned and so beautifully toned throughout your body and we want that. But we also want the mobility and the flexibility to have the impression of the earth in the sky. Massage our body. So where you do one more set on your own, I'll just watch. I'm not doing it. Go ahead and let your pelvis roll back slightly. Feather feather. Let the chest rest on the front. That the all the dead air out.

Inhale into your back one time. Exhale, lean forward. Slide the hands up. Push on the heels of the feet. Heels are the hands. Go into extension on the link. Come back to settle on your whole pelvis. Nod your head every time I see more movement. So ladies, let's not go further right now. Just come to standing and tell me what happens to your weightbearing on your feet.

What happens here? Your weight feels more evenly distributed. What about you? I don't feel that on the left. Now. Isn't that fun? Because we did not do a right and left exercise. We did a central axis, whole body participation, paying attention to this spine, rolling the pelvis and the shoulders.

And what happened was it set them or reset them into they're better neutral. Just turn facing that way again because people looked at you from this side before, before you started your exercise. Perhaps you can see that they're more centered. Oh, very nice. Thank you. Very good. Okay, good. So let's go on then. In this time, what I'd really like is I'm to have you, um, sit on that box and I'm going to have you sit on the corner of that table.

Yeah. For right now. And faced that direction. Okay. And what I'm going to have you do, so you're sitting low. I'm sitting with my pelvis higher than the knee.

If you're going to do this on a seat, having your pelvis a little higher than the knee would be good. You're with a lot higher, but you can do it on all different surfaces. Here is an additional part of this exercise I'd like to add to get changes up to the shoulder girdle, neck and head. So if you want to watch me just once when I go into flection, I'm going to start it by taking my legs internally, rotating then and my arms. And I'm going to go into that flection position. And exhale.

I'm going to lean forward, push on my feet, open my arms and legs in external rotation for the inhale, and then settle. [inaudible]. So as we start to roll back with the pelvis, let your heels go out that the arms cross each other. Really go into this flection pattern in your low back. Exhale, lean forward. Bring the heels in, palm space up, push off, go into the extension.

Inhale. Ah, and settle into your new [inaudible]. Yeah, so we're going into this curve in the back. We're going into this curve, a longer curve and straight or curve to the front with adding internal and external rotation of the limbs. Turn the legs out, palms go down. Exhale the feet. Push your lumbars back. Beautiful. Exhale, pull dead air out. Lean forward. Bring the heels in, legs and arms, going to external.

Ah, and relax what is stand and see how that feels. Do they go on up to your shoulders a little bit more now and your arms feel like they're weighted? Yeah. Great. You mean the Trapezius and all or not holding them up? This is very, very good. Okay, great. So that's the second application of the arking exercise we did with just mainly the trunk and then we added internal and external rotation. And lastly they found neutral.

So one last time. Only this time we're all gonna stand this time I'll do it facing the camera this way. So now we'll do the same exercise where you're going to soften your front and let your lumbars go back, soften your knees, arms get heavy and you exhale. That's plenty right there. Exhale, lean about an inch forward. Bend the knees more. Push off the earth to straighten the legs. Inhale, let the arms open, palms forward.

Inhale and settle where the front and back are about the same length. Okay, so this is your neutral for now in standing. You could have done that on the box. You could have done that on the pad, you could have done that on the bolster. But here's the application again. Let's all face this way now so they can see you starting with just transferring your weight slightly toward your heels. That's your back soften. Feather down.

Exhale at the air out at the very end. Soften your knees. They're not really bent very much. Blow the air out. Inhale into your back. Exhale again. Lean forward to the balls of the feet. Bend your knees, push off, arms extend out. Inhale, and then settle down onto your whole foot where the front and back are about the same length. And nod your head and see what happens. Yay. I see it go through. This is good.

Okay, so let's get some chairs and do the next exercise. Okay? Okay.

Chapter 4

Utilizing the Force of Gravity

This next section is just called rocking and it will be hinting the trunk at the hip joint. [inaudible] what I'd like you to do is just, um, inhale once and then exhale down the front and just soften your front. When you get to the bottom of that, just lean a little bit forward across your hip joint right there. That's it. And just come back easy. Just fall into gravity and come back. Good. So now we know about gravity, right?

We know that it pulls on us every moment on the earth that we're on the earth [inaudible] but it's not partial to us. It's, it does the same thing on enormous buildings. So these buildings are being pulled by the earth, but the earth pushes back. It pushes an equal force to the weight coming upon it. So that for example, if we were to hold one arm up like this, go and try this and move your arm. Okay, bring that down. Let the other arm cross the field of gravity and rotate it and feel the difference of these two. The one that crosses the field of gravity is being pulled on more than the one that is this little narrow space up here that I'm rotating.

So suddenly this is much more effortful, great for toning the arm by the way. But not if you have to do this for all day long for your job. So there are ways to utilize the force of gravity and it's counter force. The counter force that pushes off the ground toward the sky is called ground reaction force. And this is what gives the body shape. It gives weight and sometimes it gives a lot of effort.

It helps a gravity, gives a lot of effort to the body and ground reaction neutralizes that effort. So for example, would you go ahead now and fall forward and put weight into your feet. But this time instead of using your back to come back, push down and engage ground reaction. And when you push down on your feet, it just brings you back so easily. Do that again. Fall into gravity. Push down and use ground reaction to come back now fall into gravity. And don't use ground reaction. Come back the way you did the first time.

Can you feel you're still on hold? The movement didn't finish itself. Okay. So we fall, we push off, we come back. Now let's do this going side to side. Will you let your body, your trunk lean to your right so your over your right issue of tuberosity and now lean and fall to your left. Good. See if you can let your head go with you two. There you go. And Go back and forth to the right and to the left.

Now you're on the left. How do we get to the right in an easy way? I use ground reaction force. Push off your left foot and come over. Push off your right foot and callback. Push off your left foot and go over. Don't push on your right but go to the left. Do you feel the compression?

She didn't like that one. We saw the little distasteful expression. Yes. Okay. So one of the ways that we can do movement is to alternate between the forces of gravity pulling us and ground reaction, pushing us to massage the body all day long and to use it in all of our exercises. Every Palabra is exercise. You can be alternating recycling these forces to your maximum. So let's do this. Now. Let's lean to your right issue of tuberosity.

You don't have to go quite as far this time. Lean forward onto your right foot. Push off your right foot to come back to your tuberosity. Push off your tuberosity to go to your left tuberosity. Push off and fall to your right, left foot. Push off your left foot.

Come back this time. Push off your foot on the left and the issue to Rossy. Come to the right. Lean forward. Push off your foot and raise your arm up. Let go of that GRF and let the arm come down while you're forward. Push again, lifted up. Let go of GRF this time. GRF keep the GRF to bring it all the way to the ceiling.

Let gravity have it. Lean forward. Push off your left foot. Lift the arm, keep pushing. Keep pushing again and let go. So now the dance occurs because you are doing the force of the gravity and the ground reaction to help smooth out the snags or uneven movement. How does that feel? Yeah. Okay, so now let's take this into rotation. Just slide your hands forward on the right back on the left and reverse and let your head go in the same direction. And now your trunk and now your trunk. And now push off your right foot through, right push off.

GRF Your left foot to turn left down and up, down and up. Can you feel that you're using the foot GRF to help your whole axis rotate? Very nice ladies. Great. Very nice. We're getting ready. We're getting closer to doing some of the philosophies exercises. So this concept of alternating gravity and ground reaction.

Let's take it to standing now. So go ahead and come on up. And now kind of the same thing. Just transfer you. Put your hands on where you sent your center gravity and move your center of gravity to your right foot. Let your head go with you and to your left foot. You're just rocking. But feel that if you push off your left foot to lengthen you to come up and over to your right, soften, push off your right foot to go to your left, you end up in a much longer position. Okay.

And soften. There you go. Okay, so now that your arms just go to your sides, push off your left foot to go to your right, push off your right foot to hold your arm up. Lifted up, let gravity habit control the fall by sustaining some ground reaction. Beautiful that go same side to the ride. Push off to lift, push off to lift even higher. Slowly control the fall by controlling GRF until you let gravity have it to the left. Push off the right, push off the left, push off the left, more control the fall income onto. So it just makes the movement quite fluid. So one of the things, let's just not use ground reaction and let's just bring the right arm up and out to the side and then to the top and to the side and to the top and to the side and contrast other side up to the side, up to the side up and okay, the right with GRF push off to go right GRF up. Push off to the side. It can be a micro movement.

It can be almost imperceptible to the people watching us. It's just a little weight and it helps take the weight out. Don't use GRF and do those movements at that speed. And suddenly it feels like just to shoulder exercise. Did you feel that? So let's feel both arms now.

Lean a little forward. Soften both knees slightly. Push off that bottoms up. Push again to go further. Yeah. Push again to hip hinge. Ah, push again to come back up. I just got he started. Yes. Three little taps using ground reaction. Let's do it again. Lean forward. One, two, three. Beautiful.

Go all the way down and push off the GRF to roll up and come back. Beautiful. Do it without GRF. Go ahead. Yeah. Do you feel how you have to effort your back muscles more? Let's let have them see that one more time with the TRF. Okay.

Our new best friend and GRF GRF Gera. GRF The fourth one. Yeah. Can you describe any difference for how your body felt? Whole hold on. Segmented. Oh, very nice. Oh, per year. Also in better alignment because when I did it this year, I was back on the heels again. Okay. Very good. All right, so I just want to remind you watching us that we just did the arking exercise to find neutral, which went from flection to extension to neutral.

We use the arms internally rotating on one of them just to go ahead and include the upper body with the flection internal rotation with the extension external rotation. We did rocking seated. We did rocking standing. We did rocking and reaching, but the gift came together when we alternated between gravity and ground reaction. Now a lot of people I know I learned in dance you have to fight gravity and so you have to hold with the Skylar. Can we hold with this sky reach for the Sky Hook with the top of your head. This is having gravity take us down, but we are resisting it.

Okay? The only problem when you do them simultaneously instead of alternating is that you go on hold and all your movements are on hold. Feel the difference if even just standing here, we just push off the ground and we feel a little inhale gets to the top like the top of an elevator. We settle back down into gravity. Push again, get to the top and settled back down. Keeps the body dynamically juicy. Okay. Because the constant movement, continuous movement.

So that's the end of part two going through the movement designs. I want to take a little bit now of time to introduce how to apply what we've just gone through to doing some of the work with the exercises and so on and so

Chapter 5

Applying the Concepts to Pilates

forth. Continuing from the theme of allowing motion to go throughout the whole body. Let me just give you a few concepts from this work to apply throughout your day, but particularly when you are getting ready to do your exercises, your workout. So first of all, you want to find your best available and neutral.

Some days are harder than other days and you might be feeling like this really, you might be feeling like this in your body. So rather than start your workout in this place, which could create injuries, do that arking exercise that we just demonstrated where you are flexing, honoring this flection of the chest changing and using this push off to help give some boost to the chest to find your neutral position. For now. If it's been a particularly challenging day or it's been an emotional day and you don't really want to force something, even just bringing breath into an area can make it safer for your back when you get to the exercises than it is if, can you see, let me explain why. Can you see that? If I'm in this position and I collapse my chest, watch what happens right here to my back, so I compress, I load the bag tremendously. If I'm going to pick up a weight, I have probably multiplied the stress on my back and depending on how many inches that weight is away from my body, it could be 40 pounds of stress extra to that part of my back.

So take just a moment to neutralize yourself from the day or from the driving to the gym or to the PyLadies class. Take a moment, find neutral. Second thing. See if you can begin to get this to be automatic that they're going to, you're going to play between this second concept of gravity and ground reaction alternating and recycling the forces of gravity that pulls us to the center of the earth and ground reaction that pushes us off the earth. So in your setups, as we just demonstrated with the exercises we did, you're using the GRF two effort and letting gravity control the fall effort using GRF for the up. Let gravity have the down controlling the fall considerably. Slowing it down. You're using, you're letting go of that GRF a little bit at a time.

Okay. The next thing I want to remind you of is we recommend that people take in this idea of micro movements, that one of the important concepts for us is the movement might go from here to here for example, but because of shoulder injuries and life and patterns and uneven strength, you may find that the pathway for these movements is a little bit unlike the other. Exactly. It moves through a little micro plane of adjusting. Same with when you're going down into the arking and you feathered between the right and left the set joint. For example, as I'm bending to go up and over, I'm doing the same thing between my ankle, knee, and my hip, but it's almost imperceptible. I point this out more as a thought form for you to use more than your teacher's going to say, I'm sorry, but what are you doing?

I'm using a feathering concept from two to test. Well, stop that immediately. That's way too much is just micro Michael Movement will allow us to move smoothly through our bodies, snags from life in terms of habit patterns and injuries. Okay. Lastly, the fourth thing I want you to think about here is please honor the uniqueness of your right and left side. Let them be different and one of the ways you can do this is by setting up the right side just as we did in the last exercise. The right foot lifts the right pushing down with your f lifts, the right arm. Can you see that?

If I push him with my left foot and lift my right arm, I don't have the support to hold my arm out against the pull of gravity, right foot, right arm. If I'm sitting, it could be right issue of tuberosity. Right on. So let's play with this concept a little bit more. Amy and Jia, will you join me please and bring the blocks and the bar? Yup. Thank you so much. So what I want you to do is to take a block.

It could be a water bottle or something like this. I want you to throw it up in the air. A young man like this and catch it and hold it with one grab ready. And now check what happens when you use both arms to contact and hold an object. Check your range of motion. Went on the up to the right, to the bottom, to the left and up back.

And feel what that feels like. Okay, got it. Now hold it in your left hand. Move to your right foot. Push down GRF with the right and let the hand come on. Hold it with the right hand. Now move to the left foot. Push down with the left foot, let the hand come on and now come to the middle and check again the range.

Any different? Hmm? What did you notice? A lot more movement. A lot more movement. I felt a lot more range. So what happens when we contact an object bilaterally? The same. It pushes the negotiation of this object to be held at the middle of my body, which lessens my range for my right or my left.

Someone might say, well, it's already in the left hand. Why don't we just use it to the right? Go to the right and go ahead and set up with the right foot, right hand and now check one hand doing it. Now made it lopsided. One hand has more rage than the other. You set up the hand for that foot or the GRF comes from the foot or the hip.

So going to the right, one foot, one hand, push off the left foot, other foot, other hand, come to the middle. Check your range until the right and back. Yeah. So the same can be true for whatever object. Let's use the bar now. Okay. People say, well, I'm just going to grab the bar and I'm going to be using that to pull and push and so on and so forth. But check the range again.

So I have had these shoulder injuries and I can feel every single little part of them right at the moment. So instead, let's go to the left this time. Let go of the left hand, push off your left foot, place your left hand, go to the right foot. GRF You're letting the GRF come up to set the right hand. Come in the middle and now just check. Same thing. Luckily, yeah, it happens. Yeah, you can do this with the handles too. And even just uh, playing with that setting up one hand, one handle, even if the other hand has to hold it a little bit.

But really think about this throughout your exercise. Okay, so one more thing I wanted to just have you think about, we've been playing with the breath and we've been testing the breath a bit, but let's see out a little bit more focused to it right now. I want you to feel that you can use this ground reaction force to help you inhale. So go ahead and let your exhale out. Lean a fraction forward just to push off your feet a bit and let that inhale Linkedin your body. So okay, so you just set yourself before you do what you're going to do. So let's just now really, let's just say our day was like this. We're so exhausted.

So now let's just change the direction of the breath. We're gonna lean forward, push out the feet, inhale up the front, come back to the whole foot, exhale down the back. So that would be how to reset ourselves. If we're feeling this way or we happen to be driving in a car seat for many hours with traffic, that leaves us in this chest down position. That would be a way you could get out and go. Before I go deal with the kids, let me take a moment. I'm going to inhale up the front years. GRL I'm going to exhale down the back and not in terms of the imagery.

Let's do it one more time. Let's start from here. Lean forward, push off the feet, inhale, being back on the whole foot and exhale down the back. But now in our job we had to buck up and we had to really be on it. Chest out. Come on. I know you can do it. You can handle this dress. We're counting on you. And we finished the day we go. This is way too uptight. I'm, my back is hurting me.

Let's settle toward our heels. Yeah. And exhale down the front. Push off the heel, inhale up the back and settle yourself on the whole foot. Yeah. So that took us out of that hyperextension so there we are, different ways to use the breath. Okay.

So let's go back to your pretest. How are you doing on your feet? Great. Much more even. You were mainly on the heels. Yeah. What about you more centered in forward. So for you more forward and back centered for you more, right to left and whole foot centered. Isn't that fun?

I love it. So I want to go through and do a few of the, or do the two exercises that we did with the standing roll down. Use Your GRF, use your breath. How was that? What was different? My arms are a lot freer. I was holding them before.

Just for your, for you. Yeah. Did you feel more of your spine? Did you get more articulation in the low back because that's where you were both on hold more. Yeah. So this time if you wanted to increase that even a little bit more in that area, I would have you start with your weight on your heels, push off the heels to let the back come back first, push off the heels to let the back. Like you're going to hinge now start your roll from there. Just on a day where your low back is feeling.

Yes. What's that? And see how that feels in Camana. Yeah, yeah, yeah, yeah, yeah. What made that better for me? I just felt like open window kind of. Yeah. Or I moved forward. I'm so glad because what happens many times is when people are going to go forward. They of course lean forward already. If we had electrodes on your back, you'd see that increased the tension when you push up and you start to dive forward, even with just the head that increases. So to start by just having the breath go into your back, your weight on your heels to push up, to come to start the rotation of the head into the fall. Try it one more time.

Very, very nice. Good. Huh. So you can appreciate it would be the opposite for someone who starts here. They would probably, if they were very hyper extended, they'd probably have to start with exhale here first push off and then start the role. So it would change according to, yeah. Okay. Well thank you very much. Alright, so the other one was the rotation, the trunk rotation on the floor and I now would like you to play with it. I'm going to bring over a couple of things for you to play with.

It could be a towel folded, it could be your pad, but I'm going to ask her to change it so that it's on the diagonal or pelvis. Yeah, so that it matches the triangle of the pelvis. Yes. And now go ahead and play with it. Okay. Now I'm going to have you start over just for a second. Before you contract your feet or anything.

Go ahead and think I can giraffe off my issue. Tuberosities and the heels of my feet to flex. I can very, very close together. I can go boom, boom with my pelvis to go one hand in the other hand, right left instead of exactly the same. And now go ahead and try your rotation using the left heel a little more to turn right and bring you back with the right here in back to center. How is that a lot more rotation. Yeah. Good. What made the difference for you?

Using the GRF of points of contact? So if I'm standing here sagging on the earth like this, this is my Gr, I have point and this foot actually. Okay. So I you will use my contact points to bring the GRF up from the ground into my body to support my motion. Okay. Well you were saying it felt good. How about doing just one more. Try that again.

Very nice ladies. And so the difference for you was using my feet in the ground, just using that GRF off your feet. Yes. It makes so much difference, doesn't it? Gravity does its thing, but GRF is their gift. It's been such a pleasure to share some of these ideas and concepts with you. I hope you will use them. I understand there's a way that if you have questions, you can contact me through the forum and it'd be happy to do what I can.

Uh, I will look forward to hearing how this goes for you. I will look forward to that very, very much. I'm also quite excited because I just finished the second edition of the Aston postural assessment book. It's being published by handspring and a, it will be out later this year. And so I just have to tell you that. Okay. Bye for now.

Thank you for your attention. Thank you.

Related Content

Comments

wow! it was amazing  to see this workshop.
it reminded me the dance, the Schroth method, the gyrokinses. Some time I think that the Pilates method block some natural body movement,. For example a twist doing with a movement of the trunk but not of the pelvis.  I feel free when the all body moves freely! So it is a special gift to know Judith Aston.
thank's very much!
Ewa
Thank You
2 people like this.
Great to have you back Judith!  Wonderfully presented workshop.  Really looking forward to playing with GRF in my own practice as well as bringing it into my sessions.  It just makes sense and feels so supported yet easeful!  I do have a question about students with osteoporosis.  A lot of the tests had flexion (standing roll down, seated roll back, rotation).  How would you apply this to someone with osteoporosis?  Thanks so much!  
I learned so much from this video. I can’t wait to put it into practice! Thank you.
1 person likes this.
Bonnie, thank you for asking the question about low bone density participants.  I also need to know the variations for this large and growing population.
very very informative. Thank you to you and to Pilates Anytime for providing this workshop with no charge. Awesome.
Ana B
Very informative and great explanation! Thank you
Cynthia G
Thank you so much for your gracious time and knowledge and to Pilates Anytime as well for providing the platform.
Kamni  B
Great workshop! 
A question:   
 What  about clients who have Osteoporosis how would the flexion/rotation  tests apply to them?  
Dear Judith, what a wonderful workshop! Slowing things down, being more attentive, feeling the body, gravity and how to apply it easier through life. Ive learned so much and it reminded me on Trager which says: What can be lighter? Often our life creates too much "heaviness" - too much effort instead of doing less but with much more focus. Thanks a million! I truly enjoyed it!
1-10 of 11

You need to be a subscriber to post a comment.

Please Log In or Create an Account to start your free trial.

Footer Pilates Anytime Logo

Move With Us

Experience Pilates. Experience life.

Let's Begin