Description
About This Video
Transcript
Read Full Transcript
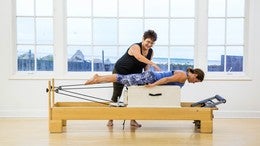
What about those athletes? What about those people that come to see plays or they ask questions about Plata is about how can it improve what they already do? So, um, this session now is not, uh, like a full blown session where you're going to count reps and things like that. But what I want to do today is create, um, good connections for the athletes. So say you have a weightlifter or you have somebody that's in athletics that's working on specific things like around their buttocks, around their shoulders, and around their blades and around their lats. So I'm going to say those again. The shoulders, the buttocks, the blades, and the lot.
So I've chosen some exercise said here to try to make what I call connections for people that are looking for a more athletic connection. So this isn't necessarily a full, like athletic workout, but it's good connections to make for the people that are looking for it. So what I'm doing on my back, and the first thing I'm going to create here is an awareness of where my blades are when my arms are down by my side. So when I'm lying flat, my blades, they're kind of approaching my spine. Um, they are not squeezing so much together that my chest lifts, not now anyway, but there will be later that I want to make this kind of heavy connection through my upper chest and my shoulders. My heels are on the bar and I'm going to start with a little articulatory bridge, getting a connection into the glutes. And so now you're rolling your eyes and you go, me and everybody else making a bridge connected to the glutes.
Just bear with me here because we can't really buy pass this exercise. Okay, so we're going to come up and stay up. Are the bones upper arm bones press down. So not my hands. I may even need to bend my elbows and press down to keep my chest lifted.
Then I'll go into single leg marching as I do this. I'm have all my springs on here because I just don't want to move the carriage. I'm treating the reformer like a little mat right now and then lie myself all the way down. But the bridge is harder because my feet are simply higher. Now when I go into a one legged bridge, I'm going to take one of my knees into my chest that asks me to tilt my pelvis a little bit and then it will turn on just this glute on the right side. I hold and then I lower.
I press down to lift up the center of my buttocks, open up the front of this hip, and then I lower having my knee pulled into my chest makes it so that I don't arch my back. When I push up a bridge, often times people will go into their low back spinal extensors to take the place of a bridge, I'm going to pull this knee in. The belly pulls in again. Pulling the thigh in makes me kind of round my pelvis a little bit, lifting up my bottom. My other hand isn't even helping me. I press down to lift up. I press down to lift up and I'm just going to do one more time down to lift up and then I lower myself all the way down.
Now the next bridge, keeping my feet on the bar, taking my arms down by my side. I'm going to do a neutral bridge where I'm not going to articulate and you'll see my pelvis crease or my hip crease in line with my knees. My eyes are looking up at the ceiling. And now what I have to do is find my upper back extension. So watch it's gonna come right between my shoulder blades.
So it looks like my sternum is coming closer to my chin. I hope you can see that. And then I'm gonna lie down all the way down. So what I did there is I had to hold my glutes to protect my low spine and I'm gonna do it again. Lift up in neutral. And then I used my upper back extensors actually to lift my sternum.
So here I go, glutes going to my upper back. So I'm gonna lift up my chest so it almost feels like my shoulder blades are pushing my chest up and then lower all the way down. So now I'm going to take my feet down flat. I'm going to move away from the shoulder rest just a little bit and now I'm going to take my arms out to the side. Much like I had a little weighted pole in my hand.
And what I want to do here is I want to show you that I can actually start to extend my thoracic spine and my chest without lifting my buttocks and then I'm going to release. So it's not that I'm just look at sticking my belly and my ribs out, but I'm kind of gathering my upper back. I'm kind of doing an upside down cat or cow or whatever, you know, whatever that upper back extension is. And as I hold this, my eyes are still looking straight up and I'm going to push my arms up and down. My blades are not moving, but they're setting the stage for a base. As I press my arms up and down, I take my arms down, I lower my back all the way down.
I can do this bridge more time offset, lift up in a neutral bridge. When you lift in a neutral bridge, it allows your hip extensors to work a little bit more. And that means that I'm just going to come down again because when you come up in an articulatory bridge like this, the action of the posterior tilt is already feeding hip extension. So when you stay down in neutral and you lift up in a neutral bridge, you have more actual hip extension availability. So we hold here, of course you can march and March, right? You can take your arms up and March and March and then you can do that lots of more times. And then we're just going to bring the buttocks down. Now we can challenge this by taking the feet and offsetting the feet to the right. And so now when you lift the pelvis, it just becomes a little more of a challenge to keep the pelvis level.
Okay? So you got to take the hip creases up, you've got to look at that sternum and lift it up. And now in this offset bridge. It's amazing cause now I'm just gonna Cross and offset them to the other side and then lie myself down and pause. And then I'm gonna lift up with my legs to the left and really lift up by pressing down. And then I'm gonna crawl my feet over.
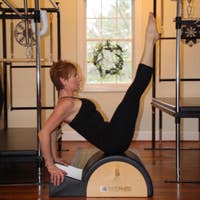
Try not to move the carriage over to the other side and then bring myself all the way down. Whew. Okay. So these are glute awareness exercises. So I'm going to come on up and in the next awareness is um, it's the action again of hip extension. But what I'm going to do here is I'm going to take this carriage and I'm going to move it all the way back til the farthest docket can go. All the springs are on to try to keep the carriage stable.
I've taken the roll down bar, I've taken it with two purple springs, about my hip level ish. Okay. I'm going to step inside here. Take this roll down bar, stay with me. Okay. I'm going to put it at my hip crease. Okay. And then I'm going to crawl on the carriage and I'm in a crawl forward putting my toes back against the the bar here.
And you'll see this looks a little like knee stretches, but that's not what we're going to do. And now when I bring myself up to vertical, you're really going to see how my hip crease has to go back. So here's a Tuck, but okay, bulging thighs, rounded chest, here's a length and abdomen length and torso, hip creases, toes really nice and extension. That's so important for ankle and toes. From here I'm gonna take my hip crease back. Pause. Now the work is going from this hip flexed position to a hip extended position, which is center of the butt, cheeks forward hold. Oh my goodness.
And then we'll just do this three times down and then up. Notice that I'm not over arching my back, or at least I hope I'm not. And then I sit back down and then I come back up. How would I make this harder? I'm going to challenge it by raising my arms. Why? Because when you raise your arms, your spine wants to go in to extension.
But I'm going to keep it thinking about flection while my hips go into extension. Then I can kind of vary this any which way. And then at who? I think you're going to like that one. I'm going to come off of here now very, very carefully. So I'm not a slingshot. Put this down.
And next we're gonna go over some shoulder, uh, connections. Continuing on making some connections through the shoulders and the shoulder blades. I'm going to take these two short yellow springs and I'm going to put them at about my shoulder, height or lower. Now take the straps and I'm actually going to put my arm all the way through it so it's on my arm and not on my hands. A lot of people, when they have trouble making a shoulder connection, the issue is actually in their wrist or their forearm and maybe they've lost some of that motion of the rotating of the upper, of the lower arm. Excuse me. So in this particular, uh, exercise here of chest expansion, I'm going to treat this. Um, like when I was lying on my back and I did the bridging, I told my shoulder blades where to go and then I tie-dyed up my arms.
So right now I need to kind of step back. So I actually have enough tension to give me a challenge. So as I stand tall, I'm not locking my knees or whatever, but I am firming my legs, lifting my tummy, holding this here. I'm going to step back a little bit further because I need that challenge. Now I'm going to continue to pull my arms back and then release, pull back and pause.
Now rotate your head to one side so that you get full neck while you occupied this hand. The lot on this hand that I'm waving to you pulls back and then as you pull back and you turn your head to the other side, right? Which is the job of chest expansion to engage those lats where you stretch your neck and then come center and then release. That's really tough. Now we'll put it all together with the breath. So it's inhale, exhale, arms stay. Inhale, exhale. I'm going to step back a little further.
So now I want to make a deeper connection. So if I let my self go, it would be something like this. So I'm just going to cue my blades to live on my ribs and ACU, the strength of my triceps and my lats, which are connecting way to the top of my pelvis. Watch what I'm not going to do. Please. It's so important for you to see this. I'm not gonna do this.
Going to pull my belly back, but it's more my rib connection. It's more the back of these ribs staying over the pelvis and the thighs very long in their socket. Now I'm going to go
We're going to now take the arm over the head. Okay. So now the shoulder blade on my right side of me to take my left pointer finger and I'm going to feel the underpart of my blade. So as I do this now I'm not just going to pull my right arm back and arch my back. I'm actually watching, I'm actually gonna push my shoulder blade up to bring it back. So now that and then I can rest it. I can bend my knees a little bit cause I'm using the floor, right?
So I'm pushing my floor down, raising my right arm up, right shoulder blade up. My left finger is feeling that tip of my blade staying there. And then I released, it's actually called a posture. Your tilt of the Scapula is actually what it's called. So I'm going to give you just a little other bit of information.
Sometimes when people pull back too much like this and chest expansion, the scapula tips forward, okay. And no amount of queuing. The arm bone is going to change this. So we actually have to cue, challenge the arm by pushing it up. And then that lower part of the blade, it almost kind of pulls into your back and this arm, look at my pointer finger is going up and back and that's some hard work with both hands. Now taking both hands and taking them up. I have to get my base, I've got to press my legs, be from here and now with both hands I'm going to pull my arms back as my blades. Stay active in upward rotation.
And then I release, I pull my arms back, the tip bottom, tip of my shoulder blades. I'm thinking pull into my back and then release. Why is this important? Well, raising your arm over your head very actively. We'll get a volleyball person, you know that does a blog, a thrower, weightlifter, any of those kinds of things. So now we're going to take this awareness.
I'm going to take my cross spring and I'm, what I mean by that is I'm going to cross body. So I'm going to take my left hand onto this spring that's on the right side. I'm going to loop it through here so that it can kind of come here. Grab something. As I step myself back, you'll see my left hand on the right spring. It's feeding my rotation to the right. Okay?
So as this arm reaches and rotates to the right, I'm going to allow the blade to protract, allowed my trunk to rotate. So how do I then challenge this position? I need to go back, okay? And now what I need to do is I need to think, how can I get my back pelvis to get a challenge, right? So then I'm going to reach this leg back. So it's my left leg back. I'm in a little curtsy here, holding this arm forward, reaching this leg back. So I'm getting this, this rotational force turning my palm up to the ceiling, and then I'm going to pull my blade back to my spine, start to stand up, squeeze my thighs and face forward as I allow the spring to help me come back.
I'm going to let that spring when, but I'm resisting it. That's east centric loading. Inhale here. Exhale. I'm not resting. Not One single bit of my resting. Now I make a contraction concentrically through my back body. I pull my rotators, I pull my blade, I tightened my thighs. I look forward one more time.
I'm going to de rotate, but I'm resisting it and then we'll go to the other side. This is a great exercise to open up the back body. Great exercise to open up the back ribs and our reach here. Let's see, I've got to move this up. All right, so I'm going to get this feeling first. I'm going to let this spring pull my right shoulder blade so it's pulling my torso to the left. So I want my right leg behind me.
I'm gonna get a little bit more over here so I can get a little bit more cross. Okay, so the leg that's behind you, that's pulling the pelvis a rotating to the right. Why my upper body is rotating to the left, letting it go. Now I'm going to start to unwind my pelvis or retract my shoulder blade, lengthen my spine, pull my arm back. Hold. Now I'm a little too far back cause I'm fighting it a little bit.
And then I'm going to let myself come around, move myself forward a little bit. So I have to pull my shoulder blade back. Remember this shoulder blade, helps the arm know where to go and you'll see that it's harder for me on my right side. And then I let this come out. I twist my trunk, I'm actually gonna come forward for my last one so I can really find it in my blade. So that blade, I have to unroll my spine. There's the blade, there it is. And now there it is. I'm gonna let go with that.
I'm going to hold my wrist straight because I realize that's what I need to get all my d rotation in. Let that risk to go and then I'm going to come all the way out. It's gonna win, but I'm going to resist it and bring myself all the way around. Connections through the lat connections, through the shoulder blades, opening the back ribs. A couple more things and we'll be done with this. This next little series here.
I have two long yellow springs. They're from the bottom of the tower out of the way, so now I have to tie together my arms with my legs. Where do we often see this? We often see this in a very typical, like a squat progression where we come down and stand up. Those are all fine. You already know those, but now I'm going to do it by hindering my hips and then gathering up my shoulder blades. So now I should be in this kind of neutral ish position.
I'm going to pull my arms back and then I'm going to unwind my spine and then take the center of my buttocks forward much like I did when I was kneeling on the reformer. This is work right here. Now as I release, I'm not letting go but I'm staying loaded but the springs are closing and then the springs are opening. As I press back, press through my heels. That right shoulder is we here. Then my left, I come all the way up and then I go down and then I pull the springs back and then I come up. And then I release. Now to create a little awareness around that, we're going to go to one arm and one leg. So the left arm has this spring, and my right leg is going to lift behind me. So as this right leg lifts, I'm not going to get frustrated.
And then as I come up, watch, I'm not going to straighten my left knee, so I'm going to keep this feeling in that back of woe in that back of my left bottom as I come up and down. I'm gonna do that one more time. So as I go forward, whoa. And then as I come up and then I stand up, so I keep the load. Okay? I keep the load, if you will, in that back of the bottom. This is kind of like a single leg dead lift or a hip hinge. Okay.
But we're doing one leg, so I'm going to take a bend in the knees, taking my blade back. Right? So this right blade, I'm going to move forward. This right blade is giving me a little bit of challenge, so I need to adjust the course accordingly. Pull my arm back, I'm going to hinge forward at the hips. I'm going to hold right there. Get the load in the back of buttocks, the right side, and then I'm going to lift this leg up. Maybe that's all I get and that's a big load. And come on blade.
My blade is just as challenged right now as my bottom is one more time blade, blade belly, but basically is a what we're doing here, right? And I have to think all these things so I don't collapse in on my knee. This is a better one. And then I bring myself all the way back up and then release. Last exercise for last connection there. Turn around same yellow springs in the same position.
So now I have to challenge those blades again. So the first thing I really like to do here is I like to take these arms and kind of put them so that they're down my back so that the springs are actually helping, helping the springs or actually helping to open my armpits. I'm hoping you can see that. So what it's not doing is pulling me into extension. Okay, so the challenge is to keep my ribs back.
Some people might call that pulling their belly in, which is fine, but really it's the relationship between the back ribs and the pelvis. So we're going to hold that right here. This right here is a tough exercise. Just opening up those arms. Can you see how this would actually prepare us for a back bend? Because if I turn my palms in this direction, isn't that what our, where our arms go when we go into a backbend?
We're not doing it back then. Don't worry. Now. Last one. So we stretched the shoulders, we looked at the blades, now we're going to do it in overhead. So I'm going to take the arms. And now from here I'm just going to push the arms straight-A. And as I stand strong on my legs and push, my arms of my head actually stays forward. So my arms and my blades are pushing up and I'm holding it.
I'm holding it and I'm holding it. And then I'm letting them come down. Well, when I come down, you know what I'm doing. I'm still pressing up, so I don't just let the springs pull me into a collaboration. A collab. I think I invented a new word. No collection. Okay, so here we go. So arms come back. I'm sweating now. Okay, so now we're going to push up with the springs. Push up with the legs. This is Kinda like a reversed pedicle, wouldn't it be? So we're going up with the blades. Head stays forward.
It's not that the head is forward, it's that it's not back. Right. So we press, ah, inhale, exhale. And then I'm going to slowly bring them down. And then I really try and stay tuned because there'll be a lot more to come. Thanks for joining me.


Comments


You need to be a subscriber to post a comment.
Please Log In or Create an Account to start your free trial.
