Description
About This Video
Transcript
Read Full Transcript
Welcome back to the Reformer Progressions series. Hopefully you've done lots of practice with your fundamental movements. We're gonna turn it up a notch, move a little quicker in this class and learn some intermediate movement patters, so here we go. Just start standing with your arms reaching down, your head reaching up. We'll start this class the way we concluded our last class with a roll down, so we breathe in (inhales) and as you breathe out, let your chin drop to your chest and as I mentioned before, (mumbles) just as a body scan, so rounding down, feel the sense of lifting up through the center of your body.
Top of the head reaches down. Shoulder blades stay down away from the ears. Pause and inhale at the bottom. Exhale as you feel the pelvis slide underneath your roll underneath you. The tailbone tucks between the legs.
And then notice as you stack your spine over the top of your pelvis that you're stacking directly upwards, not upwards and backwards. And this time lets inhale and reach the arms up and out or out and up and then take up a lot of space with your arms. Reach way out to both sides of the room. Reach your arms down towards the sides of your legs. Breathe in, breathe out.
Chin rolls into the chest. The spine just starts melting down towards the floor. We have equality of weight over our feet. Lift through the center of the body. Uplift through the center of the body.
Pause to inhale, and exhale as we again peel the spine up. So sliding the tailbone under, stacking the spine over the top of the pelvis, standing all the way up, getting organized, reaching out, lifting up. This can kind of counterbalance the roundedness that we experience ... I experience and imagine that you do too in our daily lives. So bringing the arms down.
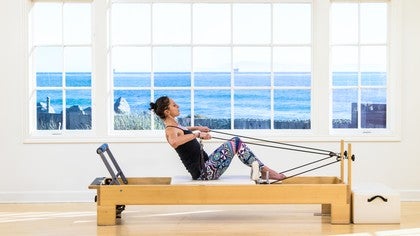
Coming to the Reformer, I've set up again, three reds and one blue spring for footwork. We're gonna start all the way down. This time the legs are gonna stretch out straight along the foot bar, so we begin this movement practice with a spinal articulation exercise as well. This is the roll-up. We're inhaling to lift the head and chest, reach the arms towards the outsides of the thighs.
Exhale, draw the abdominals in, roll the spine up, pause in your movement when your shoulders are right over the tops of your pelvis, and inhale. Exhale, roll down. So feel the rotation of the pelvis, lowering the spine down, bone by bone, and then reaching the arms up. Inhale, bringing the head and chest up off the mat. Exhale, curling the spine.
So we're not just rounding, just up and ... Just over. We're lifting. We've got a little bit of back extensor control happening here. Shoulders over the pelvis, inhale ... And exhale, drawing in, tucking the tail under.
If you're a person who feels like they get stuck in this, or you come up and you just don't have anywhere to go, it helps to bend the knees or take hold of the thighs to work through the flattening of the spine, of the sticky part of the spine, and then reaching forward, and inhale ... And exhale. We're rolling the spine down piece by piece, piece by piece ... Arms up ... Head down. Inhale, lift ... Exhale, up ... Up at the top. Drawing backwards, always working in opposition through the body. And inhale and exhale (mumbles) roll down.
Each piece of the spine comes down. So we're gonna make sure that happens right now. Lift the head and chest, pause. Go up just an inch. Go up just one more vertebra.
Go up one more vertebra. And one more. Feel the deep rotation of the pelvis, continue. And then as you move through your lower back, we come all the way up to the top. And inhale ... And exhale.
Let the pelvis rotate under. I want you to get just to the sacral area, pause. And now go down until it's flat. And now go down jut one vertebra, proving it to yourself, proving it to everyone ... Well, mostly just yourself, that you have that range, the flexibility through your spine. Inhale, lift the head and chest.
Exhale, deep and small, curl a little. And a little, and a little, and a little. That's where it's hard. If we just throw ourself through movements it's not as hard as if we work with integrity and with precision. The precision of the movements is what makes Pilates interesting in my view.
Slow ... And fun ... And challenging ... Forever. All the way down. And now we're gonna go through that one more time on the way up. Lift ... And roll up, up, up, up, up.
So now at the top I want us to bend our knees. Take your hands to the tops of your knees. Lean back a little, so your pelvis or your ... Right behind your tailbone and lift your feet. Now push your knees into your hands and see if you can ...
By using the knees against the hands and the hands against the knees, lower yourself to the mat with control. Pause when the hands are on the knees and the knees are above the pelvis. This is the double leg stretch. Take the arms and the legs out. Press the arms through space and bend.
So whereas before we were just holding our ... Or coming up ... And down from this spinal flexion position, now we're having to hold ourselves here as we use the arms and the legs against gravity to challenge the position of the spine. We'll do three ... And bend. Two ... And bend. One ... And hold, both hands on the right knee.
Send the left leg forward. Push down on that right leg. See that the toes line up with one another, and change. You wanna feel the straight leg is reaching out in space and the hands are pressing down onto the bent knee, using that to help you keep your lift, but also to feel the support through the shoulders, to feel the support through the back muscles. We'll do four ... Four.
Reach out, three. Keep the body lifted. Three ... Two ... Two ... One. Hands come behind the head. We're gonna twist towards that bent leg slow.
Twist towards that bent leg slow. Now take the hands to the thigh and use the hands like we did in that chest lift with rotation to really find a functional rotation. Get the height of the rotation and now hands back again. We remove them and continue. The eyes go just outside of the thigh so that you're looking in the direction you want your spine to move.
One more time to each side. Come back through center, hands on your knees. Push your knees into your hands. Deepen into your curled position. And can we come up as smoothly as we came down?
Bring your feet around to the side and put your foot bar up. We're gonna move through our foot work a little bit more quickly today, so hopefully we've been practicing all of the ideas around foot work. Now we're gonna add a couple more foot positions and a little bit more tempo. So I'm gonna lift my headrest up this time so I can see my feet. I like to see what they're doing sometimes.
Flexing the feet, settling through the ribs, settling through the shoulder blades. And we go ... Press out and pull in. Stretch and drag. So working, as we spoke of before, in both directions. Feeling the softening through the ribs all the time.
The length of the arms. The work ... Equality of work in both legs. We'll do four, pull back. Three, pull back. Two, drag in.
And one ... Come in all the way. Move to the toes. (mumbles) throughout the foot, push out. Balance weight across the foot, and in. So we remember that when the legs are straight, the heels are lifted and then the heels stay.
So it might feel like they're dropping. It might feel like they're dropping, but in reality we're just keeping them stable. Again, please work evenly through both sides of the body, or work in an attempt to work evenly through both sides of the body. We'll do three ... Drag back. Using this foot work to warm up our body.
Two ... We've got more complex movements coming up today, or in this class. And then heels together, toes apart on the bar. Wrap through the outside of the hips. Squeeze the heels together. Squeeze inner thighs and pull.
Check in with your arms or every once in awhile go through the personal checklist. Where is my pelvis? Is it in neutral? Where are my arms? Are they long?
Where are my shoulders? Are they relaxed and flat? Am I working in both directions? There's so many things to think about. Could think about something ...
Check in with something new with each repetition. Here's our last three ... Pull back. Two ... Drag in. One ... And back. All the way in, we're gonna take the heels just to the outside of the foot bar.
Now I want us to feel here that you wanna try to drag the heels in towards one another on the foot bar and then push ... And pull. So that sense of pulling the feet towards one another throughout the movement of the legs is where we're gonna feel ... Where we're gonna find our inner thighs. So out ... And back. And out ... And back.
And out ... Using breath to find abdominal connection. Using breath to provide rhythm. We'll do two ... And back. Last time ... And back.
And then moving to the toes. Reach out, same heel position, that high heel position with straight legs, wrapping through the back of the leg. And bend ... And stretch. Pull the Reformer in. So it's easy to push the Reformer, but it's more mentally challenging in my belief system or my opinion in that we've gotta create work in all movements.
And the in ... The creation of the work on the in, in my mind is just more challenging. Anyone can push, but can we mentally challenge the work on the way ... And last two. And one ... And bend. Bring the feet to the inside of the bar again, parallel. Press out all the way, lower the heels.
Articulate the foot and take it down. Again, as you lift and lower the heels, feel that the heel is connected all the way at the back of the leg, perhaps to where the glutes and the hamstrings meets. Lift from a connectedness through the entire back chain of the body. Last four. And three ... Pull down.
Two more ... And down. And last time ... Hold it here. And now we prance, so one foot down, one foot up, one foot down, so it's a lift and a reach. A lift and a reach. So that's ... I believe it's so important to have all the pieces in place, all the fundamental pieces in place before we just start adding pace, adding new movement or new choreography, so practice, and always ...
Never be afraid to go back to the fundamentals, to go back and practice them intermittently as you advance ... Last time. Pause here, just take a stretch. And then we'll stretch the other side. So the last time we did single leg work. For the sake of saving time, I'm gonna skip that today but I'm gonna recommend if you've got time for single leg work right now, pause this video and do some single leg work and then join me again.
For the sake of time, as I mentioned, we're going straight into our abdominal work, so one red and one blue spring. Come all the way down. As you get ahold of your straps, give yourself some space between your shoulders and your shoulder blocks. So we'll do the 100-prep, where we left off, three times. Legs up off the bar, inhale.
Exhale, lift the head and chest, reach the arms. So this is what we've been practicing. This is what we know. And then reach up ... And come back. And lift up.
And come down. So today we're gonna take it into the 100. Here it comes, lift up ... Find that nice high lift. Stretch the legs, inhale, and pump the arms. Exhale, two, three, four, five, breathe in.
Breathe out, two, three, four, reaching the arms, and in. If it's too hard, lift the legs or bend the knees. But it's important to work from a place where you feel strong. And five, two, three, four, five ... Keep the Reformer still.
Four, two, three, four, five, lift higher. Three, two, three, four, five, and in. Two, two, three, four, five, breathe in. One, two, three, four, five, inhale. Exhale, bend your knees.
Keep the lift, keep the lift. This is gonna be part of the next exercise. Staying lifted as you bend ... And come down. Adding in the coordination, so we go up into our 100 ... We open-close the legs. Bend, stay lifted.
That's the piece I was just speaking about. And down ... Exhale, lift, stretch. Open-close, pull in ... And go down. And exhale, lift. Open-close, pull in, reach the arms, reach the arms, reach the arms.
And come down ... And two more. Reach out, stabilize, bend ... And down. Last time, lift ... Open-close, pull ... And back. I don't know about you, but that was hard for me. So we're gonna put the feet in again, feet into the straps, one foot at a time.
We're gonna skip our frogs today because we're gonna do a different frog exercise in a little bit. So start with the legs coming up towards a 90 degree angle from the hips. Press the legs down. Take the legs out ... Around .. Together. And press down ... And take the legs out.
Around ... Together. And press away ... And reach. Around ... And up. Let's do three more, reaching away from you as you move your legs away. I just said the same thing twice just then.
What I meant was that as you're pushing down with your legs, also feel that you're stretching your waist, stretching your whole body ... And around. And back, and now we reverse. Open ... Both legs connect at the same moment we reach out, touch the heels together and lift (mumbles). Open ... Hips press, reach out. You're gonna touch something that's far away from you.
Notice if you're a person who tends to thrust the ribs, that might be a place where that's tempting, so stay nice and connected through the middle of the back all the time ... We'll do three more. So working through the full range in all directions. And two more. And last one. So today we'll do the extended frog.
What I want us to start by doing is to bend the knees. So from there we're gonna open the legs out to the side. Now as the legs are opening out to the side, keep the heels on that same horizontal line. Keep the carriage still. So in order to do that, it's a combination of outer thigh and inner thigh and pull the legs together.
And bend, inhale. Stabilize the carriage, don't let it move. Keep the thigh bone still is a good way to know how to do that. And then pull together ... And bend. Softening in the center of the body.
Reach out ... And pull together ... And bend. Reach out ... And pull together. Last time, and then we'll take it in reverse. Take it out to the side, drag back together ... Reach out ... Hold. Now again, stabilize the Reformer.
Keep the knees reaching wide as you bring the heels. Watch them come straight across until they touch and then press. Here's some breath suggestion. Inhale ... Exhale, work the legs together, wrapping through the back of the leg. Feel the inner thighs working.
Pause ... Inhale ... And exhale. Three more, open ... Bend. Pause ... And stretch. Open wide ... Stabilize the Reformer. Yep, that's where it's tough.
Keep the back of the legs strong. And stretch one more time. Open ... Stabilize. And take it forward. Awesome, so we're gonna take the headrest down.
We're gonna bend the knees and take the feet out of the straps. We're gonna do our first spinal articulation exercise so far in this progression on the Reformer. I would recommend giving yourself a little bit heavier spring. I'm just going to again, for the sake of keeping us going, try to challenge myself on this spring. So we've got a little bit of spring on the Reformer.
We're gonna do a pelvic curl here, or a bottom lift. You're gonna roll the spine up and now as we roll up, we're gonna try to keep the carriage still. So lifting the hips, pressing the hips up. Reaching the arms long. Did you pull your carriage away from the stopper?
Hopefully no ... And then slowly roll down. So if you did get up to ... Or you are getting up to change springs, probably two red springs is as much as you want, dropping the tailbone all the way down. Let's do it again, inhale ... And exhale. Rolling up ... Picking the hips up, sending the knees forward, sending the arms long.
And inhale ... And exhale down. So let's challenge that a little bit more if you can. You can stay on your heels. That's gonna make it a little easier. Stay on your heels if you want it to be a little easier.
Now wrap your toes around the bar. We're gonna roll the spine up. Keep that carriage still, that's where it's really tough, when we have the feet on the toes. And then we're gonna take the carriage away. Only 3/4 of the way with the knees, and then lift up, bring the carriage all the way in.
And press out ... And lift up, bring the carriage all the way in. And one more, press out ... And lift up to bring the carriage in and pause and now peel down, stabilize, stabilize, stabilize. Drop the tail all the way. Inhale, if you stayed on a red and a blue spring with me you know how hard this is. Keep that carriage in as you lift up, push it out lift and come back in.
And push out ... So heres like a moving pelvic roll. We learned the pelvic roll in the fundamental work. We'll do one more. Now we have a moving pelvic roll and a much lighter spring. And then we roll down, all the way, and drop the tailbone down, good.
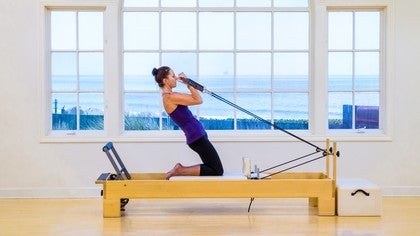
Come all the way up. All right, so let's take it down to one red spring for a stretch. Today's stretch, we're gonna do the kneeling lunge. It's not always the most comfortable for knees, this exercise, so if you need to get a pad to go underneath your knee, that's advisable. So one foot comes up onto the foot bar and here and when we did the lunge standing we talked about biasing towards a posterior or a forward rotation of the pelvis.
And here we're just stretching. This one's a lot more difficult right off the bat, just getting into the position. Breathing in and breathing out. Now as we take the carriage back for the hamstring stretch, we wanna feel that that back is flattening. It's a little challenging, a little tricky to do if you're all on your own, to find the perfect alignment, but I'm doing my best.
Typically what we wanna try to do is the leg that's stretching, I wanna drop that tailbone down. That sitting bone down is a better way to say that. We're gonna bend in ... Gonna bring ourself back. So lifting the chest, pause ... And breathe. Reach the tailbone back, working the pelvis towards an anterior movement, looking for a long flat back.
I suspect mine's not perfect, it rarely is, but just know that I'm trying. And then coming back in all the way. I'll take that foot down. It takes me a minute to get my foot set up because my toes are, in my old age, not wanting to bend under that way as much as they used to, as readily as they used to. And I'm trying to remind them that they are supposed to do that.
So I challenge that position. Sometimes it takes me a little longer to set up. So we press forward into the hip flexor stretch and breathe. And then we go out ... Out, stretching that leg out. Looking for a long, flat back.
And then bending back in, lifting up, keeping activity in the leg that's behind you, so reaching that leg back even as you're coming in, holding and pausing ... And then reach out. Stretch out ... So really just adding a couple more exercises to our choreography so that we can practice integrating those movements and then coming all the way back in. Once you come in, we're gonna go into the down stretch today, so we've got both feet against the shoulder box and we spoke about in the standing lunge, the idea about trying to get a really nice, strong posterior tilt to support the lower back. So bring your body forward over the bar. I'm gonna keep a red spring.
You can make it heavier if you wish. Then lift the back, get into that nice arched position. So we push the Reformer back. Keep the eyes just in front of you, meaning don't drop the head, don't lift the head. So the eyes just move as the carriage moves.
Push the Reformer away. Feel that the hamstrings and the abdominals are the two places that we're looking for support in the spine as we reach and lift the upper back up. Press away. Reach and lift the upper back up. Let's do three more.
Inhale to come up, as a suggestion. Exhale as you push the springs, keeping that body and just that nice arched position. The only thing that changes here in this is the placement of the arms relative to the body. This is our last one, we come all the way in and up, up, up ... And then untuck your toes, rest your forearms on the foot bar. Rest your forearms on the foot bar and just take a little shoulder stretch.
Okay so lets come up from here. We're gonna carry on with the round back stabilization trunk stabilization knee stretches with the scooter today. So tucking the toes under, get one foot right up against the shoulder block and then the foot that's on the floor I want you to line up the heel of this foot, the floor foot, with the toes of the carriage foot. Now this one's a little trickier. We learned how to stabilize the spine in the reverse scooter.
Now what we're gonna do is we're gonna keep that outside leg bent. We're gonna get real round in our back, lift the knee up off the Reformer. Now keep everything still except for the leg that's gonna move, the Reformer leg. We take it out ... And pull in, that's it's rhythm. Out and pull in.
Notice there's a tendency to wanna straighten the front leg or move that front leg around, but we just keep it still. The degree to which the leg straightens behind you is dictated by your ability to really maintain that spinal shape. Last two ... Last time. So it's a similar exercise. A more active version of the same idea instead of pulling the knee.
And well, we are pulling the knee in, but we're pulling the knee in without the tension of the spring. We're pulling the knee in in resistance to the tension of the spring, or in opposition to the tension of the spring here, so it's slightly different. So bend that outside leg in, nice and round. Knee comes just off. Make sure you're nice and square.
Look at your pelvis, and here we go. The breath in and out ... And out. Draw in ... So you use your abdominals to stabilize your trunk to resist the pull of the spring as the leg comes in. Last four, shoulder blades down. Everything else is stable.
Last two ... The emphasis is on the in. And one. Okay ... I'm happy with the red spring. You may want a red and a blue, a green. Red spring works for me.
We're gonna step up onto the Reformer and we're gonna step the heels up against the shoulder blocks. So this is the most fundamental movement in our up-stretch series. So we've got the heels of the hands on the foot bar. We're doing the elephant. We wanna reach the spine out long.
So get the back flat. The head's down between the arms. Heels are anchored into the mat. Scapula or shoulder blades are slid down the back. Now we're just gonna keep the trunk still, the torso still, as we take the carriage back.
Lift the toes, then pull the carriage back in. And inhale ... And exhale. So we wanna feel that the spine stays long, stays stable. And inhale ... And we'll add onto this in later progressions piece by piece. So really we'll learn the spinal stabilization, shoulder stabilization.
Feel as the carriage comes in is that the heels are grounded and maybe the toes are a little light. Lets do one more, inhale back. And exhale in. So taking the arms down, stepping down off the Reformer. We'll sit down for our arm series.
Today we'll do the arms sitting. Last time we did the arms supine, so the spine was held still on the Reformer and now this time, we, it is our responsibility to hold our spine stable against movement. So we'll start with the arms straight out to the sides of the body just slightly forward of the pelvis. Find a straight back, breathe in. When we breathe out, press the arms down and back.
Inhale, forward. Drawing the abdominals in and back. So just keeping that stability, that stationary orientation position of the spine is quite hard. Much harder than lying down, in my opinion. But the same idea of pressing the arms back also by pressing the ribs back so we don't over-extend through the upper back.
We'll just do two more. Lifting up out of the lower back is where it's typically the most challenging. Last time ... And then taking the arms out straight, turning the palms to face up. Keep the body lifted, organized, straight. We bend the elbows ... And straighten.
So you could decide that you wanted a little bit more spring tension here. What's important is that the upper arm stays still. The upper arm stays still. The shoulders are stabilized. The spine isn't shifting around.
It's just nice and solid. So three more. So for me, this is less of a challenge on my biceps than it is on my scapula stabilizers, on my spinal extensors, my seated extensors. And then we'll reach out ... We're gonna take the straps over the elbows, bringing the arms up in front of us.
So now we're gonna take the arms open. I don't want you to squeeze your shoulder blades together. I want you to try to separate them. Separate the shoulder blades. Send the elbows slightly forward of your hands and your estimation of where you are in space and then take the arms forward.
And so open ... It's like a horizontal opening abduction of the shoulder joint. Thumbs back, elbows forward. (mumbles) you don't just arch your back. And then forward, and again open, open, open. Really trying to tap in to the support of the upper back.
We'll do three ... Elbows forward, hands back as your visual. And two ... Elbows forward, hands back, spine lifts, chin in ... And one. Now see what it feels like to slide the scapula together and then separate the scapula. And then bring the arms forward and we'll continue with that idea at a later date. Let's hang the straps up and turn around.
We can take the foot bar down here. (mumbles) right up against your shoulder blocks, taking the straps in your hands, arms out to your sides, abdominals drawn in, spine long. We bring the arms across the front of the body and open wide to both sides. So you're keeping, at all times, your arms in your periphery. Keeping your elbows soft ... And open.
And soft elbows, long body. The more you can think about co-contracting or using at the same time the abdominals in your back muscles, the more stable the spine will be held in space. This is the second to the last and we'll do one more. And then we'll bend the elbows. So bringing the thumbs just outside of the temple.
See what happens when you let your elbows go behind you. That's not what we want. We want the elbows to be just in front of the eyes, the scapula wide on the back. Now feel the shoulder blades push down as we pull the abdominals back and stretch. Inhale, bend.
Exhale, scapulas go down. Arms work in relationship, or move not because the hands are pushing, but in relationship to the stabilization of the shoulder blades. So first we set the bones in place and then we move the arms. Now if you're anything like me, you're not very flexible in your hips, you might feel like your hip flexors are screaming at you. Mine are.
So what we could do in that situation if you wanted to (mumbles) still let your knees bend a little bit and concentrate more on the orientation of the back and create less of a challenge in the legs. Last time ... And then the arms are gonna come down and around. So to finish today, we're gonna do a little prep from my favorite exercise called the side-over. We're not actually gonna move the body in our side-over today, we're just gonna find the position, which is how I often transition people from one movement to the next. Can they just hold the position?
Can they be in the start position well? So we put the box on short ways, put a bunch of springs on, all the springs on, and then we're gonna come up onto the box. We're gonna take the foot underneath the strap, reach down with the hand, your hand, and put it onto the headrest. The leg that's in the strap is lifted up and I want you to bias towards lifting with your heel, then create a long spinal position with the bottom ribs lifting up. Take the top hand behind the head, now here's where we find out if we can stabilize.
We have to keep everything still. We take the top hand back and we hold 10, nine, eight, seven, six, five, four, three, two, one. Just holding that position can be a challenge in and of itself. Let's take the elbow down to the headrest and then take that top arm up and reach it overhead, pushing the opposite leg, the one that's in the strap away from you, and then maybe a little forward, a little quarter turn to the front. And if that's the side-over prep, call it side-over still, then you know if you love the side-over, that will come soon enough.
Okay, so the hand goes down. We find all our pieces, ribs in, spine long. This hand comes back behind the head. You don't wanna squeeze the elbows back. You wanna keep the elbows just slightly just in your ... I mean wide, but not behind you.
Here we go, stabilize ... Other hand. 10, nine ... What happens to the leg? Does it turn up? You wanna keep it parallel. Six ... Even internally rotated a little bit.
Four ... Three ... Two ... One. And we bring the arm down and we come in, we tuck the elbow in, we take that arm overhead. I think the reason I like this exercise so much is because the stretch is so rewarding for me. It feels so good. For most people I think.
And then little bend forward. And then come up and off. Take your foot out of the strap and then let's turn the box into a long position. We're gonna learn an exercise called a breath stroke prep today. So what we need is just one spring.
We'll do it two ways. So we're gonna put the foot bar up. This is another one that I love. So you're gonna get down onto the box. So we did the salute, right?
And we talked about the relationship between the scapula and the hand, same here. So even a real similar arm position. So come down, put your hands on the bar. Drop the elbows down just a little bit. Press down on the bar just slightly to lift the sternum, just the sternum floor, the ribs are on the box.
Now I have a red spring on. I want you to feel that you start movement by shoulder blade sliding. I haven't pushed on the bar at all. Now with the shoulder blades sliding, that's where the arms start to move. The wrists will change.
As the elbows bend, the wrists will just follow the elbow, so the fingers start facing each other. That's just all in an effort to not do weird wrist stuff. And then as we pull out straight arms, the wrists will face straight ahead. And then bend ... And again, we'll do two more like that. So really feeling that work through the upper back.
Feeling that work through the upper back as you come in, and then one more. So this is my favorite thing to do with this exercise. So now we know what it feels like to push weight. So be careful, but reach out and take off your spring. Same choreography, same movement, but now we have to be real light on the bar and for me it's almost more ...
It's profoundly different when you have to move against almost nothing. So the scapula slides as there's a drag. And so now, instead of the challenge being on the way out more so, the out we just have to control and the challenge is on the in. So now if you have a foot bar that locks in, that's lucky for you. But if you don't and you feel that foot bar moving around, or even if you do when you feel the foot bar moving around, you know you're not working quite from the right place.
You wanna keep the foot bar still. Don't let it lift. Pull it instead, apart. So what I'm thinking about, we'll do two more, is as I'm pressing out, I'm just letting the scapula do it's rotation, and then as I'm pulling in I'm trying to stretch the bar, to pull the bar apart. Not so much with my hands.
Yes, with my hands, but with my shoulder blades more. And then we'll go out one more ... And in. And then I want you to just reach down and put a blue spring on. Step to the side and take the foot bar down. So we'll finish with a cat stretch, another spinal articulation.
So I just want you to come and stand just at this side of the Reformer, the front of the Reformer. Bend over, rounding the spine down to place the hands on the box. So now from there, reach out with the spine and reach out with the spine. Allow the spine to go long and down. Long and down.
Inhale ... Exhale, tuck the tail under. Push the box away, roll yourself up. And inhale as you reach out and down. Stretching the spine longer, reaching the ribs away from the pelvis and exhale ... Curling the tail under and rolling the box back to the start position. And let's just do two more.
Reaching out ... Out .... Out. And sliding back in. Stretching ... Allowing the fluidity of the spine to manifest. One more ... Down and out, tailbone lifting. Sit bones spreading, naval back towards the spine.
And now round back in ... Bring the carriage back in. Rolling the spine up, letting the arms lift as the spine lifts and then just softly allowing the arms to fall, noticing that you can bring energy into your body in a soft way as well as in a challenge way. And once the arms come down we'll call that a wrap. Thank you for taking class with me.


Pilates with Meri Rogers: Fundamental Reformer Progressions

Mention
 |
Meredith Rogers (Teacher) |
 |
Jocelyne B |
 |
Barbara L |
 |
Vicky Andrews |
 |
Kk |
 |
Cindy K |
 |
Heather G |
 |
Neslisah S |
 |
Terri D. |
 |
Rachel R |
 |
Stacey S |
 |
Leah M |
 |
Connie M |
 |
Ana Carla M |
|
|
Lissa D |
 |
Patti S |
 |
Kirsty L |
|
|
Valerie Kosty |
 |
George C |
Comments


You need to be a subscriber to post a comment.
Please Log In or Create an Account to start your free trial.
