Description
About This Video
Transcript
Read Full Transcript
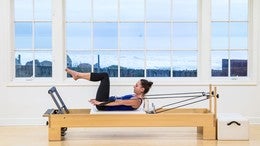
Thank you for joining me for the first class in Reformer Progression Series so today we'll start as we should with the fundamentals on the reformer. I have my reformer set up with three reds and one blue spring which is my choice for foot work and we'll start lying down. So lying down on your back just taking a moment to organize all your pieces, parts, body parts. Feel that the feet are placed on the bar just in line with the sitting bones, separate slightly. The arms are right next to the body, long and straight.
Bring awareness to your shoulder blades and see that they are flat on the reformer and wide on the back. And then bring awareness to the alignment of the spine, the top of the head, reaching backwards or long as the tailbone reaches down in the opposite direction and then taking a moment to focus on the breath and feel the inhale and can we bring awareness into our bodies, in fact, place your hands on your ribs and inhale, drawing the abdominals deep towards the spine, feel that as you inhale the expansion in the body happens around the ribcage so you could actually widen the orientation of your hands on your body and then as you exhale, deepen the connection with your abdominals or in the center of your body and let the ribs slide down and together. And then again, taking another inhale, feeling the expansion, the three dimensional expansion to the sides and to the back of the body that the ribs do and then draw the navel to the spine and exhale feel the softening or the drawing together or the corseting action of the rib area. And then allow your arms to come down next to your body once again, preparing for movement so inhaling and then as we exhale, feel that same sliding down the front of your body with the ribs, tip the tail bone under and allow the lower spine to flatten into the mat. Feel that the abdominals are primarily working to do that or are working basically the only thing working as your abdominals to do that movement.
And then release the tail bone down and back. And let's arch the spine a little bit and feel how as your tail bone drops under or backwards, your head will slide on the mat a little bit, proving to ourselves that the head is indeed, connected to the pelves and then find, what we call, neutral, where the two front hip bones and the pubic bone are in a straight line and again, exhale, feel the lower spine flatten. So can you do that with just your energy or just your abdominal energy. Not really using the legs at all yet. And then inhale pass through center or neutral and allow the lower spine to arch so we feel the changing of the pelvis in both directions or the changing of the spine in or reference to our neutral position in both directions.
Let's do that one more time, exhale to flatten the spine, bringing the pubic bone up towards the tip of the nose and then inhale as we pass through neutral into an anterior tilt or an arch and then settling back into neutral alignment again. Inhale here, exhale, flatten the spine just as before and now press down into your feet and begin to just pick the pelvis up off the bed so you roll the spine up, lifting the hips up, feeling the shoulders and the knees come into a straight line, inhale here. Starting from the throat, begin to place the body back down and concentrate or envision each bone coming individually down on the mat. And perhaps we can create some space between the bones of the spine as we lay the spine back onto the mat, inhale at the bottom. Exhale, flatten the spine first, pure abdominal work and then let the legs start to kick in, feel that both feet are pressing actively or evenly and actively down into the bar and we lift the hips, creating a long, straight line from the knees to the shoulders which are soft and again, wide.
Inhale and exhale. So many things to notice in these most simple movements, they're my favorite 'cause you may know about me, I love the basics. Drop the tail bone down because each movement, each advanced movement, let's roll up again, has a home in the basics so it's appropriate for us no matter what our level is to continue to come back to the fundamental movements. To continue to improve our awareness or our skill around these simple things so that we are ready in our bodies prepared with strength and awareness as we move into the more intermediate or advanced choreography. Last time.
Inhale and exhale. Lower spine flattens, pelvis tips, feet pressed down, pelvis lifts, knees reach away from the shoulders as the heels pull back towards the shoulders so creating oppositional energy. And inhale and exhale as we just lay the spine back down, stretching it long. And come all the way down. So with your hands, reach back to where the pegs are, the metal pegs where the straps hang up, lift one leg and lift the other leg.
So keeping the feet right in front of the knees, feel as though you're trying to pull the pegs apart, not with your hands but with your shoulder blades so the shoulder blades again are wide, inhale as you tip your knees towards me, keeping the opposite shoulder blade down and open and then exhale, pull through the center of the body to bring yourself back into the center or back where the spine is long, inhale, it's a rotation of the lower spine or the lower half of the body, upper half of the body, our upper third of the body stays fairly still. Exhale, pull back to center. And again inhale as we reach over. And exhale as we connect the shoulder blade to the ribs, the ribs to the side body, the side body to the spine and inhale, keeping the knees aligned. And exhale and we'll just do that one more time to each side, noticing the depth of movement that you can create as the knees come towards me.
The navel pulls back in the other direction towards the spine and then we can deepen into that connection, in theory. Feel like you can create the most depth, the most depth in these simple things and exhale to come back. So once you're back in center, place your feet back down onto the bar, place your hands on your midsection, stay just above the pelvis and just below the ribs with your thumbs, notice at the bottom of the rib cage and the front of the body is resting downwards, inhale. As you exhale, feel that you're trying to create space between your hands and your skin as you lift one leg and notice, can you do that without changing anything else in your body. As you inhale, place that leg down, now here's the tricky part, can we place one leg down and lift the other leg up without any shifting in the body at all, it's quite a challenge.
It might not look like much of a challenge but it is. For me. Exhale to pull one leg up, notice if there's tension in the neck or in the shoulders and see if you can settle around that, settle around no tension in the neck and the shoulders and then exhale, the other leg comes up so at no point am I allowing my stomach area to push up into my hands. All the time I'm trying to create a space, an inch of space, a half an inch of space between my hands and my body. It's gonna be the last one, down and then switching sides.
Now we're gonna do that with more of a floating in space type of action. So inhale here and exhale, pull away from your hands and switch. And switch. Consciously, actively contracting to keep the deep abdominal muscles firing. (heavy breathing) No shifting.
One more time to each side. And then leave the leg beds down down and let the other leg come down to join it. So if you give yourself about three inches or so of space it'd be different for all of us maybe, so you just need to figure out how much space you need. If you can reach back and take a hold of your head with your hands, I'm just reaching around the pegs. Inhale here, press down with your legs and together with your legs, we're gonna exhale, holding the back of the skull, curl the head and chest up so the gaze goes just over the knees.
Inhale, pause, maybe lift a little higher and then exhale, lay the spine back down. Just a chest lift, inhale to prepare, exhale the front of the ribs draw down, the head and chest curl. Notice if you're pushing forward on your head and see if you can let the head or the neck stay long as really the changing of the spine is what lifts the head through space, not the push of the arms. And inhale to come down, let's see three more. Exhale to lift the head and chest.
Deepen, deepen, deepen, inhale. And exhale, lower the head and chest down, one more time. Inhale, lift the head and chest. Pause when you get there, take your hands behind your thighs. Now use your arms, not necessarily to come up much higher but to see if you can curl more inwards, then let go, we're gonna reach the arms back, inhale, open the arms out and forward, exhale.
Inhale, lift the arms up, sink the abdominals, open up to the side and come forward, one more time, inhale, reach up without letting the body fall down, open out to the side, reach forward. Oh I lied, we gotta go back over head one more time to bring the hands behind the head to let the head settle in the hands and then we'll take it down. So what I'd like for you to do now is lift the leg that's closest to me so you'll be rotating in my direction as you come up so we're gonna curl the head and chest up straight up, through center, then I want you to turn towards the leg that's in the air, take the opposite hand just below the knee and then the same side hand is leg and take it just underneath that hand. So what I want us to feel is that the opposite side of the ribcage lifts up to come across towards that hip, the hip that's closest to me and that the ribs that are on the same side of the hip, draw in and down. Now pull your abdominals in, stabilize that position, take one hand back behind your head, take the other hand back behind your head, hold your body right there as that leg goes back down.
This is in preparation for the next exercise, center and down. And we'll go to the other side, exhale head and lift the opposite leg. Head and chest come up, rotate towards the leg that's in the air. So the way you're rotating, those bottom ribs are sliding towards the spine, take the hands just underneath the knee and then just underneath the hand, life, twist, rotate, neutral pelvis or tail bone down, take one hand back, take your other hand back, lower the leg to the mat, feel what this feels like, we're about to do it again with no help from our hands, find center and lower down. Did I mention that I believe that these are also the hardest movements?
Exhale head and chest up. Let's give ourself just a little bit of help here, drawing deeper, drawing deeper, reach up, hands behind your head, inhale, exhale up and over into that same rotational place. The eyes look just to the outside of the thighs, inhale center, exhale the bottom ribs, spiral inwards as the upper ribs come over the top, inhale center, exhale lift up and across and center and lift up and across and center, one more to each side, lift up and across, keeping the pelvis very stable and center and up and across and center and then just take the arms straight up towards the ceiling, let the head come down, stretch one leg, then the other, down long along the foot bar. We'll lift the head and chest as we inhale and exhale to roll all the way back up and then swing the legs around to the side of the reformer so that we can put the foot bar up for foot work. I'm gonna put it, it's in the high bar position.
We wanna lie down on our side and transition down onto our backs. So starting with the heels of the feet on the foot bar, flex your feet, find your arms down long, find your neutral spinal position, press the carriage away. Now just take a moment here and notice that the feet are flexed as though they are standing on a wall, the tail bone is down, the backsides of the ribs are down, the neck is long, maybe drawing the chin slightly towards the chest and then we'll bend and come in. So creating a rhythm, exhale and inhale to come in. Really good place to notice here is or really good place to look for and watch are the legs working evenly is the pelvis moving around, can we keep it still and neutral, what happens with the shoulders, do they try to scrunch up and push up into the shoulder blocks or can we leave them relaxed on the back.
And the feet just stay still. Initiation from the movement happens right from the back of the legs, the top of the back of the legs. We'll do two more. And come back and one more and come back. And then once the carriage is all the way, move to your toes.
Finding equality of pressure from the pinky toe through the big toe, push out, look here, maybe even lift your head, look at the alignment of the ankles, see that they're straight. The heels now stay still in this position as we bend the knees, meaning the ankle joint is going to change, press out but the heels once we get to straight legs with that high releve position, just stay right as they are, all the time. So we work the springs on the out and we also wanna feel that we're working the springs on the in, drawing the heels back to the back of the legs or feeling that you're actively bending your knees again, taking a moment maybe to check in with the shoulders. We'll just do two more like that. Out and back in.
And then from the bottom, we're gonna just swivel the heels together, allow the knees to open up, press the heels together to feel the connection of the inner thigh muscles and wrap from the back of the legs to straighten, notice again as your legs are straight, your tail bone is dropped, your spine is long and then keep squeezing the heels as we bend and stretch, inhale bend, same orientation of the feet so when the legs are straight, the feet are pointed. When the knees bend, the heels stay still so we work the stabilization of the feet or the muscles that were to stabilize the feet and the ankle joint are wrapping from the back of the hip, zipping up through the inner thighs, we'll do three, bringing awareness each time to your breath and the work that you can create with your breath and last time, just working at this nice, steady pace. We'll speed things up again a little later. Go back to parallel alignment with your feet, press the carriage away, connect the heels all the way up to the hips to where the glutes and the hamstrings meet each other in space and then take the heels under the bar and roll back up so we're doing a full articulation of the foot, you wanna feel that you're not just allowing the springs to pull you under the bar but you're pulling actively from the front of the shins to drag the heels further than the springs will as you go under the bar with your heels. We'll do five more here.
Again, just going through your checklist, noticing the alignment of the neck and head, the positioning of the shoulders, keeping the knees and the ankles and the hips in line, last two, and one more. From the top, thinking about keeping the pelvis still we'll bend one knee, take one foot down, lift both feet in center and change. So we go up to go down, up to go down, the foot of the bent knee pushes as the other foot wraps so we've got to push and a wrap happening so that both feet are active on the bar. Let's do three more. Two more.
And last time. Taking the stretch underneath the bar. Changing sides. And then lift and bend and bring the carriage back. Roll to your side, use your hand to help yourself up.
I'm gonna take away a spring so I'm gonna go down to two reds and a blue instead of three reds and a blue. Come back down, do a little single leg work. Single leg work is important because we wanna work the body asymmetrically or bilaterally. So one heel stays on the bar, the other leg comes up into tabletop and we'll just take that leg out, take a moment as that leg is straight, notice the position of the pelvis and then bend and come back and press away and bend and come back and press away. We'll do six.
For those of you who know I can't count, maybe keep track of your own repetitions. For those of you who don't know that about me, there's a fun fact about me. That's five by my count. And six. Notice as the one leg moves, the other leg just comes along for the ride, it stays absolutely still.
Here we go, pressing into the heel of the foot, stretch out and pull back, stretch out and pull back, feeling the connection to the back of the leg, there's three and four and softening through the ribs, five and six. Coming back in, placing the toes on the bar, opposite foot lifts up and take it out, same position with the foot, feel that the heel is lifted here but then as the knee bends, the ankle changes and the heel stays still. The leg that's in the air doesn't, doesn't move at all it just stays right over the pelvis on that side. We'll do three more here. Bend, pull back.
Two more. Feel that as you press up, it's not from the legs, but it's also from the abdominals, not only from the legs I should say. And then back, changing feet again. Lifting the opposite leg up, connecting to the back of the leg, here we go, we press it out and come in, press out and come in, just creating that rhythmic movement, working with the breath, here's three and in, two, long arms, long neck and one and in. Okay.
So that's completed, we used our footwork to help warm our bodies up for more, for more complicated work or more core challenging work. We're moving the springs to one red and one blue now. We're gonna come back down onto our backs. And reach back and take a hold of your straps. It's always a good idea to make sure that they're even with one another.
Take the arms and bring them just above the shoulder blades. Push into the straps a little, not by squeezing the shoulders together but by broadening the shoulder blades so that they're again, they're wide on the back, lift one leg and lift the other leg. Now what I want us to think about as we press the arms down is can we press the arms down from the rib area. So it's as though the sternum drops, the ribs drop and then the arms reach long, inhale, resist the arms coming up, exhale, sternum drops, ribs drop so we use the abdominals, in theory, to move the arms. We use the awareness around the abdominals to move the arms.
Just two more here. Inhale as you lift, sliding the scapula down, exhale to reach away, inhale to lift, exhale to reach away. At the bottom, rotate the palms so that the palms face the legs. Inhale, expand the breath into the movement of the arms and exhale, use the arms and your awareness around your breath to bring work into the middle of your body. Inhale, reach out, scapula slides down, arms come next to the body, neck is long and reaching.
Inhale, open and exhale back. Inhale, open and exhale back. We'll do two more, reaching out. So our most fundamental arm series here, Arm Supine. Last one, using the abdominals to hold the legs so moving on, rotate the palms to face down, lift the arms over the shoulders.
Keep the carriage still, keep the scapula still as you take your arms out to your sides and come down. So a good way to think about where the shoulder blades are is feel that they're reaching out with the arms. The arms are reaching to touch both sides of the room, feel that the shoulder blades stay still and wide, the ribs stay pressed down into the space between the shoulder blades and we'll do three more. Reach out and pull. Two more, up, open and pull.
Last one, up, open and let's take that in reverse so take the arms out. If it gets tiring to hold your legs up for this long, just let your lower legs relax. Bring the arms over the shoulders, carriage stays still and press down, out to the side, stabilizing the shoulder blades, bring the arms at the same time over the shoulders and press down deep in through the abdominals and out and over and down. Two more, out and over and down, last time, out and forward and down now let the arms come right next to the body, bend the arms, keep the upper arms just off the mat and straighten the arms so feel that the arms are being straight, not just from the back of the arms but by a depression or a drawing down in the shoulder blade area, we connect there before we move our arms always. Connect into the shoulder, stabilizers and then move, connect into the shoulder stabilizers and then move and we'll do about three more here.
Oh check in with the rims, Meredith. Two and last time. Lift the arms up over the shoulders, take a breath in, coming into our most basic abdominal work, or that was abdominal work but of flexion work so we're gonna drop the sternum again, feel the connection of the sternum to the ribs but start lifting the head and chest up, taking the arms and reaching into the foot bar then begin to lift the arms up and take the head down. Again exhale head and chest up, reach past the hips, press the legs together, lift the arms and bring the body down. And exhale, lift the head and chest.
And inhale and exhale, take the body down and last two. Lift the head and chest, reach past the pelvis and down and lift the head and chest, feel the reach of the arms that's a lot of where the height of the trunk will come from and come all the way down. Place your feet back down onto the bar. Push out with your legs. Take one of your feet into the straps.
Hold tension on that strap so that the carriage stays still as you lift the other leg and place that leg into the strap. And then bend the knees to bring the heels together, toes apart. Knees just on the outside of the ropes and then here we're gonna squeeze the heel together from the insides of the thighs, wrap as you press and then pull the legs back. Just our most basic, basic hip work. So what I like to think about is can I delay the action of the feet while I find where it's meant to be connected from, where I'm meant to be thinking from, from the center of the body, from the external rotators of the hips, from the inner thighs so it doesn't become just push the legs through space.
It's not really a great deal of tension to make pushing the legs through space challenging. Challenging instead to find the proper connections and work from integrity, with integrity. Last time so we take the legs out and I take the legs down, just slightly, out to the sides, around together. And press out, reach long, out to the sides, around, together and reach out. So I'm sending my legs away form me, keeping my pelvis in that neutral alignment so never bringing the legs up so far that it feels as though the pelvis needs to come to.
And we'll just do two more like that. Reach out as you press down, around and up. Reach out as you press down, around and up. And now from the top, separate the legs, press down and together and lift. Tail bone stays heavy, open, feel that there's equality of pressure, equality of contact into your straps with your feet, stretching legs out and away.
We'll do three more here. Reaching long and up and two more, reaching long and up and one more, open, reaching long. Pausing there, going into opening so imagine that there is a horizontal line or a horizon and keep your heels on that line of horizon. Don't let them drop so as they open out, if they can stay on that side, same line, it will feel as though they're lifting at the end and then draw the inner thighs together, support through the insides of the legs, through the front of the legs, inhale, so what I mean by that is just make sure that the knees don't bow backwards and the ankles, that the knees have plenty of support to handle that fairly large range that we're asking for. Exhale, pull through the middle of the body to come back together.
Inhale open, exhale through the middle of the body to come back together. We'll do one more time, inhale and exhale. And last one, oh I said one more and that was one more. I guess that's it then. Bring the legs up, flex your feet or flatten the soles of your feet, pull down on your straps, give yourself a stretch, tail bone heavy, scapula down, shoulder blades down, soft, then bend your knees.
Take one foot out of the strap, reach that foot down onto the bar so you're stable. Take the other foot out of the strap, bend your knees and come in. Hang up the straps on the hooks. So let's roll to our side and help ourselves up again. We'll go down from here to just a blue spring, just a very light spring.
Then what I want us to do is to come around so that we can put the knee up against the shoulder block. Bend over and put your hands, let's say about six inches away from the carriage. Bend the outside leg so that the knees are pretty much right in the same place and then I want us to tuck the tail under and round the spine. Shift so that the shoulders come just over the hands. Inhale here, keep the standing leg still and then deepen, pull through the center of your body, think of just stabilizing the trunk as the knee comes underneath.
Inhale to reach out. So hopefully you'll see that the only thing that's changing in terms of movement is the relationship in my hip joint. Everything else in my body is staying exactly the same, very still. So this looks like a moving leg exercise but what we're really doing is working the abdominals as a stabilizing force as we work our deep hip flexors, this is our last time. Exhale and then bring the carriage all the way back before you step up.
Then come around to the other side. So we hear a lot in Pilates about use your abdominals to bend your knees, use your abdominals to move your legs, what we're really cuing there or talking about there is our deep hip flexor work and what the abdominals truly do there is they create stabilization. So that's what we're practicing here. So we find our position, hands about six inches from the carriage, round the spine and then stabilize the spine as the knee comes through. So shouldn't be so much that you'll see a shift.
Just everything else is very still. What I think about is can I round my body more, can I move my leg from my spine so maybe that's a good place to come with your mental imagery. We'll just do two more, exhale as you bring the knee under and inhale back and exhale, bring the knee under and inhale, reach back. Okay good, so take a red spring on or one full spring, remove the blue spring. Place the foot on against the shoulder block and then the other leg is just gonna reach out and step just outside the frame.
We're gonna take a stretch here. So want us to bend the front knee just over the ankle there. Push away from the bar with your arms and then start to take that, that knee back, the knee that's on the carriage so hopefully if we engage through the back of the leg, think about biasing towards, pressing the pubic bone forward, we should be able to find a stretch in the front of the hip. So breathing in and breathing out here. Breathing in and breathing out.
And then let the pelvis go straight back as we work to straighten the front leg so tipping the pelvis now up towards the ceiling or working towards an anterior tilt or an arch. Breathing and then bend the front knee again, allow for the idea of a posterior tilt or a little tuck in the pelvis as we work to stretch the muscles in the front of the legs. It's nice to think about keeping the muscles in the back of the leg engaged just to support that joint. And then lift the front foot, reach the pelvis back, tip the tail bone up. More important to have a straight spine than a straight leg here.
And then bend, bring the carriage all the way back home, step off and come to the other side. So we put the foot up against the shoulder block, we find our back extensors. This position where we're biasing towards a tuck and using the arms to help us create extension in our spine as a four runner to a different exercise that we'll do in the next sequence, called the down stretch. So the idea of the pelvis being pressed forward as we lift the chest up and away from the bar and then the front foot lifts, we tip the pelvis back, the hips go straight back. Pausing here, breathing in and out.
And then bend, dropping the hip back through, reaching up and forward through the spine. Breathing about three breaths to hold three to five breaths here and then bringing the hips up and back sending the carriage back, finding a flat spine. Bend and come back in. Bring the carriage all the way back, step off and just sit for a moment, sit just right on the, right on the reformer, both feet on the floor. Bring the hands behind the head.
Notice you're not squeezing your shoulder blades forward. If you feel like your head is getting pushed forward, chances are the shoulder blades are trying to come together so let them wrap around the front of the body, like a shoveling action or a scooping action so the bottom tips, the bottom outside tips of the shoulder blades are coming down and up and then from here, we're gonna inhale as we lean over to one side, keeping the opposite what, the pelvis on the opposite side still and then come back up. You'd think I know words like pelvis by now but you know, sometimes you just, you just can't quite get them. So more details. Can we feel as though both sides of the body are lengthening?
And then we're trying to reach both sides of the body long, creating a stretch on the one side of the body. Where the stretch is happening is where we wanna engage to pull back to center. Inhale as we reach up and over and just the most basic, laterally motion. Lateral motion. Oh we better quit this class soon, I can't speak anymore.
Here we go, let's do one more time to each side. Inhale and exhale. And inhale and exhale. And then bring the arms down. And we're gonna go back to a blue spring.
Take the red spring away so you just have one spring, one blue spring and then take the foot bar down. Retrieve your box. Hopefully you'll have a box. And place it on longways. Lay down on the box.
Still have to be careful there, it's not a lot of spring so look after yourself. So organize so that just the ribs are at the edge of the box, the chest is just over the edge, slide the arms out quite far and then feel here that you're trying to lift through your abdominals. Make sure that the whole pelvis is down, meaning the front of the hip bones, two front hip bones. And what I want us to do is I want us to start to move our shoulder blades. So we're gonna start sliding the shoulder blades down.
So get the carriage to move underneath you. Once that happens, then we're gonna allow the upper back to start to lift just a little bit, just a little bit so I'm keeping the front of the ribs on the box and trying to maximize work into the upper spinal area. So a sliding of the shoulder blades down the back doesn't equal squeezing the shoulder blades, it means just drawing them downwards, that's where the box starts to move and then they essentially continue in that direction as now we start to move the spine. Pausing and then coming back. And then again, scapula sliding down.
Spine stabilizing, legs energizing, upper spine lifting. And then reach out and down and two more and back and last time so breathing, if you breathe in as we reach out, reaching the back of the ears up in back and then release all the way forward. So once your carriage comes all the way home, then you can relax your legs, you can help yourself down off to the side and then just standing, gonna finish with a roll down so it's like a body scan so lengthen and lift tall. Take a breath in and then start to nod the chin into the chest, let the top of the head reach down towards the floor. Notice that the knees are just over the ankles, the hips are just over the knees as you pass through that round position, the hips are gonna come with you so at the end you could think about trying to open up the pelvis or arch the pelvis and then inhale, initiate the upward movement by first engaging the abdominals than feeling the rotation of the pelvis, the forward rotation or underneath rotation of the pelvis as we stack the spine over the top of the hips.
And inhale and exhale. Chin goes to the chest, abdominals draw in and back, top of the head reaches down and all the while, as you're taking your spine down towards the floor, you're lifted, you're connected to the front of your body. Pause and inhale, exhale to lift. And come all the way up. Hope to see you next time for part two.

Beginner Reformer: 40-Minute Classes


Comments


You need to be a subscriber to post a comment.
Please Log In or Create an Account to start your free trial.
