Description
About This Video
Transcript
Read Full Transcript
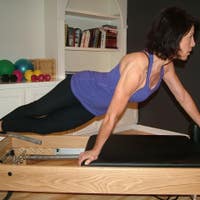
Hi. I'm Danica Kellum DeRulu, and this is standing strong. We're gonna be looking at how to progress our clients to exercises standing on the reformer. Now I cannot iterate enough that standing on the reformer is an intermediate skill that builds to the advanced level. Beginners have a lot of work to do before they are gonna be confident and most importantly safe when standing on top of the reformer. Regardless, what we really need to focus on is our footwork and our connection to the carriage once we mount the carriage. So we're actually gonna start on the floor with some standing footwork and dynamic balance work so that we can get our ankles and feet ready for the instability of the moving carriage.
It's always better to practice on a solid surface first. So I'm gonna turn side on just so you can get a better visual of alignment as well. We're gonna do the best we can to stack the ears over shoulders over hips on top of ankles. Versus weight back into the heels, which I hear queued a lot. If we take this standing into the heels onto the reformer, as soon as the carriage moves, we're going to be very unstable and unsafe.
So what we wanna first start with is finding where the actual plumb line of our body stands on the strength of our feet, which is not in the heels. It's also not in the toes. It's where we're gonna have the full metatarsal first through fifth and a connection of the heels, but everything is standing on top of the strength of our arches. Which is why making sure when we do our footwork on the reformer that we're getting that strength in the arch of the foot. And regardless if you have flat feet, you still have muscles in the arch. So with a sway back and forth, look for where the toes themselves can rest easily on the floor and be ready for weight shift because our toes are there to help us.
But we wanna find a place where our plumb line settles on top of the arch where our ankles are in a nice door selection, but there's this engagement of wrap together. I'm in a very small Pilates v, which is external rotation, but is not the first position that a ballet dancer would take. This is actually very extreme and more external rotation than a lot of people need. But everyone has this little bit of external role of the femur in the pelvis that actually guides us into the adduction of our inner thighs. I'm gonna bring my hands up behind my head and I want the hands high really eye height versus down at the base of the neck.
If you go too low with the hands, you don't actually come into the height and length of your cervical spine. And we're gonna just start with some basic standing footwork. Keeping the heels together, lift both heels, shifting weight to the metatarsal, bend both knees over toes. And again, I'm not in a lot of external rotation, so I don't need to go wide. I need to keep it right on top of the strength of my arch as I roll through to the heels straighten the knees. Inhale and lift.
And if we're keeping the heels together, you will not go all the way up. If I go higher than this, at a certain point, my heels have to come apart. That's where we're going to get really propped into the metatarsal, and we're not really stable because we're stacking our bones versus standing on strength. Lower down. One more, lift the heels, bend the knees, roll through the feet, and stretch. And let's reverse that. A bending of the knees Now, this can get tricky. When you lift the heels, keeping them together, we do not want to swing the pelvis.
It's a little bit extra flexion in the hip as we flex in the knees and stretch up, zipping together in that wrap squeeze to roll down. What we wanna look for in our clients is to make sure that they're lifting and coming right on top of that first second, little bit of that third metatarsal. We do not want to stretch up and fall out to that fifth metatarsal. Where then, if we were jumping that would put our ankle in a place of risk because we're not coming through the line of our foot. One more time, bend the knees, lift the heels, stretch up trying to keep those heels together, which will help us stay towards that first second metatarsal, reach back down.
And then let's just keep the knee straight with a press up. Control down. One more. I'd like to give the image sometimes that your heels are pushing down trying to squish a grapefruit So you really get that opposition and resistance versus dropping because if we drop on the carriage and drop on the springs, we're going to be unstable. Now that really worked to get my calves, my shins and the soles of my feet more awake, But let's work a lateral shifting of weight where the ground is nice and solid underneath of us, because again, once we get on the carriage, we no longer have that stability. And if we press and push and press and push, find a balance, find a balance where you have to pull it all together into center, and then reach back out to the side, and just move on top with your plumb line and pick up. If you want to add a little bit more stability, reach the arms out to the side, you can feel more of a reach and you'll feel more of that work to actually help you pull you into center since we're reaching out. One more over right, left, pick it up.
And that's moving through our frontal plane. However, when we stand on the carriage, we're also going to do work where we move through our sagittal plane. So I want you to take your feet apart, and I want you to slightly externally rotate your back leg. This will make it a little bit easier to get more opening in the front of the hip, more engagement in the glute hammy. If you're parallel, tightness in the ankle and calf may restrict the ability to open up the front of that hip. So a little bit of external rotation.
And if we take a shifting of the weight back, pressing weight forward, back, we're gonna go forward with the balance. Reach through the toes, place the heel. We go back, forward, back, forward one more time for a balance, bring feet together. Sending the other leg back, reach, bending the knee as you go back and forth, so you can really feel the push, and then reaching through the toes to find that support in the arch to land the heel one more time forward. Back, push. That, for me, is a little bit easier than if we wanna send weight forward and push back and change. Brush a leg forward, land on it, press back up.
You have to really move the unit of your torso as a whole. When we want to shift weight, we don't want to go in pieces because then it is so much harder to deal with how to come off that center line and back on top of. So really try to keep the torso. Your arms can really do what they want to help you or challenge you. But where do you come back into that back body? Last one, as weight shifts forward, push back.
Now when we get on the reformer, that shifting of weight forward is really gonna be the carriage moving. So what we've learned on the floor is the stability and the connection of our feet into the ground that we're going to need on the carriage as it moves underneath of us. So now let's talk about mounting the carriage. We come around to the back of the reformer, and right now I have all springs loaded. The carriage is not going to move.
In the traditional work, When mounting the carriage, it's most commonly taught to step onto the carriage first and then the frame, or now what we have is the platform. However, this has changed greatly over the years mainly because of how reformers have also changed. If your spring tension is not heavy enough, if your carriage is not heavy enough, the lighter the springs The more likely the carriage is going to move if you step onto it. So I like to teach the best of both worlds so that when you are on different brands of reformer, you know where it's best safe for people to step up. Now regardless, with all springs on, the carriage should not move, I should be able to step right up onto it.
And we could start with a simple idea of going up front or your front lunge on the chair. Placing one foot in the center, finding a reach of the arms forward or up, out if you like. Any variation is fine with me, except for hands on hips, where it tends to allow us to sit into our chest, instead of staying strong in our back body. I'm gonna choose arms forward because for me, since I'm going forward, it helps me find where that weight shift is going. So as I press down the idea of being on the chair where the pedal lifts up underneath of you lifting the back heel step up, be here for a moment. Let your neuromuscular system get used to the reality of being up this high.
Then I'm going to free the opposite leg. I have to pitch forward ever so slightly as I bend and lower back down. And if you watch carefully, the connection of this foot, weight should shift through the ankle and through the foot. But it should not get crazy and move side to side in that frontal plane. We wanna really stay through that sagittal plane.
Coming forward, lift up, zip. I like to take an inhale here. Then as I exhale, I find that opposition of the exhale rising as I lower and you can see the challenge to find that movement clean through the ankle. One more time. If we wanted to make this even harder, Well, we could add a magic circle. We could add some arm weights.
The options are endless. Reach back. One more, and we'll stay up here. Now, I'm gonna keep facing you but you could easily turn towards the foot bar or the shoulder blocks. And I want you to repeat the same footwork you did on the floor. Again, to get used to being up this high and feeling all the atmosphere up here. So if we do a, lift the heels, bend the knees, lower down, and stretch, I'm gonna go ahead and reverse it. You could go in the same direction each time. It's up to you.
Notice again, I'm not lifting my heels very high. I'm not going to where dancers would call it relevay. It's just a press to shift weight through the arch, zip it up, lower back down. I'm gonna open my legs and open my stance And just again, find an easy side to side shift, because in a moment, this is going to be the movement of the carriage. And if I want to step and pull, even I was a little hesitant, I had to really work and find my plumb line to draw in and up. I'm gonna lower down, press out from the outer hip, shift, shift over. I'm gonna pull that leg in and zip it up.
This will come back as a very necessary skill in a moment. One more time. And again, get used to being up here. For a lot of our clients, they've never been up on a reformer this high for this long. You have to give them time to get used to it and up. I'm gonna face the foot bar, find a small Pilates d in the middle of the carriage, and just take a simple roll down, like a sun salutation.
Inhale arms come up, And the minute my head comes down into that contraction of the upper abs rounding over, this is a whole new moment for my equilibrial system. Okay? A lot of people at this point start dropping back either because of tightness or fear. Okay? Because we are moving forward towards the foot bar trying to stand strong on top of our arches. Without falling back in the heels, can we tap the bar with fingertips and then tail down, roll back up? We can take a little swan at the top, which is again a whole new experience from looking up versus looking down. Lift up through the arms, contract.
And if you wanna go a little farther out to the edge of the carriage, maybe if you have the flexibility plant the hands down, And then if if you even have more flexibility, really pull that chin to chest and coil into the contraction of your abdominals. As you roll up, initiate tail, sits bones down to the heels, getting those hamstrings to come back alive as you roll up. I love a little extension at the top and come back center. Let's also take a little side bend, because I ask our eyes move with our head going side to side, again, your equilibrial system and your neuromuscular system are getting a huge challenge. And one more over to the right, coming back up and over to the left.
And now I'm gonna come back to face you and step back and drop some spring. The moment I drop spring, the carriage has become significantly more unstable and unsecure. I'm gonna come down to two red springs, and I'm also gonna lower the foot bar. If I were working on a controllogy reformer, the wheels have drag in the tracks, and the carriage itself is very heavy. It's more secure than a more contemporary styled reformer once we start dropping springs.
That is why now I'm going to step on the frame or the platform first versus stepping onto the carriage first. And you just have to know the style of your reformer to cue for that body. We remember when I said, pull up through the plumb line as you're stepping up. Now that's really important because as I place a foot on the frame, I do not have a place for my foot to land next to my other foot. It would have to step way out. So the first thing I like to see is coming right in line with hips square so that as I come up, I'm gonna draw the leg up through center, and then reach it out to the side, back into that lateral shift.
And as you can see, there was a little bit of carriage movement really try to keep it as minimal as possible. Then I'm going to shift weight back to that platform leg, bring that leg back up to, and you already see the challenge, reach back and down. One more time. Bring it up through, step it out to the side. Now we're ready for side splits. Again, I'm on two red springs which is gonna be weighted challenge for my a b doctor's outer hips.
If you wanna reverse the challenge for your adductors inner thighs, lighten the spring. Because with heavier spring, more resistance to press out, lighter spring, harder to come back in. Now there's nothing really wrong with leaving my foot where it is. However, with nothing for the carriage foot to press into, There's a bigger chance for lateral instability in the ankle. The ideal goal, and I will show a modification for this with the box in a moment, but the ideal goal is to actually in out in, out, and get against the shoulder blocks.
This requires a lot of inner thigh flexibility, a lot of strength in the outer hips. From here, we press the carriage, and again, we do not have to go far for this to be a whole lot of work. Aghale, pull back in, pressing out, and exhale zipping up to get tall. One more. And back in. Then I'm going to turn in, turn out, again, ideally keeping that carriage as closed as we can, and come back in. Now if I leave my foot here, It's a much easier situation for my inner thighs in the home position. However, against these two red springs, when I go to press out, it takes a lot of my mental focus to not allow either ankle, but particularly this ankle to roll. Or since I'm in parallel, it takes a lot of focus not to allow a slight external rotation of that leg, which again, makes a roll, and then also throws my pelvis off.
And we know that's a no no. And we're gonna come back up tall. To do the other side, since we mounted from the frame, we should pull in and up and step back. When you come around to do the other side, walk around the reformer, place one foot on the platform, and I'm stepping very far forward on the platform because I want this leg, carriage leg to be able to go out to the shoulder block. I'm going to zip it up and step out.
Turn out. Turn in, turn out, turn in. There will be movement of your pelvis on that. Center it before you move the carriage, come back in. You can add all kinds of arm choreography, that you like, we could even take variations of saw if you choose. I'll come back in, toe ball heel, and yes, you can bend the frame. Me, that's fine.
Come up through the center, and step back and off. Your front splits feel a lot like a lunge, but they're really, really so much more than that. We're gonna bring the foot bar up. And if you have the option to secure it, do so. I'm going to stay on the same springs.
I'm gonna put one hand on the foot bar so that when I come up, I'm just more secure for the fact that the carriage could move from underneath of me. And I'll come up into the idea of elephant. Okay? Now taking one foot onto the foot bar we can turn out, turn in, and we're gonna end up in parallel heel into the shoulder block. And if you notice, it's not a high heel.
It doesn't need to be. It needs to mirror what we did on the floor and that strengthen the arch. Now, which leg do we initiate with? In all athletics to drive power out of the ground, athletes are taught, to drive from the back leg. Traditionally, that is also what we do in Pilates when we're in your front splits and soon to be Russian splits here in a moment.
I'm gonna drive into the spring from the foot connected to the shoulder block As my front leg extends, it is pushing into the bar, but it is not what initiated moving the carriage. As I come back forward, we have to feel a lot of what we do in our long stretch and our up stretch coming over the bar with the strength of our core and torso. From the back leg, press out and come back forward. Is it wrong to initiate with the front leg? No. But if we do, we are gonna fall somewhat into that back hip, and it's a much harder to keep a stable line through the hip, knee, and foot chain.
It makes me really want to move laterally side to side. And then I'll bring my leg down. If being up on the foot bar is too much, use the platform. So for the other side, again, gonna bring my hands to the foot bar. I'm gonna place one foot.
My heel is slightly hanging off. I'm really trying to think about where the arch of my foot can connect versus the ball or the heel. Because again, I wanna stand on the strength of my foot. Now as I go back to the block, wiggling, turning in, turning out, one thing that's fabulous about this is my shin being connected to the foot bar. As I drive through that back leg, it gives me such a nice opening through the front of the hip, and I'm keeping that idea of strong front leg and back leg.
Coming back forward, here's where I'm gonna need to scoop so that I can come forward on top of the front leg. My torso is just too long. I feel better and a little bit of spinal flexion here. Going back out, I'll extend. What we want is not the idea of dropping into a big split.
We want the idea that we are splitting energy and weight between both legs so that we can actually lift. So that we could do any variation up here with the arms that we like. Coming back in, stepping to the carriage, and carefully stepping down. So your front split is going to be more of a challenge foot on the foot bar. It will be more accessible for more people front foot on the frame.
However, the back leg has two options. I showed a parallel leg. Now I'm gonna show you what it looks like if it's slightly externally rotated like we did at the beginning of class. If you come back up and I'm gonna go ahead and do the frame again, toe ball heel back. I caddy corner the edge of my foot against the shoulder block edge.
Now I'm in external rotation. I'm gonna wrap my waist back around to center. Still driving through the back leg, this is a completely different feeling in the front of the hip. Way more of my inner thigh is getting a stretch around through the front of the hip because of this external rotation coming back forward. A little variation.
If I start to straighten the front leg, again, I am lifted up I'm not falling down. I could lift arms. I could do things, but I'm gonna choose to come back forward. I would wanna rotate back to parallel, step back to the carriage and off. Both a parallel and externally rotated back leg have to find the drive into the spring to move the carriage. Now front splits and side splits are gonna be the first splits or standing exercises that you add into a client's repertoire.
Russian splits are a little bit more advanced where we're gonna be facing the shoulder blocks and away from the foot bar. We're still on two springs And because we have to mount the carriage, just like in our front splits, we're gonna put a hand down for stability, putting one hand now on the shoulder block, opposite foot steps up onto the carriage, about middle of the carriage, maybe towards the back edge. Other hand opposite foot. It's still a lunge. However, front foot is going into the headrest. And if you need a black pad or a sticky pad for traction, Get one. Now I'm gonna take my back leg, bending both knees, reach it for the foot bar, which this is the daunting part of the whole exercise.
It feels like the foot bar is really, really, really far away. Could we put the foot on the frame? Absolutely, but we're gonna show the harder version first. I then have to feel like my back heel is connected. Depending on the size of your foot, for some people that might be the whole external rotation.
For a lot of people, it might be more of the ball of the foot metatarsal on the side bar of the foot bar. For me, this feels more secure than going into that extreme external rotation. Now I'm gonna press into that foot bar and drive forward into the spring to find my lunge. Now, again, I am not thinking about lower down into my split. I'm thinking of what keeps me connected back to the foot bar so that I can drive more into the spring and bend and pull back in.
If I can find the connection and drive from the back leg, it makes freeing the arms and lifting up doable, whereas if I'm only weighted into my front leg and not giving a connection back into the bar, I lose the ability to actually lift and move the hands. If I wanna add a variation, I can straighten the front leg, still continue to drive from the footbar, out into a longer hamstring stretch, But even then, there's tension in that hamstring. If I lift back up, it's an idea of picking up through the back of the hips. Drive forward. I could also add a bending of the front knee to pull back in.
To close the carriage, I'm gonna lift the hips and give an extra stretch in that hamstring as I bring the foot down. Now, for the other side, I'm gonna show putting the foot on the frame. For this, I am now gonna move my leg back to the platform first because it's lower, it therefore feels farther away. I'm gonna scoop pick up in my abdominals and bring the other foot as far forward into the headrest as I can go. Maybe it doesn't make it because again, being down on the platform has shifted the angle and now I'm in a longer, lower lunge.
I also have more of my metatarsal pushing into the edge of the frame versus all the way back, because here, I could slip. I'm gonna wiggle it back forward, and my metatarsal creates a stopper with the platform. I can do the same choreography, the same variations driving from the back leg. However, The back leg is in parallel, and because I'm lower, it's more eccentric length and work for that front hamstring. The springs may not go as far. That's okay.
Coming in, I find it considerably easier to just allow people to bend the knee, come down, and then you can even take a little bit of a single thigh stretch up, come back down to the shoulder blocks, and then dismount the reformer. Now all three of those exercises require solid foot connection to the frame, the carriage, the blocks, the foot bar. But what if you don't have the flexibility in your hips, inner thighs, or hamstrings? We just have to give you a shorter distance to cover. So grab your box, and we're gonna place it in front of the shoulder blocks, where it will have the most stability on the carriage.
This has now shortened the distance. So if we bring that foot bar back down for your side splits, I'm gonna step onto the frame. I've gotta come over and in a little bit because as you could see, my stance was too wide. If I'm starting here, I got a lot to do to pull weight up onto this leg way more than it needs to be. Get ready and in line to that movement up through your sagittal plane.
Step up, and then step right into the box. Now I have that solid grounding and connection down out through the feet like I did when I had my foot out to the shoulder block. Here, I can now evenly press and drive out into the spring and come back in because I've narrowed my stance These two springs are a much greater challenge for my outer hips. If someone has enough flexibility, they could take a lift, a roll down, take off a spring, And now it's gonna be a lot easier to go out, challenge to the adductors, pulling it back in. Lot more work to pull back in center, and I'm about to start shaking.
Press out pull back in. And this is where I would add variations of side lunging, skaters, so many variations you could bring here. But the important thing is to have a connection. Because I draft a spring, when I dismount, I want that spring security. I'm gonna put it back on, roll up, step to the frame, reach back to dismount.
For your front split, I'll bring the bar back up. Again, I could lower the spring, but I'm just gonna stay on these two. Step in front of the box, Take one foot up to the foot bar or the frame, pop up that heel. So I'm back into that parallel, and as I press out, that back leg can straighten. And come back in.
I'm gonna start with an easy skater lunge variation before I take it into that press out and pull back forward and in. Notice how much higher up I am. So coming down to the frame is gonna send me lower and still give me more of that movement through my spine as I come back up and in. I'm gonna step two, and down. In regard to your spring tension, the more you shorten the carriage, the heavier your spring setting is going to feel.
So if you noticed, it seemed like a lot more work for me to push into this back leg in my front split than when I had my foot all the way back into the shoulder block. That's what you need to know when you add props in to give you that connectivity. It is gonna change how heavy the spring feels, be advised, change it to what you need. It is a great modification and aid in your Russians. And I am gonna go ahead and take it down to one spring.
I'm gonna keep my hand on the box opposite foot, other hand. And this is such a great place for people because you can really, really use your whole hand, but wait on your shoulders, and you feel so much more stable because of the amount of surface area versus when you had your hands on the shoulder box. I'm gonna go to the frame. I'm gonna press out, and this is just a nice easy way to build into that more advanced Russian split. It even feels a little bit nicer if I think reach one arm out pull it back down.
Reach an arm out. Pull it back down. To maybe both arms, bring them back down. I'm gonna pike up, and I'm gonna step to the carriage. I can go to the flip bar I can go to that turned out leg, but because I've got the box and I've moved in, it now feels better to be in parallel.
To start here in external rotation, gives me some rotation and torque in my low back. That's gonna make it a little bit harder to find center as I press out. I can anchor the arms, lift and scoop, press into that footbar with that back leg, drive forward through the chest and waist, And then I can take whatever movement, whatever variation of straight to bent knee, and notice the higher my pelvis goes, the more I need to lift and scoop, find a little bit of spinal flexion to come back into a little bit more spinal extension, bending to come in, close the carriage, I could also do skater variations here with the foot bar, and I'll close step to the carriage and step down to dismount. Using the box shortens the carriage and makes it more accessible so that you can have a grounding of the foot on the carriage. Again, it does make your springs feel heavier, so choose accordingly.
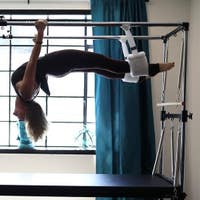
The best way to progress someone to the shoulder blocks is to find a moon box that then cuts the length of your short box so that you're gradually getting closer and closer to the block. Now we're gonna go ahead and take the box off, and we're gonna talk about the most advanced standing variation and exercises you can do, which is where you are actually standing on top of the carriage and moving the arms with your hands in the loops or in your handles. For this, I'm going to be on a red spring and a blue spring for a little bit more support. Two Springs is a lot if it's two reds. One red isn't enough.
So adding the blue for me makes it just right, but you have to do you. I'm gonna lower the foot bar, which actually makes this feel a little bit riskier because you don't have something to touch, but we need that open space to move. Now again, we're gonna make sure that we hold on to the blocks when we mount the carriage. Do a hand and opposite foot. And let's get back into the idea of what it feels like to stand fully on top of the carriage.
Keep the knees bent, tuck the tail, roll up slowly. And again, I'm now only on the red and a blue. When I did this at the beginning of class, All springs were on, the carriage was completely stable. It is not now. If I give wiggle front and back, the carriage is gonna move underneath of me like a skateboard, and we do not want that. So first, I'm just gonna go back to practicing, lift up, 10 to chest, rotate, roll down.
Bend the knees, or keep them straight depending on your hamstring flexibility. And roll back up. We're looking for the carriage to stay completely still. Now that I'm down here, I'm gonna bend both knees, take a hold of the loops. What I do not wanna do is pull from here.
This is actually gonna be the last thing that I add. First, I'm gonna press down through the feet, come up to straighter legs, not locked, because you see how that has me falling back on my heels. And if you remember at the beginning of class, I said stand on top of your arches. So with this forward curve of 100, I've got slack in the ropes So we're not pulling at all. I'm just gonna bend and straighten up through that thoracic flexion. Bend tail down on top of feet and come back up.
Bend one more time, and as I come up this time, I'm gonna start adding some extension in the thoracic spine to come all the way up to standing. I still have not pulled with my arms. I've only brought the strength and shape of my back higher up in space. Then as chin comes to chest, ribs close in the front, I'm gonna come back into that easy bend to the knees, slacken the ropes. When I straighten the knees, when I begin to extend the thoracic spine, pulling strength into my rotator cuff, tricep connection, I'm tall in my upper back.
This is when I can now add a row, a bending of the elbows, a straightening back out, or a tricep press with straight arms similar to standing chest expansion on your tower or springboard. Now when I want to come back down, again, I'm gonna close the spring, allowing thoracic flexion and a bend of the knees. If I wanted to get into more bicep front body, I can easily rotate finding that bicep action to pull and lower back down. The blue being on is a little bit too much for my biceps. I had much stronger connection with this blue spring on in addition to the red going into my back body.
Again, however, look at my connection of my feet into the carriage. Regardless, what arm variation of rowing I wanna take to target different parts of my shoulder I have to maintain the connectivity of my feet to the carriage and my plumb line on top of the strength of my arch. The minute weight falls back I will fall back. The minute I fall to forward and move the carriage, the weight of the spring will pull me forward. To come out of this and close the spring fully, I'm gonna chin to chest.
Around the spine, begin to bend the knees, and we come back into that slack of the rope. Now, this is a very hard exercise that does progress to squats. However, what I wanna show more of is that beginning position we did on the floor where that back leg was a little rotated. And again, as I finish coming up, I'm gonna leave Both feet nice and strong and finish coming up into the spring from the strength of my back. I'm then gonna lunge forward in that front knee driving into my back leg, I can do the same rowing variations targeting different parts of my shoulders and chest.
This stance, however, being wider has more support than feet next to each other. I have a wider surface area in the base of me making it that much easier to split weight between my legs which in my front splits and my Russian splits is why I was driving from that back leg into my front leg. So now I can use both. If we turn around, I still think that you should dismount first because the springs are not set very heavy. If I just turn around up there, there's a good chance that the carriage is gonna skateboard underneath of me. Okay?
We're gonna come back on for standing work facing the foot bar. This can be a little bit scarier for people because you're facing forward and as we pull on the ropes, we'll be moving backwards. So we really need strong planted feet. Rather than doing feet together, we're gonna take more of a split stance for more surface area and support. So the foot bar is down.
You could lift it if you want to, but I'm gonna put a hand out on the carriage. No big deal. Of opposite foot, other hand opposite foot. Now with my hands down and my head down scooped up into those abdominals like you would in your kneeling knee stretches. I'm gonna send one foot back, caddy cornered into this shoulder block, and the other foot forward.
From here, first, I'm just gonna play with shifting forward. Standing up, and then rounding back down through that sagittal plane and back into my back foot. This is the same choreography we were doing in the beginning. But I'm focusing on keeping that carriage nice and quiet as weight shifts back and forth, pushing from the back leg. To get to those loops, we're gonna really need to contract. I'm gonna go forward round contract.
I'm gonna grab my loops. I like to do one at a time because, well, it's precarious. And as much as I wanna pull, I'm not. I'm gonna find my back leg, send weighted work to the front leg. My spine comes up, and I'm gonna ask my biceps for help as I push back into the legs to go forward with the arms.
And here's what I mean. We're looking forward, but as we pull, we move backwards. Another reason to initiate all of your front and Russian splits from the back leg. Because if I try to go forward and push with the front leg, I really can't move the spring because I feel like I'm gonna fall, and I do not feel connected back to this leg. Drive into that back leg, feel it move all the way up, and then ask the arms what can they do from here?
Now once again, I'm on a red and a blue spring for security. If I wanted more range in these arms, I could take that blue spring off. To close the carriage, I'm going to bend these, roll down, replace the loops, you can hold the shoulder blocks, notice how much flexibility this would require in the front leg. Again, why these exercises are so advanced. I'm gonna bring my hands down to the front, step to the side, and step off. I hope you see why the standing work on the reformer is considered an intermediate skill progressing to advanced skills. We have to build so much of the strength from our feet, up through the chain of our knees and hips, and into the strength of our core.
If we're going to stand on an unstable surface and control that surface with a little bit of connection that we have of our feet to the carriage.
Intermediate Reformer: 40-Minute Classes


Comments


You need to be a subscriber to post a comment.
Please Log In or Create an Account to start your free trial.
